


If you’re reading this article, you’re probably heavily immersed in the “tactical lifestyle.” That term sounds rather silly and borders on absurdity. But hey—we’re all a little weird. Chances are, you could open Instagram and find a post depicting a dude in full tactical gear pop up in your feed within two thumb scrolls. Said post could be depicting an actual operator with a blurred face redaction… or just a dude dressing up in his latest purchase from [insert gear e-store name here] for a trip to the range.

The past 25 years have seen the evolution of the tactical industry into a pervasive culture that includes active-duty military and law enforcement professionals, retired military and law enforcement individuals, shooting enthusiasts, airsofters, Mil-sim enthusiasts, videogamers and collectors. This motley cast has propelled the tactical gear industry to new heights of innovation and ridiculousness. And if you ask me, it’s pretty cool.
I am and always have been a gear guy. My friends are gear guys. I work for a company that develops innovative gear. And I teach classes to armed professionals and civilians that rely heavily on gear. Most of my adult life has required me to use issued or purchased tactical gear. It’s safe to say that I know a thing or two about the topic.


And while I could write a helluva coffee table book about all the “battle rattle” a properly dressed warfighter, SWAT cop, or tactical enthusiast could ever have, I don’t have the space for it in this article. So I’m going to focus on one piece: the helmet.
Denis Leary once famously said: “Life’s hard; get a fucking helmet.” All helmets tell a story. The make/model, attached accessories, and “flair” can tell an observer a lot about the wearer. Helmet setups can provide insight into what job the wearers perform, what unit/agency they work for, whether they look for the latest gear upgrades or simply use what is provided to them.
Besides the mission-critical accessories, most helmets can also tell you a bit about a wearer’s personality through the addition of morale patches and/or paint jobs. My jobs have afforded me the opportunity to use a lot of the helmets and accessories available today. And again, while I could probably write an entire book musing over my insights on various helmets and helmet accessories, I’m going to focus on my current setup with the hope that it provides guidance to anyone looking to up their headborne game.

Obviously, the helmet model needs to meet the job requirements. Does it need to provide ballistic protection, and at what threat level? Will a bump helmet suffice? If so, do I need a higher-end carbon shell or will simple polymer be sufficient? After deciding on the protection level requirement, comfort is the main goal. But “comfort” is a subjective quality that takes many different factors into account. The main things to consider about comfort are that no two head shapes are the same (and neither are they perfectly spherical).


Everyone will have a different physiology that includes muscles in the neck/traps and said muscles’ ability to “shoulder” the weight. And total weight/weight distribution must factor into mission-critical accessories. Some of this can be limited through conditioning, such as wearing the helmet while performing various job-related activities. Note that this is body conditioning and not athletic or strength training. But a lot of it comes down to realizing that the helmet is the sum of its parts (accessories), and said parts must be interrogated as to whether they really need to be there: What is your mission and does the accessory support it?
Before continuing, I want to talk about the quality/integrity of manufacturers. There are tons of helmet makers on the market, including original equipment manufacturers (OEMs) and white labels (companies who purchase components or complete helmets from an OEM and put their own brand name on it for resale). Many of these are great companies with great intentions of providing the absolute best protection for warfighters, law enforcement, and patriotic civilians.
There are also a lot of fly-by-night companies who are in the business of making false claims, taking customers’ money, and providing a cheap knockoff product. Some cursory internet searches will yield articles about companies falsifying ballistic and bump protection ratings on inferior products to win government contracts or bids. In some cases this is done while the company is aware of substandard materials and failings, or of outright untested products.
In other cases, manufacturers have used materials or purchased components from other OEMs who falsified origins or ratings unknown to the final brand who was buying the material in good faith. There’ve been a lot of lawsuits concerning faulty PPE over the past 25+ years. My point is that helmets are expensive, but TBI costs more. Do your research into the brands you or your agency are considering. If a price seems too good to be true, it always is.


After determining what type of helmet I’m going to use, weight is the biggest factor. I’m ideally looking for the most lightweight shell that provides the desired protection level. Several companies make helmets advertised to stop mid-caliber rifle rounds. But you must give something to get something, so a heavy (pun intended) weight penalty is extracted. There are many helmets that boast shell ballistics capable of stopping 7.62×51 NATO.
But higher threat protection does not always equal the best choice. The early years of the GWOT saw NATO militaries racing to up-armor their soldiers with as much ballistic coverage as possible. Bulky armor carriers, ballistic belts, yokes, collars, bicep panels, groin flaps, leg shrouds, and full-coverage helmets started showing up in droves. This madness was spurred on by a Western public who went bananas when they started seeing young soldiers coming home wounded or in caskets.

But it was soon discovered that all the well-intentioned added armor was having a severely crippling effect on soldiers who were so overburdened that they lost combat effectiveness. A job that requires you to wear ballistic protection is inherently dangerous, and those who swear the oath are fully aware of what may happen. But to quote the late Col. Charlie Beckwith: “We ain’t making cupcakes for a living.”
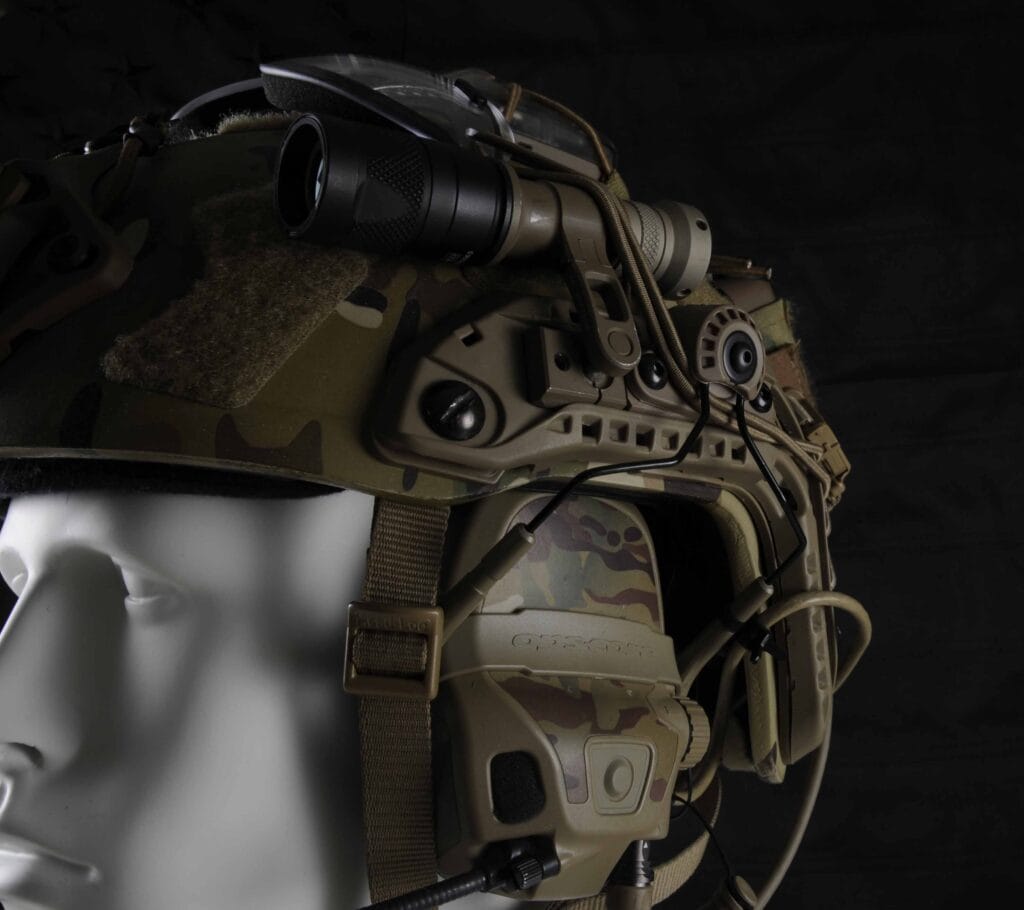
With that methodology, I want to balance weight and protection. As a longtime Ops-Core user, I have been wearing the FAST SF for about four to five years. Granted, I am not jumping out of airplanes for a living anymore, but I still find myself kitted-up often enough as I teach military, LE, and vetted U.S. civilians. As an instructor for TNVC’s Nightfighter classes, I like to stay kitted-up as an example to students of how to set up their own kit.
I often say, “If you can do it in the dark, you can do it in the light. But the inverse is not true.” Many training classes require minimal gear. If you want to get all decked-out, go for it. But a solid belt kit is usually all that’s needed. Nighttime classes have a different dynamic. They are less about shooting performance and more about leveraging technologies. And that includes being able to run your kit in the dark. For these classes, I want to provide a good example of what I’ve found works over the years.
The FAST SF helmet is not cheap, its MSRP running a little over $2,000 USD. And while you can get helmets that look like an Ops-Core for a quarter of that price, brand names and technology hold a lot of water. Companies like Ops-Core, Team Wendy, MTEK, and Galvion have created tremendous innovation in the fields of ballistic head protection. These companies and those like them—please note that I don’t have the space to list every single good helmet manufacturer—create modular helmets that take the sum of the entirety of accessories into account to create some of the most user-centric systems in the world. They build their products to the very highest standards and have well-earned reputations for quality among the most elite units on the planet. Helmets in this category are going to cost between $1,600 and $2,000 (give or take).

The Ops-Core FAST SF weighs 2.33 pounds (size large). It meets NIJ 0106.01 and NIJ 0108.01 Level IIIA. And it passes compression testing Top-Bottom=0.020” at 400 pounds and Side-Side=0.125” at 300 pounds. It’s made in the USA from American materials. Sure, there’s more science and math, but that’s not why you started reading this article. The bottom line is that I trust this helmet to do its job. Is it guaranteed to save my life from all ballistic threats and heavy impacts? No. But do I have a high degree of confidence in it? Yes. Look—ballistic projectiles do crazy things.
The standard ballistic helmet tests in the LE world are the National Institute of Justice (NIJ) protocols. These tests revolve around pistol-caliber threats. I’ve personally witnessed helmets that are only rated to this standard stop 7.62×39 rifle threats in combat. While these instances are anecdotal exceptions to the rule, they have instilled another layer of confidence in my psyche. Again—we’re not making cupcakes for a living. I’ll take a lighter-weight ballistic helmet that meets the above standards over a heavier ballistic helmet tested to rifle threats. I value the weight savings because I still need to put mission-critical accessories on the helmet. And said accessories are not always the lightest. With all that said, there are tests beyond NIJ required by the U.S. Department of Defense. If I’m in the market to buy a helmet for legitimate work purposes, I would only be purchasing from a company with U.S. Federal LE/DOD contracts.


Pad systems can make or break the comfort level of a helmet. I prefer softer pads that conform to my head shape and contact my scalp across a greater surface area. The Ops-Core FAST SF Vented LUX Liner does a really good job of this. It’s a two-part system that features a permanently installed hard-foam impact liner (expanded by polypropylene EPP) covering the entire inside of the ballistic shell, with soft comfort pads velcroed over it.
Besides the soft pads, the reason I like setups like this is because I can change pad type and placement to meet my personal taste without compromising the blunt-force impact protection of the helmet. The impact liner provides the rating, while the pads are essentially subjective to the individual. As someone who has sustained multiple TBIs, I will say that I take this protection seriously. But personal comfort takes a close second. The OEM comfort pads are good, but I’ve swapped out a few in strategic locations with pads from 4D Tactical. 4D pads feature a memory foam-like material that is very comfortable in high temperatures. They get a little hard in the cold, but they hold their shape more than the cushier Ops-Core pads. I put 4Ds where they touch the top/front of my head because my skull slopes down a little there (probably dropped on my head as a baby). But that little bit of pad adjustment makes a world of difference after wearing the helmet for hours on end.
I’ve kept the OEM chinstrap, but permanently sewed the Ops-Core Fleece Chin Cup Extender Cover over the chin cup. As a proud, bearded American, I don’t cup my chin in the chinstrap. Instead, I wear it under my jaw like the old PASGT and M1 before that. I’m no longer jumping, so the chin cup isn’t very important to me. I’ve never been able to talk or yell correctly with the chinstrap tightened over my chin anyway. The fleece extender cover just provides a nice, comfortable surface that does not pull my whiskers.
Now for the good stuff: setup and accessories.
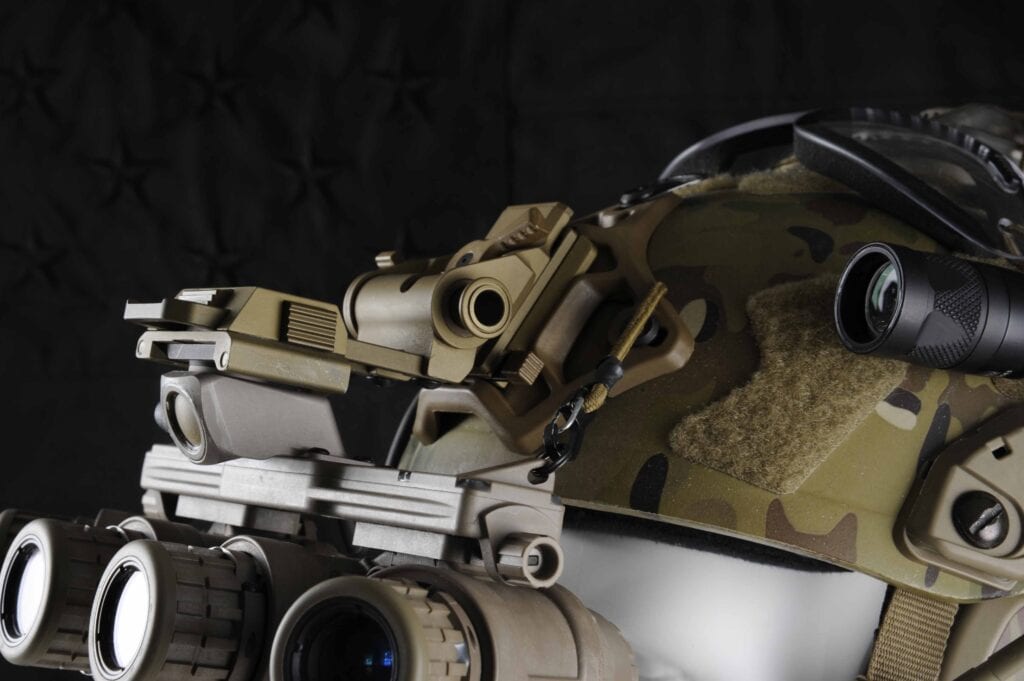
I’ve swapped the OEM NVG shroud with the Unity Tactical SUMMIT shroud. I work for Unity, so naturally I’m going to fly the flag. The SUMMIT shroud is the lightest shroud on the market and features an insert-molded stainless steel inner utility that interfaces with the NVG mount. The bungee retention system is a prototype (the production version is now available). NODs retention systems are a must-have if you are running night vision goggles.
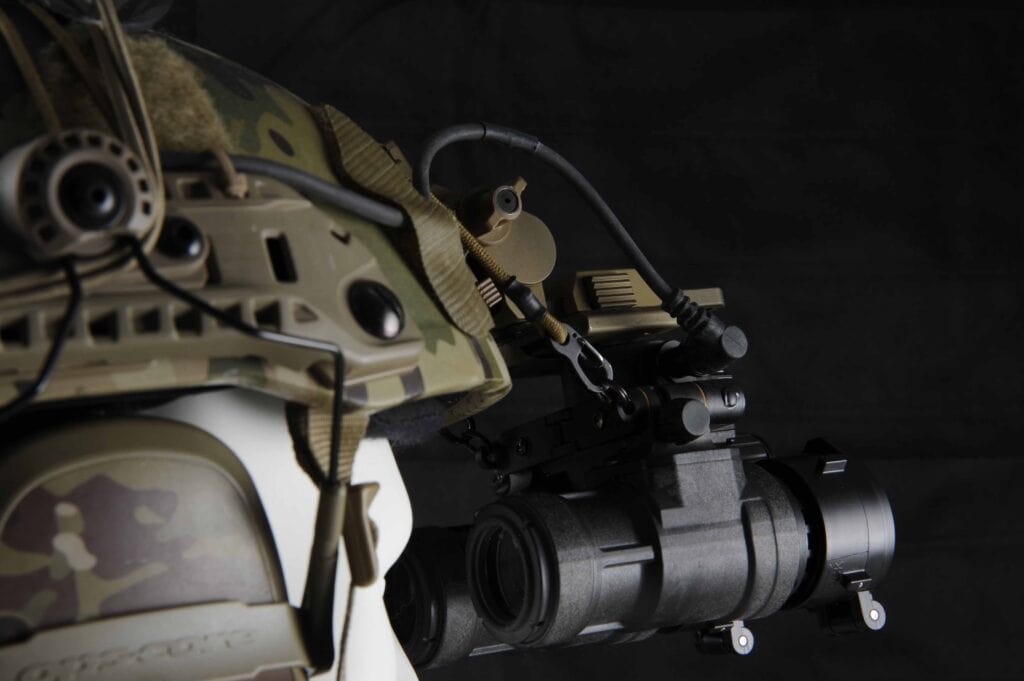
NODs go from being “really expensive” to “are-you-out-of-your-mind expensive,” so they better be tethered to your helmet with a closed clasp. Bungee retention systems with spring-loaded gate clasps provide positive locking retention. Their secondary role is to provide tension on the NODs to eliminate minute rattle from machined tolerance stacks between the goggle, mount, and shroud. This goes a long way in helping me keep my sanity during long walks. Constant clacking of the machined parts, amplified by my electronic headset, is like Chinese water torture.
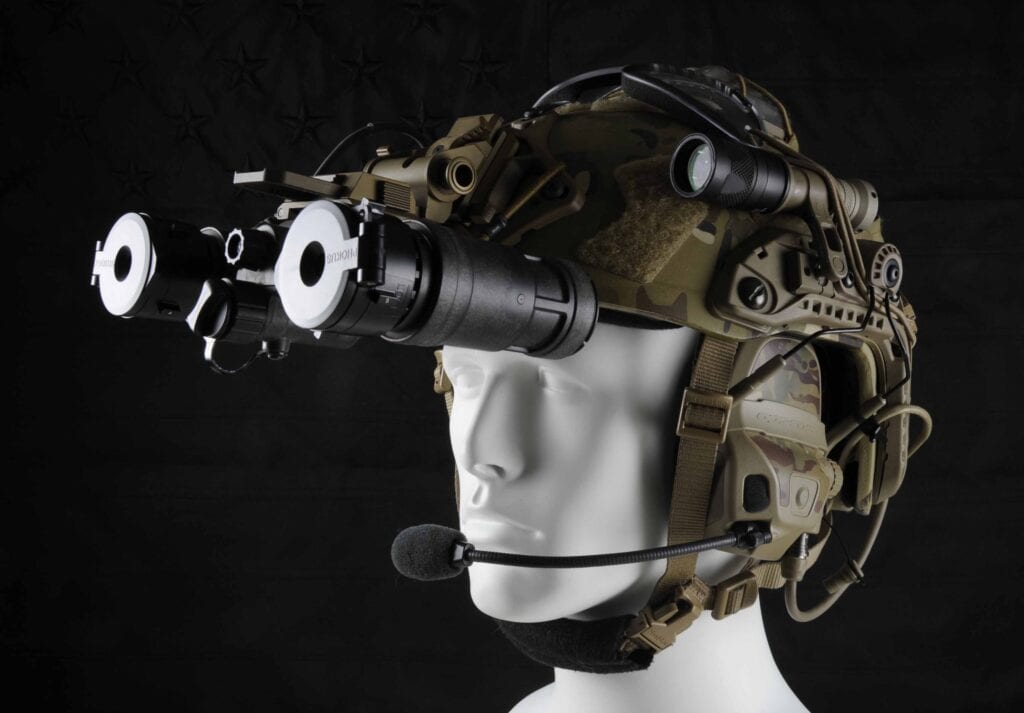
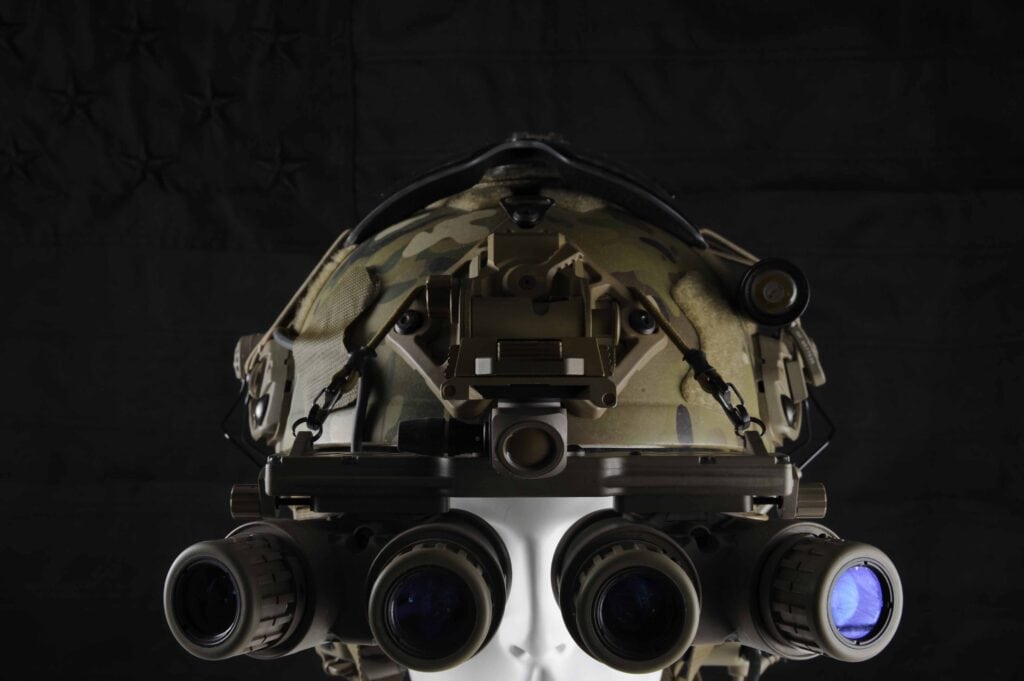
The mount is the combat-tested Wilcox L4 G24. This is pretty much the unofficial mount of SOF units the world over. Nothing else currently comes close to its superiority in size, weight, adjustability, and proven track record. Tolerance, fit, and finish are extremely important to me because I need to have confidence that a mount will support my NODs. Operationally, NODs provide me the superpower of seeing in the dark.


Without them, NATO forces are disadvantaged. And if aliens invade, zombies rise from the grave, or Russian paratroopers start dropping on the local high school football field, I’ll be using my NODs in an operational capacity once again. But for now, I want to ensure my substantial investment stays on my head. While modern night vision goggles are tough, a nearly six-foot drop isn’t going to do them any favors.
I go back and forth between AN/PVS-31As and GPNVG-18s. There is a time for dual tubes and time for quads. Yes: I own both. Yes, I paid for both, and yes, I’m still married. Yes—the panos were a midlife-crisis purchase. What can I say? Some dudes buy a motorcycle. But this isn’t an article about NODs. The important takeaway for the goggles is that they are both compatible with the Wilcox mount and both run off the same remote battery pack (more on that later). I’ve attached miniature split rings to the lanyard loops of both goggles for use with the gate clasps on the bungee retention system.
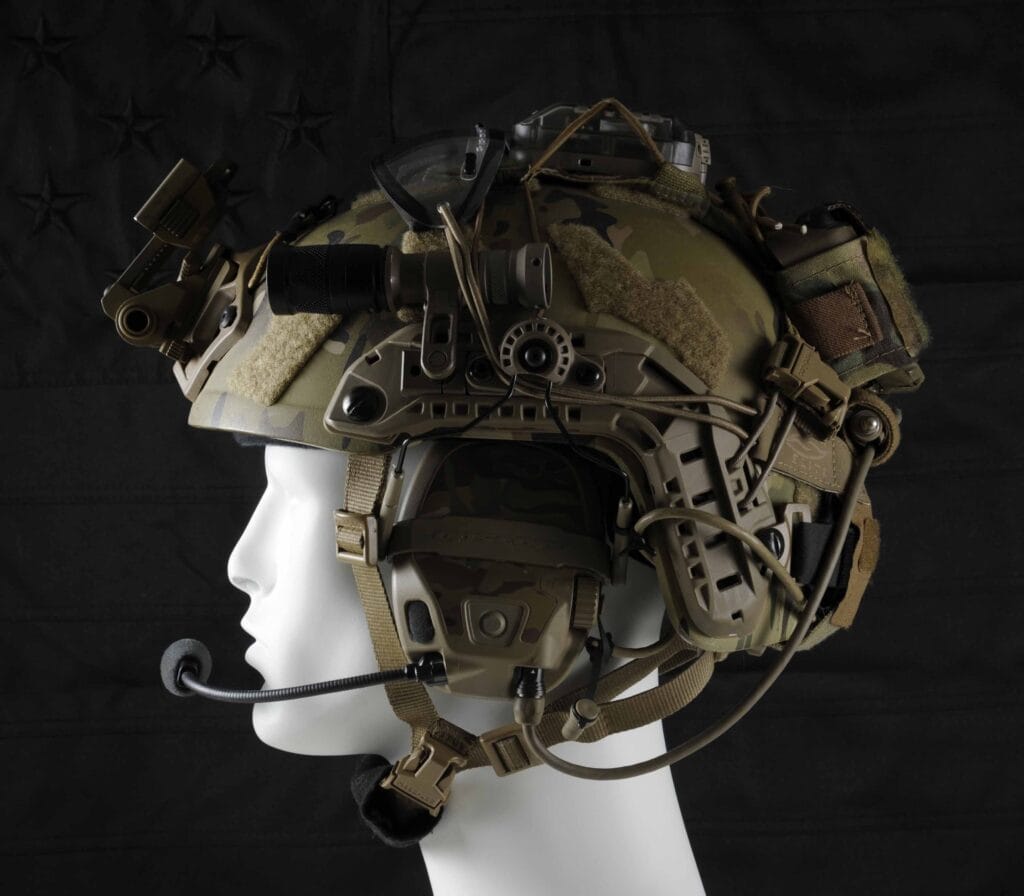
Moving around the side of the helmet, I use the Ops-Core AMP communication headset. I have found this headset to provide the best audio experience of all the headsets I’ve been issued and worn. There is no hint of tin-can tinge or clipping. And the 360-degree hearing is amazing, allowing me to reconcile direction and altitude of a noise (very important in ever-changing battlefield conditions). The AMPs are attached to the helmet rails with Unity Tactical MARK (Modular Attach Rail Kit) arms for AMPs.
This system was developed for those who don’t want to mount the AMPs using the traditional rear arms. I personally prefer this setup because it is lower-profile than the factory arms. But I am giving up the “pop-out” feature of the OEM mounts. I’m a big fan of mounting my headset to the helmet from a comfort perspective. Yes, it means I lose my headset if I take my helmet off. But it’s an easy fix with a little ear bud/mic that plugs right into the PTT if I’m only taking the bucket off for a rest. And if I’m planning on leaving my helmet off, I can always put the AMP cups back on the AMP headband. This little switch-a-roo is worth the comfort of not having headband wire forms digging into my head and being compressed like a vise around my skull.
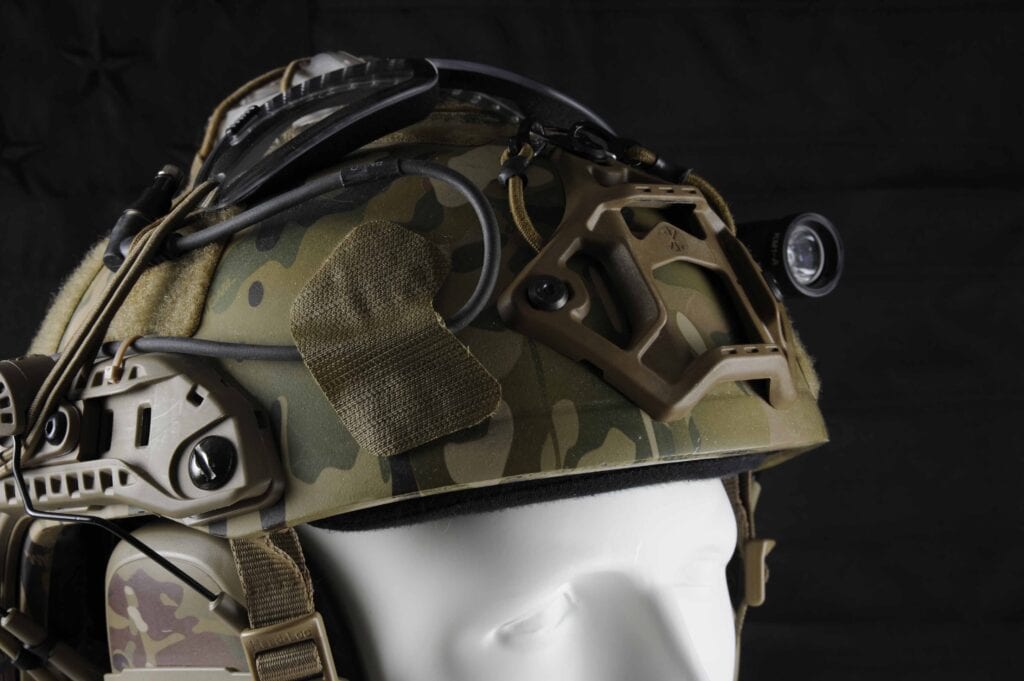
I keep a SureFire M300V dual-spectrum “vampire” light on the left side of my helmet. It’s attached to the S&S Precision M-Ax Mount. I keep the light on my left side because I’m right-handed. My right hand is going to be always staying on fire control. I’m not a huge fan of dual-spectrum lights on guns. In fact, I’m not a huge fan of IR lights in general. For one, they are too easy to activate during the day, burning your battery.
Secondly, it’s hard to know if your IR light is on when working around others. It’s not uncommon for teammates to curse at you because you’re shining bright IR in their eyes. I use a vampire light on my helmet for two reasons. First, the bezel rotation goes from “white light,” to “off,” to “infrared.” The off position acts as a lockout to keep me from NDing white light when I’m not planning on using the light. The IR setting is useful for riding UTVs under NODs. The directional IR headlights do not turn with the driver’s head, so a head-mounted IR illuminator can come in handy.
The M-Ax Mount is a great way to attach the SF light. It provides a body with ball/socket rail mount for full adjustability, and it accepts the SureFire head and tail cap. But the movement of the arm can be too much at times, so I keep it secured against the helmet with the same shock cord used to tie down the Mohawk. It still provides movement capability but doesn’t go wild.
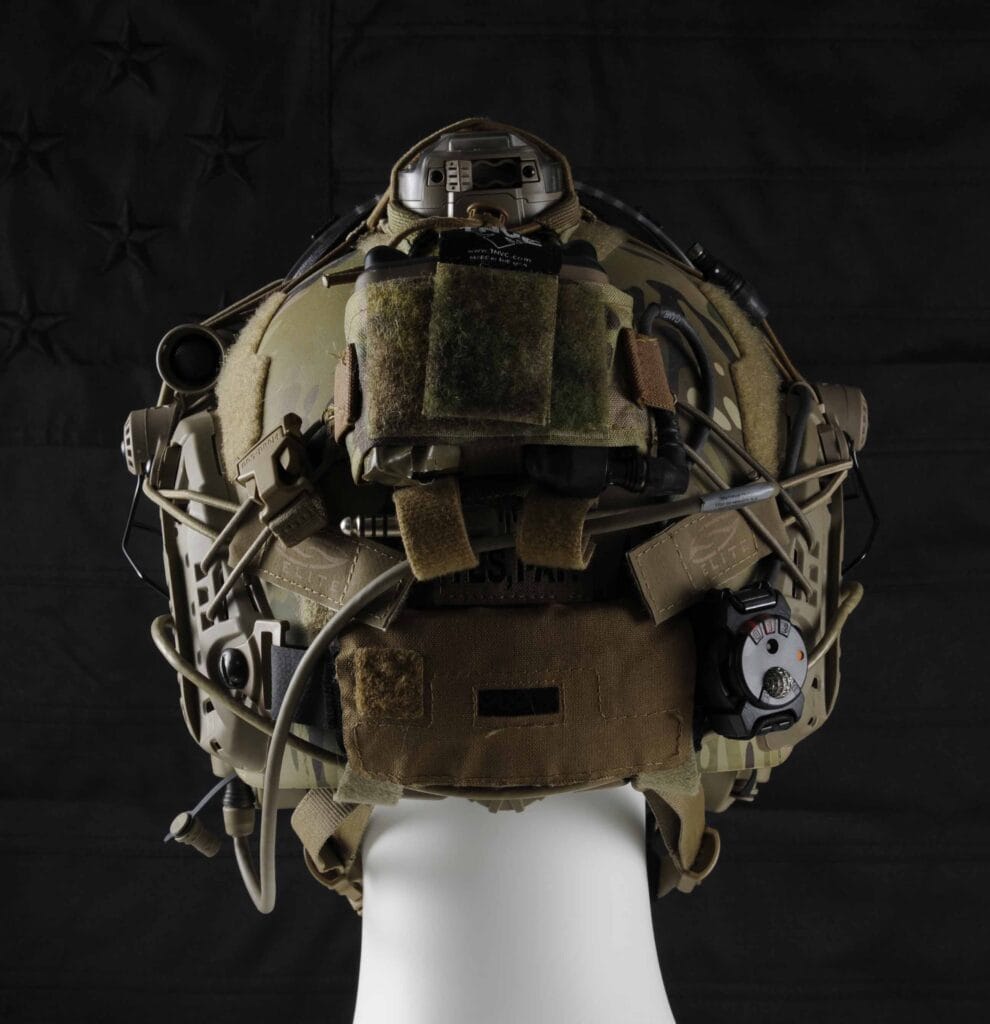
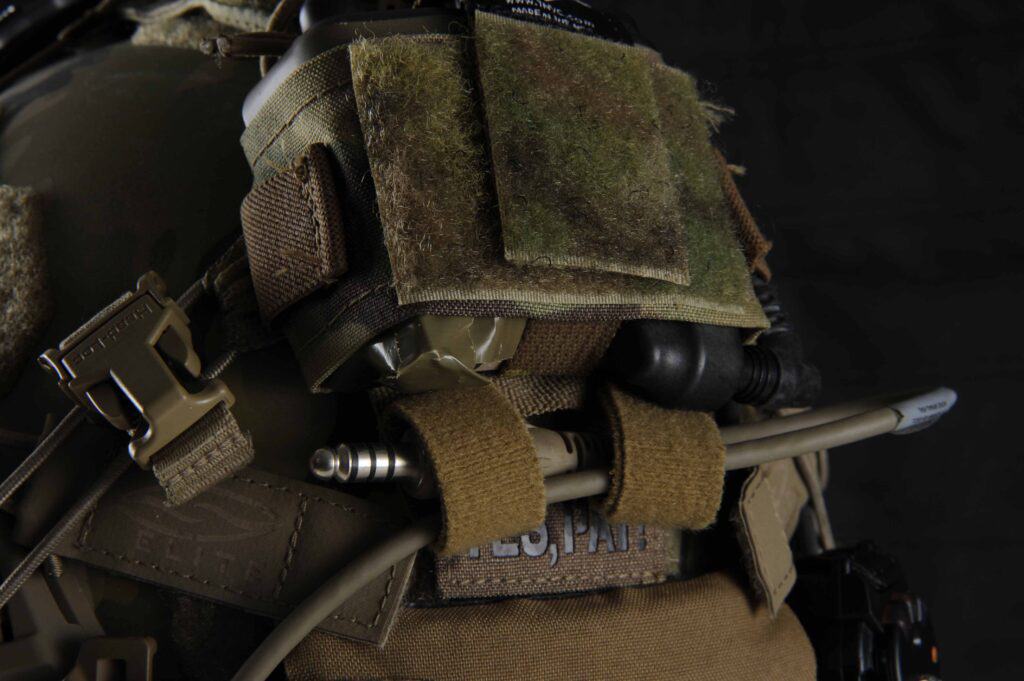
Speaking of the TNVC Mohawk: I designed this piece of kit in 2017. It provides security and management of accessory devices on the helmet. I’m running the Mk3 variant, as it is specifically designed for the L-3 battery pack that powers my NODs. I’ve taped the little lever on the battery pack into the “off” position. Someone at L-3 thought it would be a good idea to integrate an IR strobe into the battery pack. The only problem is that the activation is so easy to accidentally rotate when sitting in a vehicle that the damn thing becomes a nuisance.
The Mohawk “landing strip” secures a Core Survival Hel-Star 6 strobe that flashes in both IR and visible spectrums (the vis is green/white). The landing strip features a shock cord lattice that provides secondary retention to the strobe. Velcro is a wonder of the modern world. But it’s not foolproof. A good rule is: Anything attached via velcro should have secondary retention. This rule comes from airborne and helo operations. If anything heavier than a patch is attached to your person solely by velcro during aerial operations, you are rolling the dice on whether or not it will still be attached to your person when your boots touch the ground. To that end, I have run shock cord through all the tie-down points on the Mohawk and tied them off under the ARC rails on the helmet (this required removal of the rails).
These tight shock cord tie-downs have the dual function of stabilizing my helmet light and securing excess cable from my NODs’ power cord. Note that the power cord is further zip-tied to the rail and then secured with a custom-cut velcro hook patch at the front the helmet. I want my helmet to be as low-profile as possible with all cables, accessories, and flaps tight to the shell.
An old set of Smith Optics Boogie Regulator goggles is velcroed to the back of the helmet and stored over the top. These are strictly used while riding on helicopters or in open-cockpit vehicles to keep wind and dust out of my eyes. They are small and seal around my eyes. I wear standard Oakley eye-pro for everything else. But glasses let all sorts of debris in around the edges. If you’ve ever been on a helo in the desert, you know that you need your eyes sealed up or you aren’t going to be able to see anything.
The Ops-Core Counterweight is attached to the back of the helmet, under the Mohawk. While it may seem counter-intuitive to add more weight to a helmet, it serves a very important role in balancing the entire setup. The added weight of my NODs cantilevered off the front of my face wants to make my helmet nosedive. Without a counterweight, the chinstrap would be constantly pulling my neck forward, creating incredible strain. The counterweight helps balance the load.
There’s a lot of different counterweights on the market, but the Ops-Core version was tailor-made for this helmet and uses the rear bolts for added security rather than relying solely on velcro. It’s also scalable. I’ve got ¾ pounds installed. It’s important to remember that battery packs or battery storage are not counterweights; batteries weigh hardly anything. While they take up space, they are not providing any meaningful counterweight for your NODs. I generally only run counterweights on goggles weighing 18 or more ounces.
A couple more accessories are attached to the back of the helmet. First is my Gasmask Chinstrap Extender. If I’m wearing a pro-mask, I need to either extend my chinstrap or add the extender. The extender is way quicker and more convenient. However, this small piece of webbing with buckles is easily lost. I keep mine clipped to itself around the retention bungees of my Mohawk, so it’s always right there on my helmet, ready for use.
I will also install the Unity Tactical Cold Weather Liner as a seasonal accessory. Traditional wisdom when wearing a helmet in the cold was to stuff a beanie under it. However, this creates a lot of discomfort as the helmet makes micro movements over the “slick” surface of the hat, grinding fabric and seams into my forehead and scalp. It also causes the hat material to ride up and bunch above my ears. Ears are one of the most susceptible areas for frost nip (turning into frostbite). What’s more, a winter hat causes the helmet to not sit correctly on my head, throwing off adjustment of my comms, NODs, and ballistic coverage.
The CWL installs between the helmet and the pads. In the case of the Ops-Core LUX Liner, it installs between the impact liner and the comfort pads. The same pads that touch my head in warmer climates are still touching my head in the same spot. The lower portion is generously cut to extend below the ears, keeping me warm and comfortable. No more pulled hair, raw forehead, or frozen ear lobes. If I’m indoors where I’m exposed to louder noises, I will simply put the Ops-Core AMP NFMI earplugs in my ear to augment my hearing protection with the cups on the outside of the CWL material.
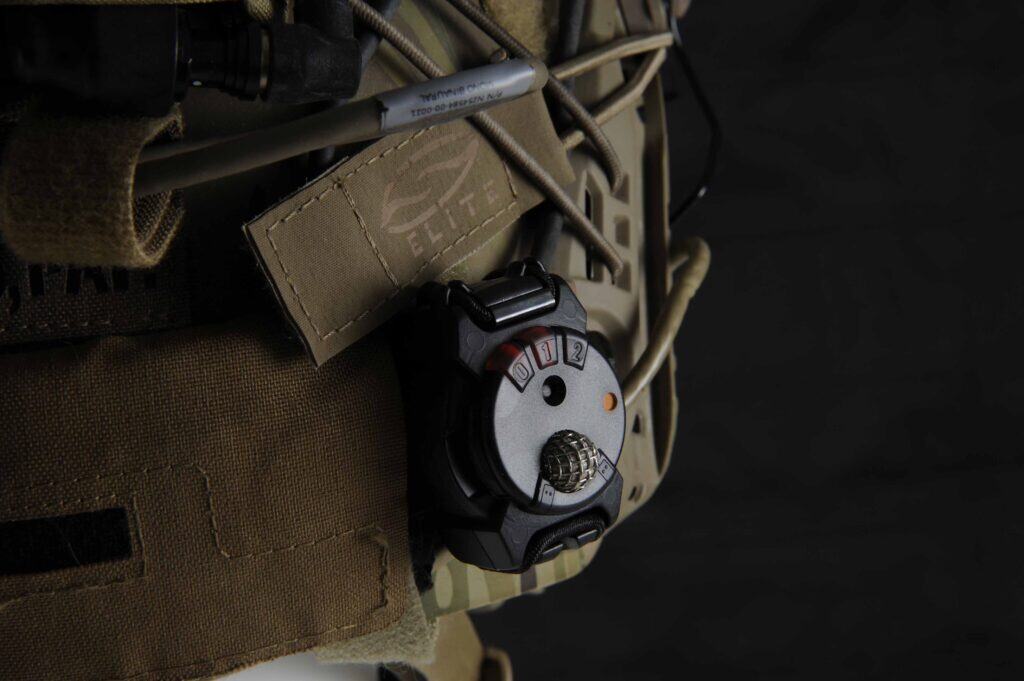
The last accessory is a Blackbox Blast Gauge System. A lot of knowledge has been gained over the past 25 years on the effects of blasts on the human body. Obviously, there is the immediately recognizable physical trauma from shrapnel, flame, heat, etc. But often there are unseen traumas that can be just as (if not more) hazardous to the body. The overpressure caused by blast energy will often cause serious long-term damage to bodies within a certain radius or path from the explosion. Many times there are no outwardly obvious wound signs from these events.
The technical term for these types of injuries is “pulmonary barotrauma.” It is an injury caused by pressure-related changes in body compartment gas volume. A supersonic blast wave will compress gas-filled spaces in the body before rapidly re-expanding them, causing shearing or tearing and damaging internal organs. Concentrated blast waves can tear eardrums, intestines, gall bladders, lungs, and can cause concussions. And since there is usually no outwardly visible trauma, these injuries can often be overlooked. Soldiers exposed to blasts have literally dropped dead hours after the event because they did not know they were injured.
The Blast Gauge System is a series of three sensors that mount to specific areas of an individual’s kit: back of helmet, non-firing shoulder, chest. The sensors measure and record blast event PSI. After being exposed to any type of overpressure situation, the sensors can be wirelessly scanned for data. If the numbers show dangerous levels, the wearer should undergo medical examination. The Blast Gauge System does not diagnose medical issues. It simply provides data that a medical professional can use in triaging and testing a patient for injuries.
Blast events can be incoming ordnance detonation, use of breaching charges (especially internal structure use), or even consistent firing of unsuppressed weapons in a confined space. A lot of research has gone into the effects of this stuff on the human body in the past couple decades. Effects can be cumulative as well. Constant exposure to low-level blast (such as being an RSO in an indoor shooting complex), as well as constant use of heavy weapon systems, can cause permanent damage. As someone who has eaten more than my fair share of overpressure before military medicine understood the negative effects, I will attest to the seriousness of the topic. And while I am no longer performing these activities daily, I want to ensure that I’m taking the best care of myself as I get older. The body does not differentiate between real-world and training explosions.
Helmet setups have become iconic symbols of warfighters and armed professionals. There’s a never-ending supply of gadgets and accessories you can add to your helmet to fit your mission profile or personal taste. The first thing you need to do when selecting a helmet and accessories is to define your mission. What are the critical requirements? If you’re simply hunting hogs on your property in Texas, a simple polymer bump helmet with task light and a PVS-14 goggle is probably enough to get the job done. If you’re a SWAT cop in a major metro area, you’re going to require an agency-approved ballistic helmet. And if you’re a warfighter operating on remote third-world battlefields with access to air support, your requirements will be different still.
Then again, if all you want to do is LARP at training classes (absolutely nothing wrong with that), knock yourself out. Your credit limit is your only limit. But like all gear, you need to wear it to condition your body. Do not invest in a ballistic helmet, dual-tube NODs, ECOTI, counterweight, IR strobe, headset, battery pack, battery caddy, helmet light, task light, and a helmet scrim and just show up to a class. If you sit behind a desk for a living, your neck is going to be giving you fits within an hour of square range up-drills. Wear your helmet setup for a few hours. Move around in it. Do some dry-fire practice with it. If you’re a professional, you better put in some heavy team training hours with your kit before going outside the wire. Pay attention to interrogating every accessory you add to your helmet. Does it serve a critical, important, or routine purpose? Then add or subtract it accordingly.