Kit Breakdown
If you’re reading this article, chances are high that you’re no stranger to tactical gear. Tactical nylon has developed its own persona within our community of armed professionals and patriotic Second Amendment enthusiasts. Some of us wear it to work. Some of us wear it to train. And some of us wear it to play dress-up.
There is gear to suit every mission. I am no longer an armed professional, but I’m an instructor that teaches both armed professionals and civilians. I get to work and train with elite military SOF, general purpose forces warfighters, law enforcement, and American riflemen. But regardless of who I’m working with, I always wear my kit. I do this for two reasons. One, I’m working around people I do not know, with wide-ranging skillsets and weapons handling competencies. Two, I want to set an example (especially to my professional students) of what a professional working kit layout looks like.
During training, everything is a teaching point and an opportunity to learn. I don’t teach basic rifle and pistol classes where the focus should be marksmanship principles and weapon mechanics. I teach applications-based classes where the weapons handling and marksmanship are “a given,” and the students are using their weapons to apply other lessons.

This often requires individual kit to be properly sorted and built for optimal performance. Sometimes students show up to class with a very squared-away kit. But often, changes and adjustments need to be made after deficiencies are highlighted during training. My kit has evolved over the years, but still follows some basic principles I developed early in my career.
Everything you need for fighting should be up front and easily accessible.
- Weapons manipulation should never be hindered by gear.
- Access to comms is paramount so I can tell people where I am and what happened.
- Specialty tools for my job should be within my own reach.
- Pouches should not be dedicated to one specific item: multipurpose whenever possible.
- Carry more medical/trauma kit than you think you’ll need.
- Secondary retention systems for items will save your ass.
- Don’t carry anything because it would be “nice to have.”
Your personal kit should be thoughtfully built out based on your individual mission. A JTAC’s kit is going to look different from a heavy breacher’s. Both of their kit will look different than a medic’s loadout. All these guys’ will look different than a law enforcement SWAT officer’s kit.
The first step to laying out your kit is to define your requirement. I used to have several different loadouts based on mission requirements. If we were going to be sitting in vehicles the whole time, I kept my back clear of pouches, the contents of which would be placed in an assault pack that could be slung quickly in case of dismount. If the mission was a direct-action assault, I would load up my back with team gear as our SOPs involved “working off your teammate’s back” to retrieve things like bangers.
I had a heavy assault vest that featured higher-rated plates and extra armor components if we were infilling directly onto a target and expecting heavy resistance. Likewise, I had a lighter assault kit that utilized front/back plates only if we were conducting an offset infill over difficult terrain. And sometimes I didn’t wear any armor at all, such as when conducting high-altitude mountainous operations. But I still followed my basic principles for laying out my kit regardless of the mission.
Today, most kit is built around body armor and gun belts. Sometimes your mission requires a chest rig rather than an armor or plate carrier. But let’s address the armor issue before we proceed. I wore armor more often than not in my past life. And as someone who took two 7.62×39 rounds to his front plate, I will attest that it’s a good idea to wear armor if it’s an option.
I’m often asked by civilian students if I think they should get a plate carrier and plates. My answer is yes. For those of you who haven’t been paying attention to what’s going on in the world, it’s getting sporty out there. So, I unequivocally believe that every armed professional and law-abiding citizen should own and train in armor. In fact, it’s not a bad idea to have it for family members, too. But like I said, you need to thoughtfully lay out your kit to fit your mission.
This article is intended to detail my methodology for laying out my kit. This is not an article about specific manufacturers, as there are many great ones that make similar carriers, belts, pouches, and so on. And a lot of it comes down to personal preferences. I have multiple plate carriers from multiple manufacturers that I switch between depending on what type of class I’m working with. And as a certifiable “gear guy,” I’m always looking to see what’s new and to try new products.
My plate carrier setups are a mishmash of various brands and pouch types. The only orthodoxy I follow when buying gear is that I buy from reputable manufacturers. A reputable manufacturer will build their gear in the United States or similar NATO first-world country from American or first-world-sourced materials. This is a hard line for me, and it should be for you, too. Whether you wear your kit as a professional or you’re a professional civilian student who’s preparing for the zombie apocalypse, the last thing you need in a drama is your kit falling apart.
From an intellectual standpoint, I will not buy copycat gear. As I said, there are lots of good companies out there, and the thing they have in common is innovation. But companies that see the success of someone else’s innovation and either outright copy it or make a minor change and then try to pass off the innovation as their own will not get my money. And they shouldn’t get yours, either.
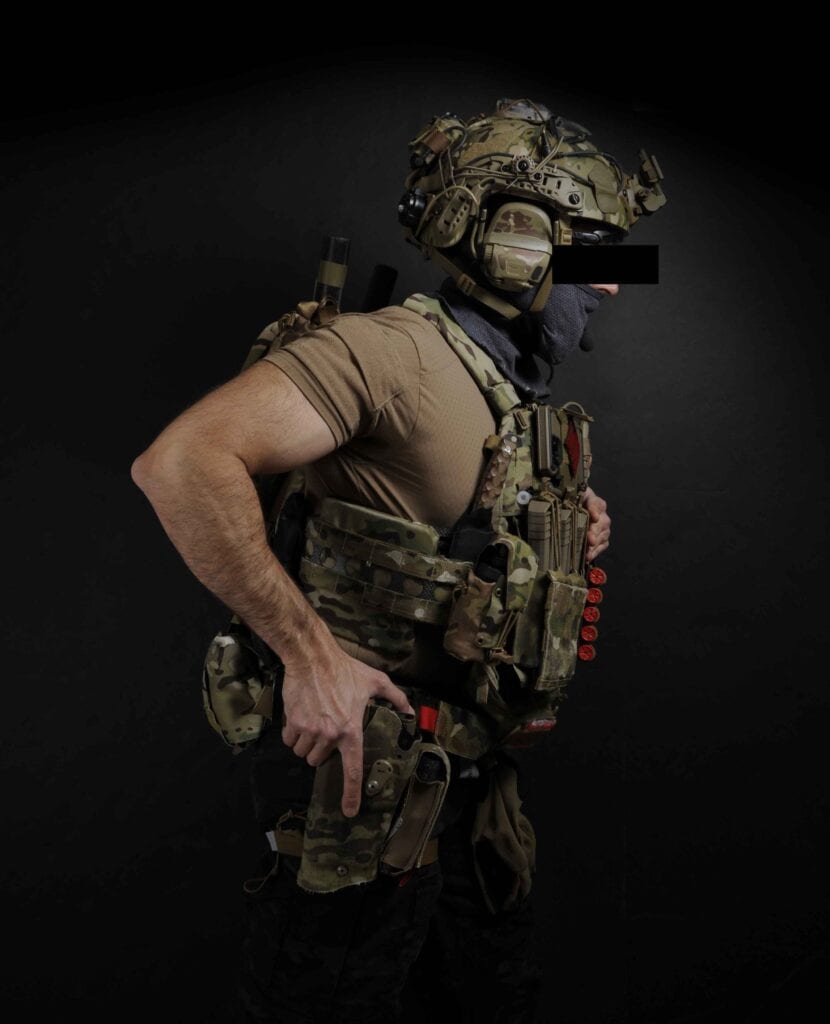
My current gear layout is based on experience as an assaulter in a DA unit. Some of it may be applicable to your job, and other bits may just satisfy some curiosity. Certain mods have been made because I am teaching these days and not actually operating anymore. For instance, regardless of who I am working with, I no longer need to carry fragmentation grenades. Beyond the omission of these pouches, the rest of my layout is true to form.
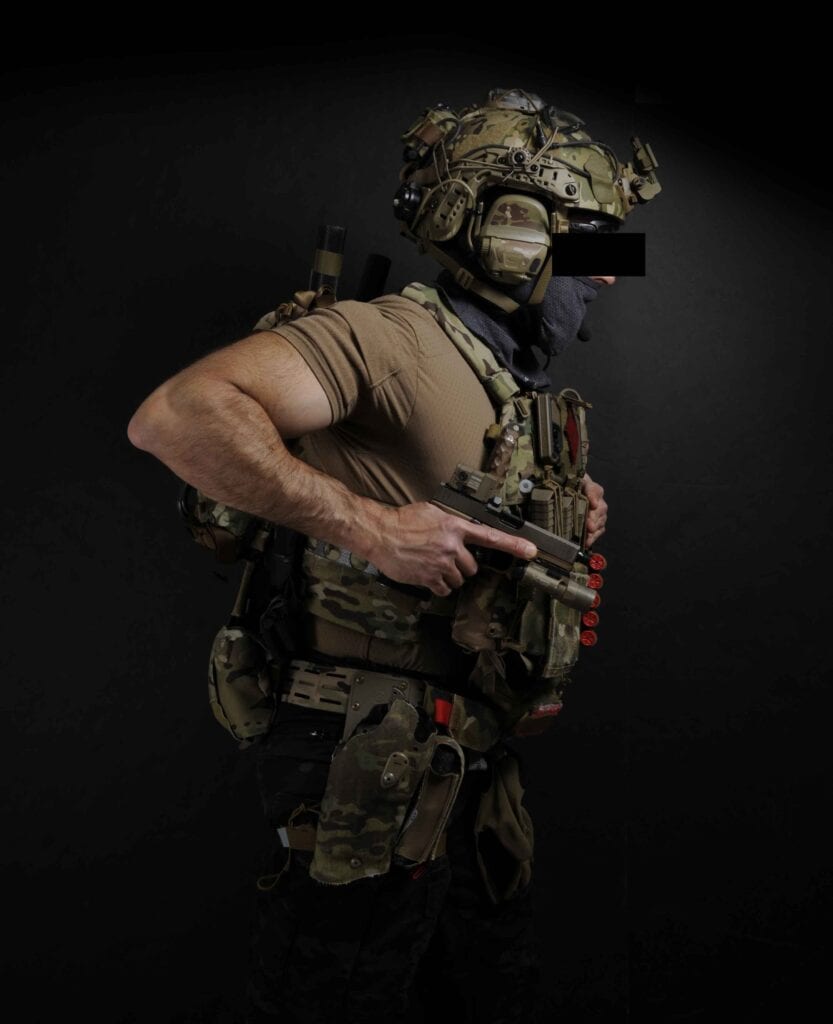
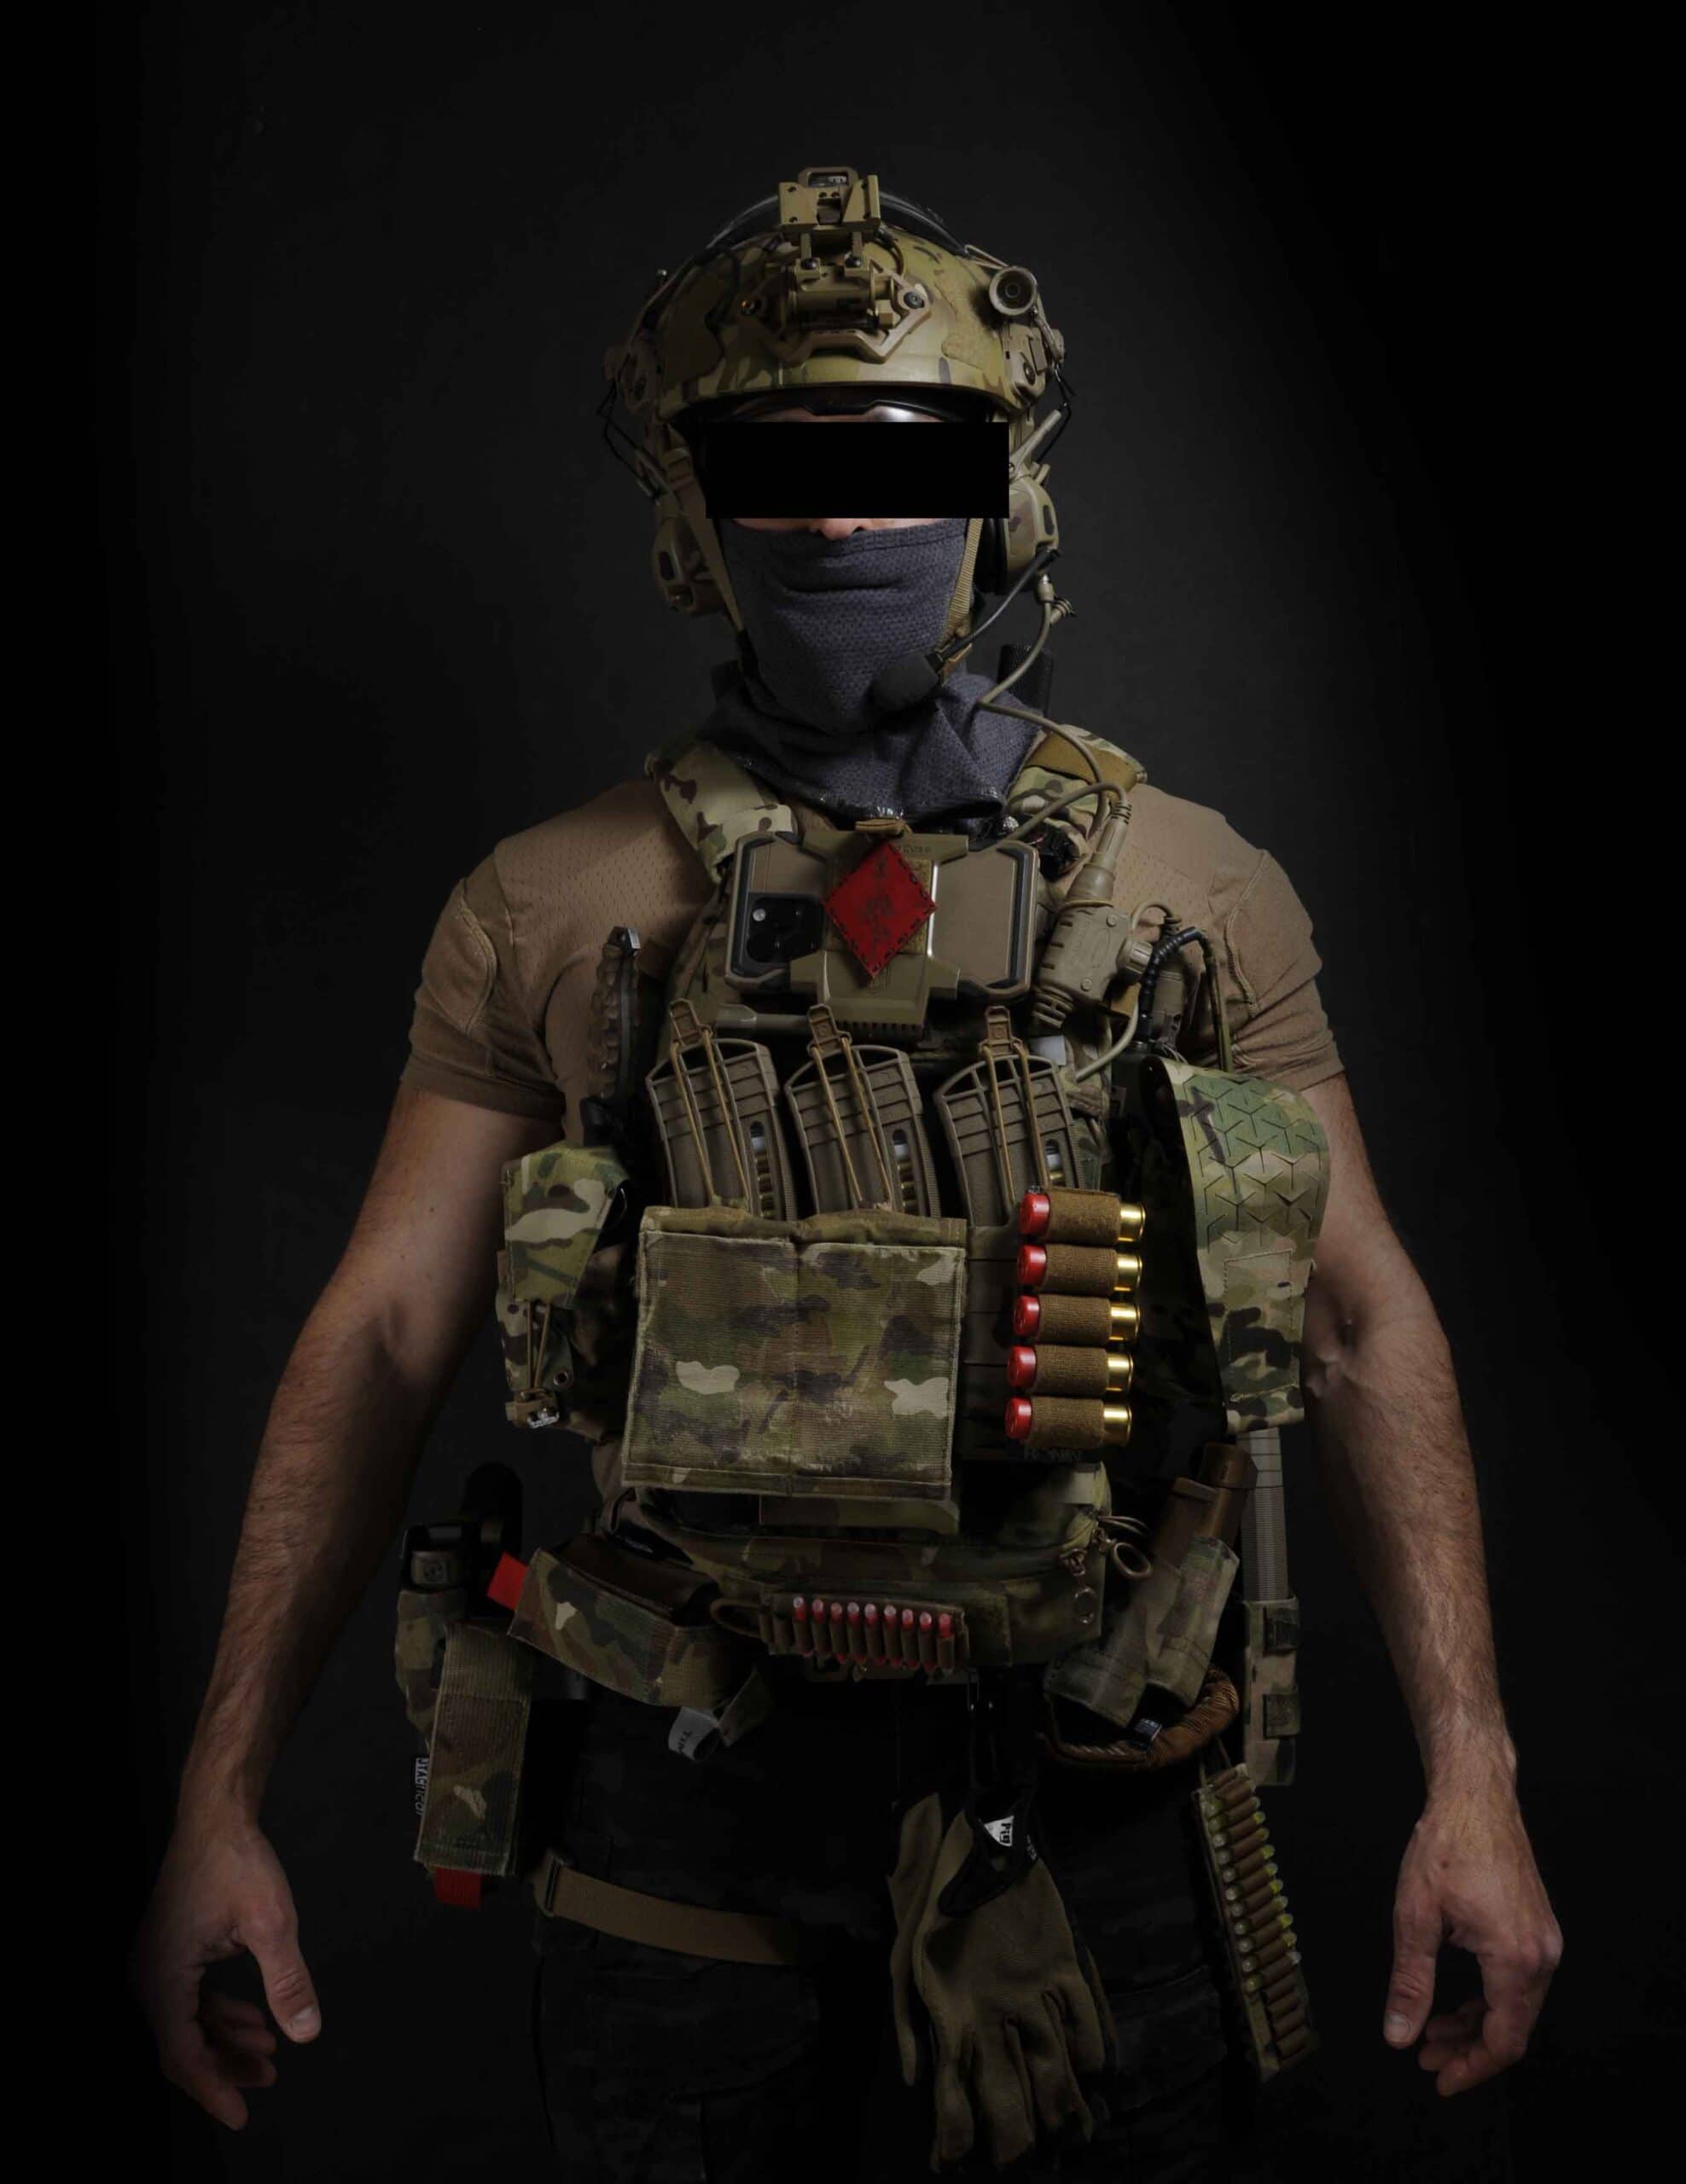
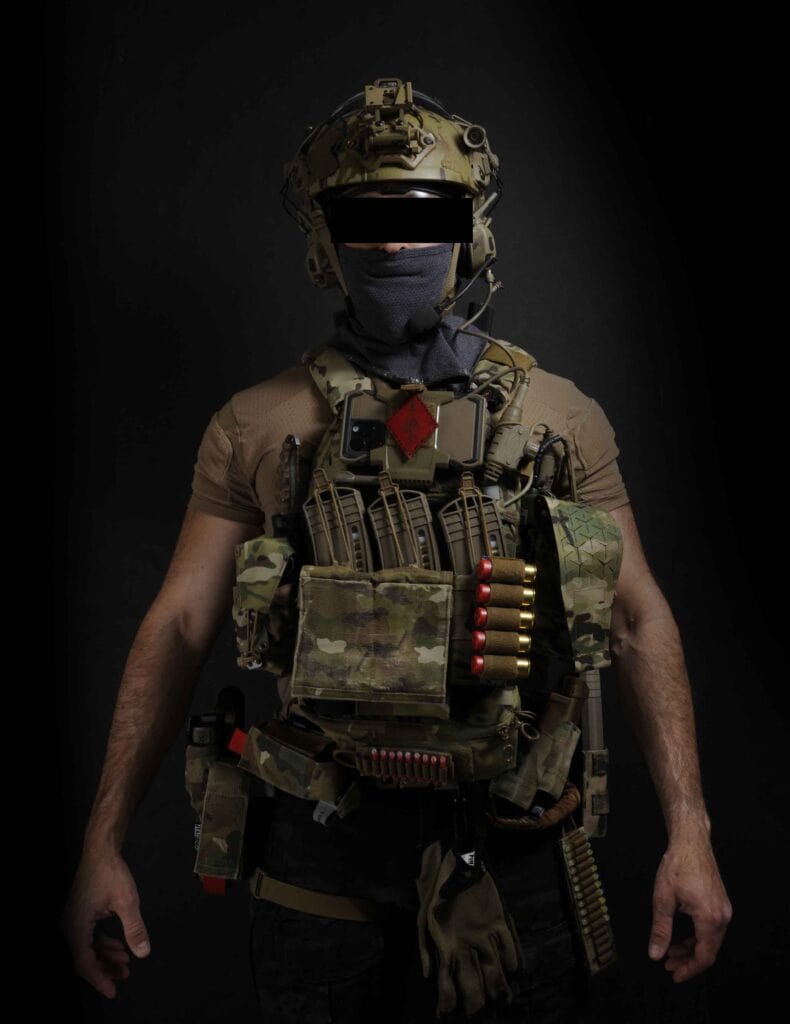
The front of the carrier is what I call “one layer deep.” This means that I am not stacking pouch on top of pouch on top of pouch. I don’t want to create a “tactical shelf” on my front. While it’s tempting to keep layering pouches to carry more “nice-to-haves” or to provide quicker or easier access to items, the juice is not worth the squeeze in my opinion. Six inches of nylon plus gear hanging off the front of my carrier is a recipe for losing equipment.
This is especially true of open-top pouches (more on that later). Infills including being jammed into or hanging off the sides of vehicles, fast-roping or other mechanical insertion techniques, and long marches to targets through rugged terrain that wants to pick my pockets taught me that keeping things tight to my body was beneficial.
Beyond the commute to work, actions on the objective cemented this lesson. Maneuvering a breaching shotgun, letting out shock tube for charges after clipping in, and moving my rifle around my body in the sling all contributed to me wanting the least amount of tactical tumor in front of me. And if that were not enough, I wanted to limit the amount of “stuff” that someone could grab if I found myself tangled up with a bad guy.
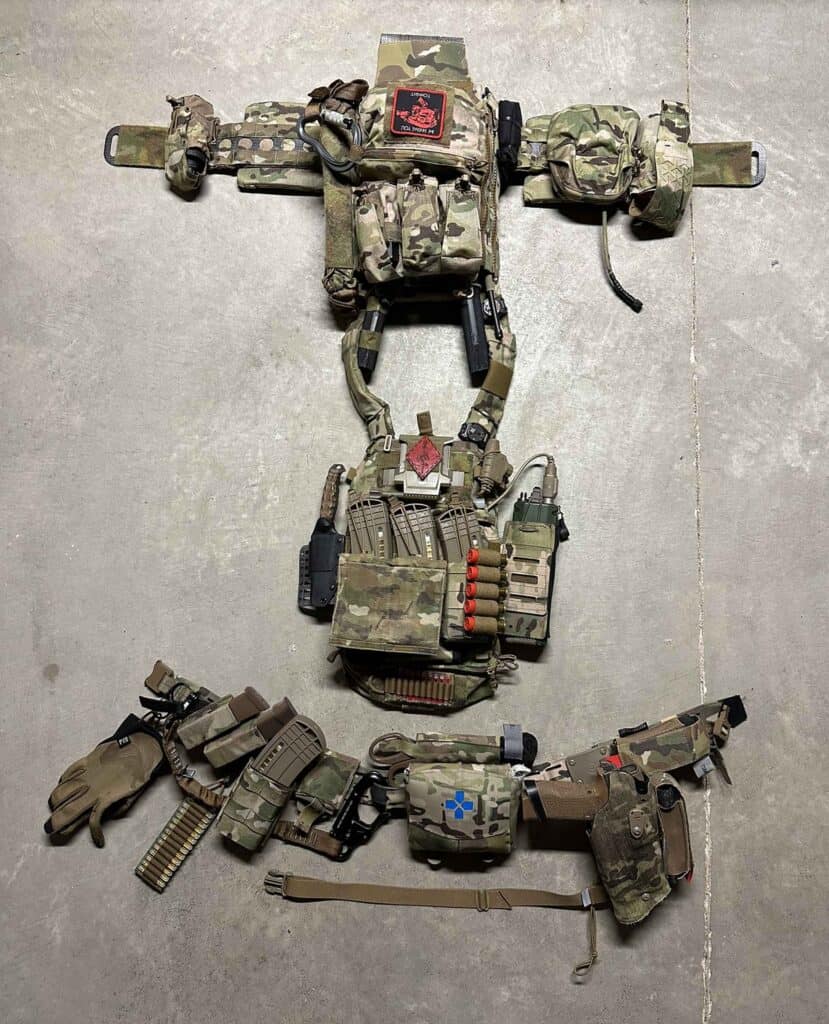
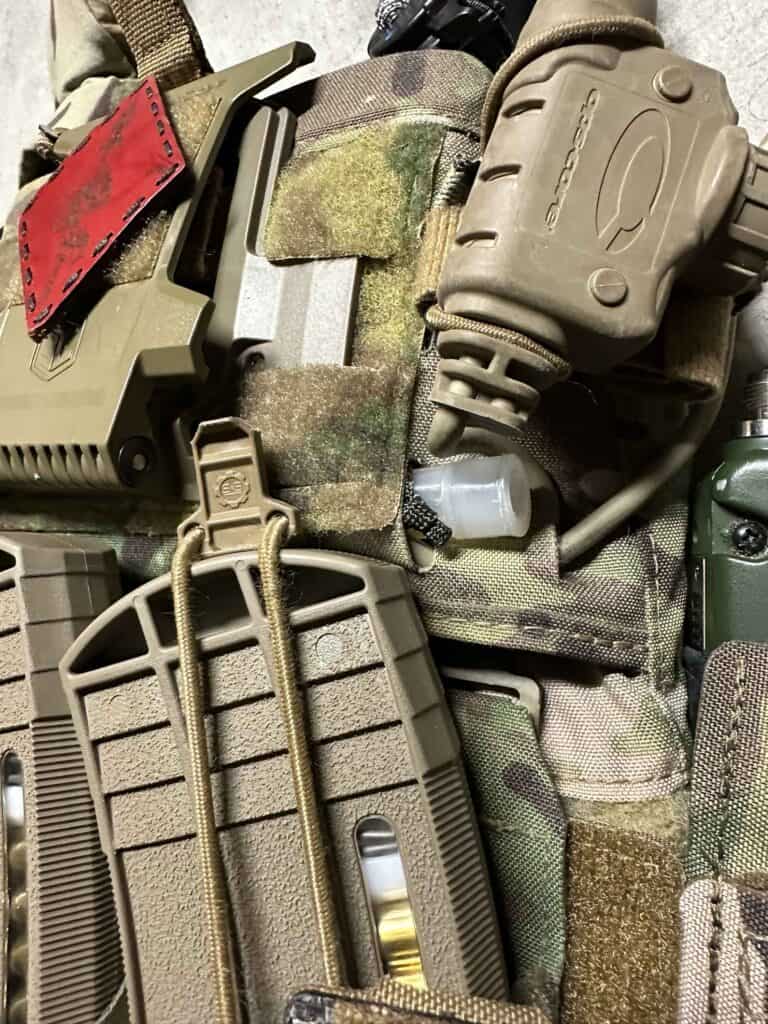
The main things I want up front are items that I will need in a fight. As an assaulter, everything else is secondary and tertiary. I keep ammo, a tourniquet, and my radio PTT up front. Notice that the mags are secured by bungees (secondary retention). These are not the mags I load with. These mags will get cycled to the emergency reload pouch on my belt as time permits.
On front of the magazine placard are a couple of elastic pouches. These can hold all sorts of items including extra mags, tools, etc. They are used for special needs only and items would not be stored there throughout a mission. When empty, they collapse flat (this particular Ten Speed pouch is in need of replacement, as elastic does not last forever). A shotgun shell carrier is also present for breaching rounds. If I’m not carrying a breaching shotgun, it can be removed or will compress flat enough to not be a nuisance.
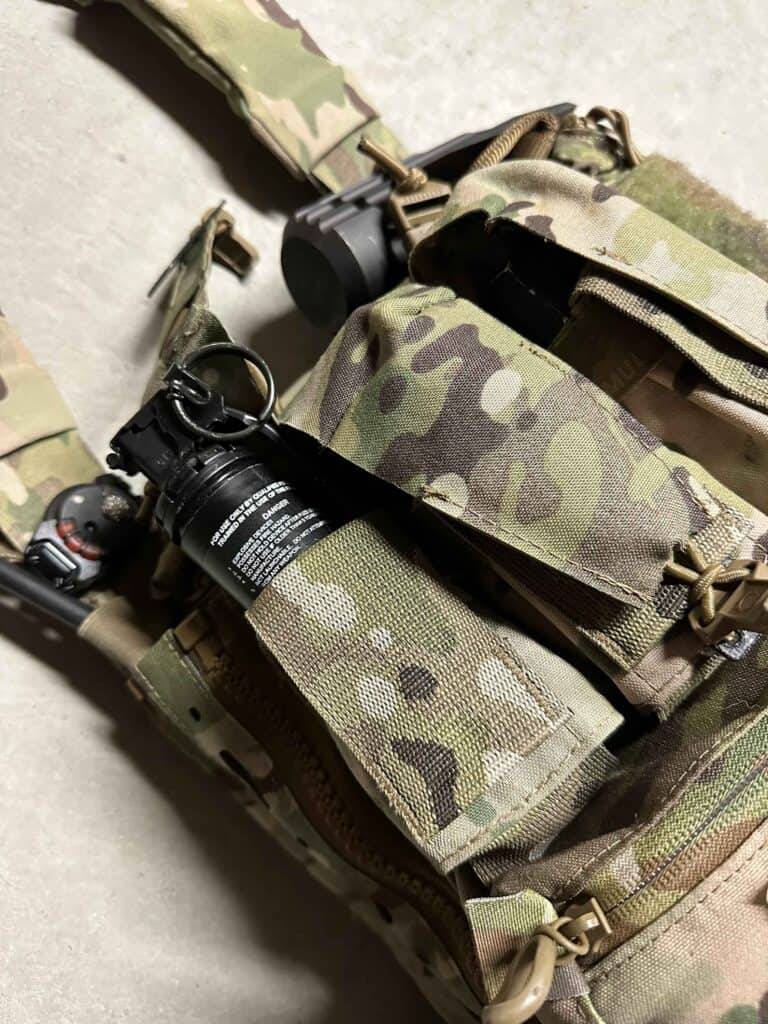
Below the placard is a tourniquet sleeve for rapid access and a general purpose pouch for various mission-specific items. I can carry extra batteries for comms, a thermal imager, gun lube, things like that. As noted, I want my pouches to be multipurpose. The front of the dangler pouch has some red mini chemlights for marking uncleared/danger areas. If your team uses colored marking devices like chemlights, it’s important to keep the colors separated so you know what color you’re grabbing in the dark without needing to look at it.
The upper portion of the front plate bag has laser-cut molle holes. This is an important feature for me because it allows for low-profile storage of various items, as well as cable management for the PTT. Excess PTT cable is pushed through a molle slit so that it does not create snag hazards. I also keep a red and a green 4” chemlight pre-tied with an arm’s length of gutted 550 cord sticking out from molle slits. These are SOP-specific signaling buzzsaws to communicate with aerial assets or other teams.
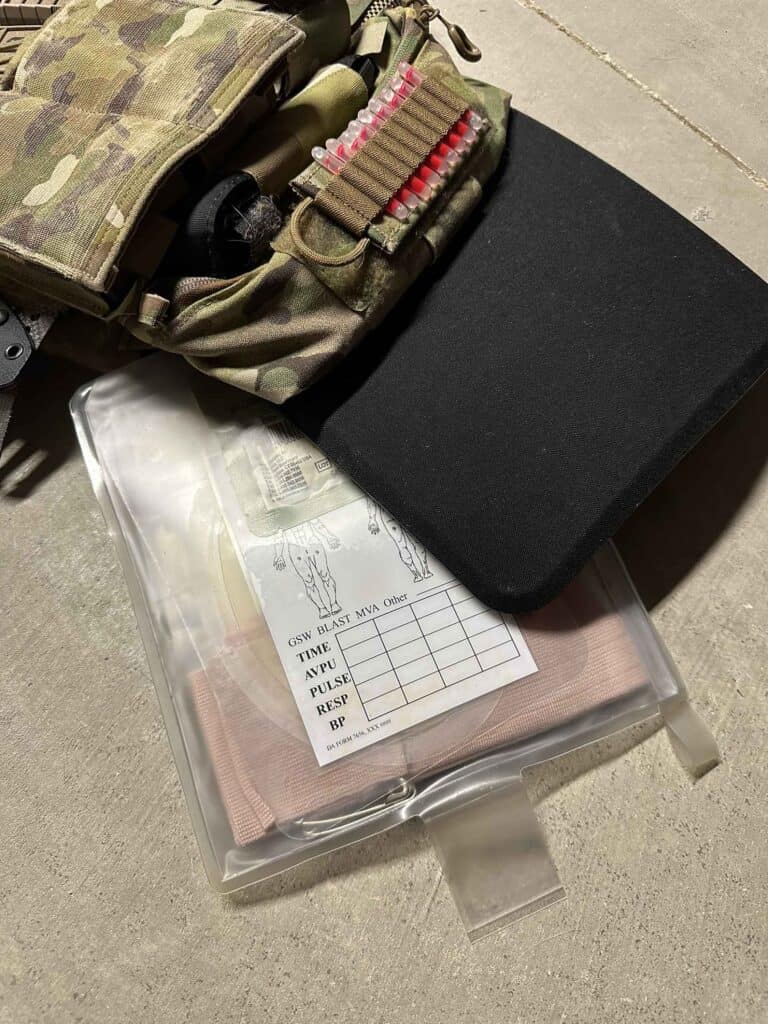
The red chemlight is on the right (R/R, get it?) while green is opposite. In this way, I will always know which color I’ll access. A flip-down cell phone holder is on top. In real life this would be used for ATACS, but these days it allows me to pull up course POIs and various training drill details. A blast gauge is mounted to the left shoulder. The last piece of kit on the front of my carrier is actually inside it. Nestled behind my front plate is a Phokus Research Group trauma kit.
It’s a complete IFAK that flat-packs in the shape of a SAPI. While my primary IFAK is on my belt (more on that later), this is a secondary. IFAKs are designed to treat a single GSW or puncture. It’s been my experience that where there is one hole, there are often others. Plus, a blast can tear outer pouches off. An IFAK that is between my body and plate is much more likely to stay with me.
Immediately next to the placard, on my right side, is a single banger pouch. While my team SOP was to work off each other’s backs for tools, sometimes the operator in front of you was Winchester on bangers, and sometimes the situation required the Number 1 man to bang his own door. Having ready access to a flashbang on my person would not hold up the assault.
Besides the side plate, the right side of my plate carrier is kept open. While it’s tempting to place pouches on available real estate, I don’t want anything on my holster side. This provides the clearest path of travel for drawing and presenting my pistol. Pistols can sometimes be a primary weapon system, if I’m cresting a ladder or clearing a small space. But the majority of times it’s a life-saving, immediate-access item that is needed because the primary gun is no longer functional. So I don’t want any tactical tumors impeding access to the blaster.
The other reason I keep the right side clear is because a breaching shotgun may need to occupy that space from time to time. A small fixed-blade knife is vertically mounted behind the cummerbund in a kydex sheath. This is a “get the f*ck off me” tool in case I become wrapped up with a bad guy and my weapon is pinned.
Behind the left-side cummerbund is an MBITR radio pouch. It can hold any PRC-sized radio and allows access to the knobs without removal from the pouch. I always carried my radio up front so I could control/access it. While it’s a bit of a pain because of the space it takes up, it’s important that individuals can access their own comms. Newer radios allow everything to be controlled from ATACS on the cell phone mounted to the chest. This allows bulky radios to be mounted in back and frees up much-needed space in front. But not everyone has access to that technology.
A single flashbang pouch is first in line on the cummerbund. Next to the placard on my left is a multi-use pouch that could be used for a smoke grenade, thermite, extra mags, thermal imager, partner force radio, or other items. The mission can dictate the requirement. Behind that is a general-purpose pouch that holds miscellaneous marking items that are not immediately needed. These days, this pouch also holds multiple Sharpie markers because someone in class is always in need of one.
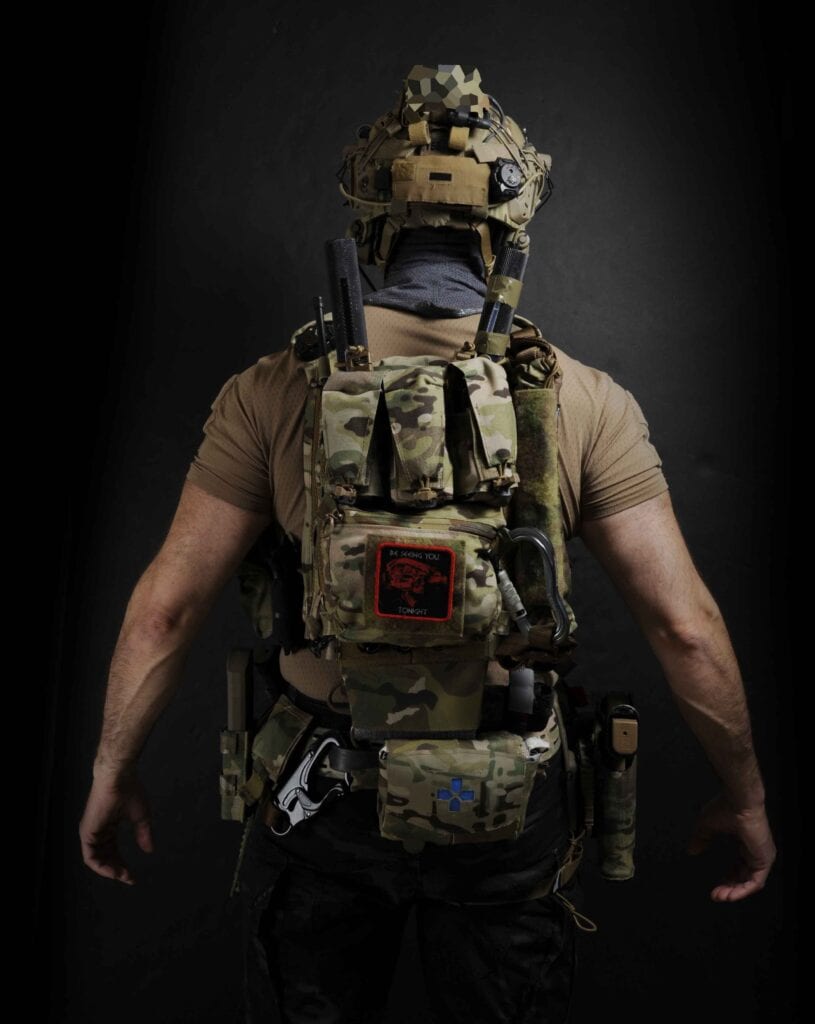
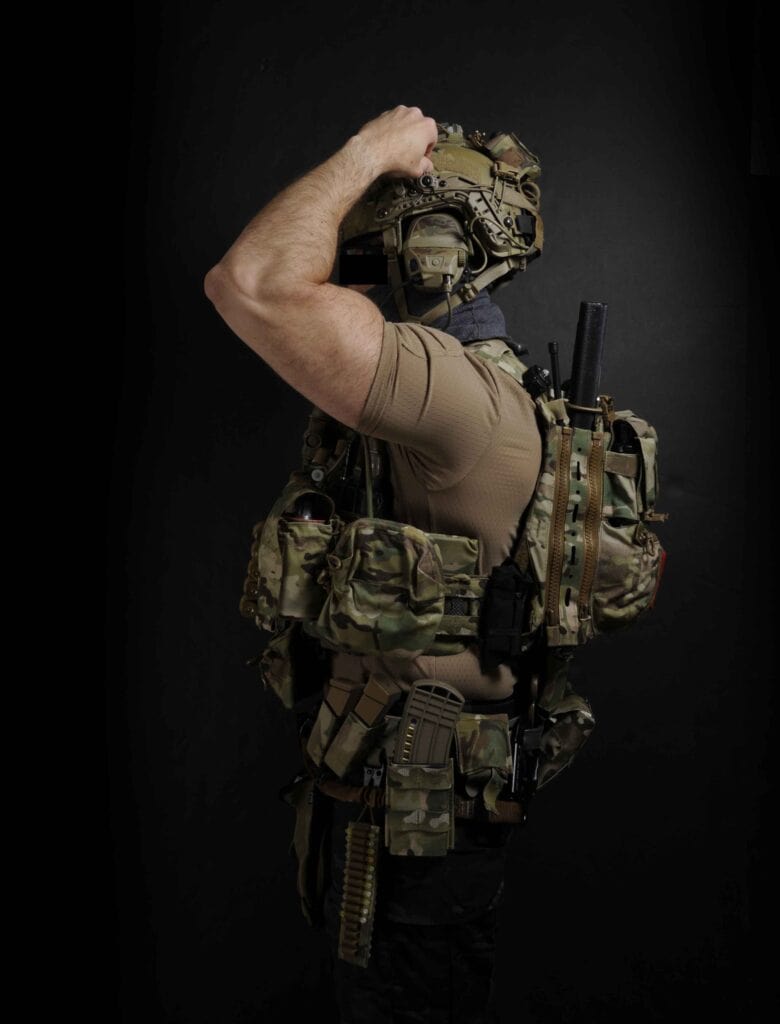
The back of the carrier is covered by zip-on panels. I’m a fan of zip-on panels because they allow for easy reconfiguration of loadouts. As mentioned earlier, if a mission requires that we would sitting in vehicles most of the time, I don’t want anything on my back. The items that would normally be there would be in a 24-hour assault pack between my knees that’s easily slung during dismount. Otherwise, I like zip-on panels because they allow for the cleanest/slickest attachment of items.
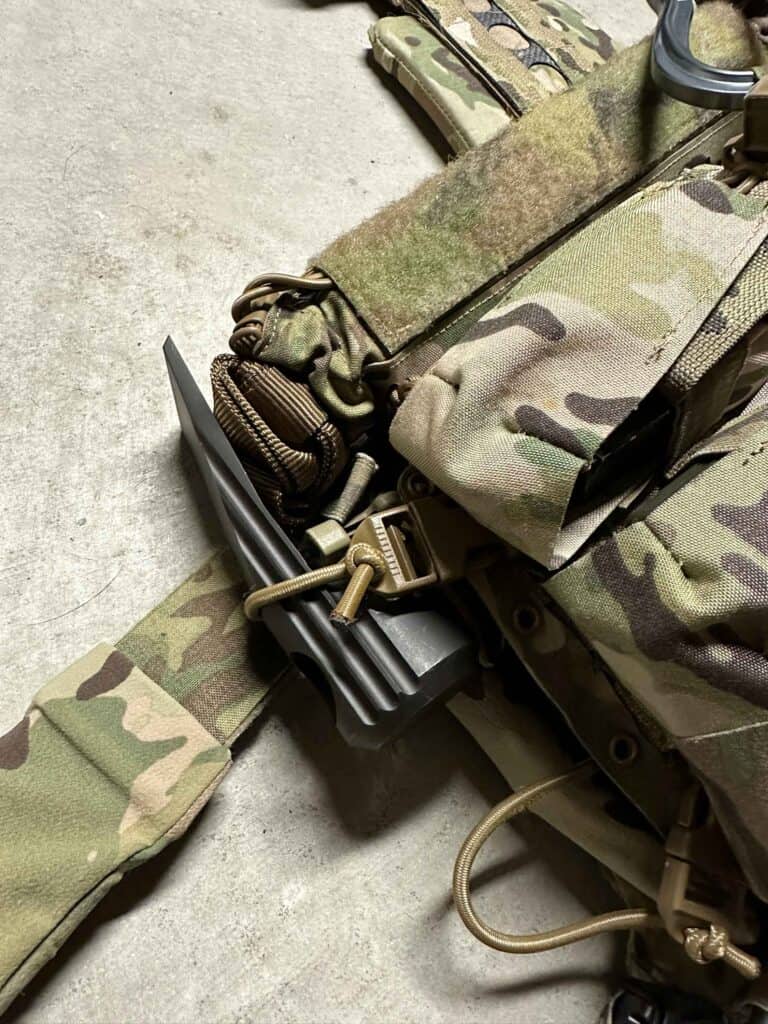
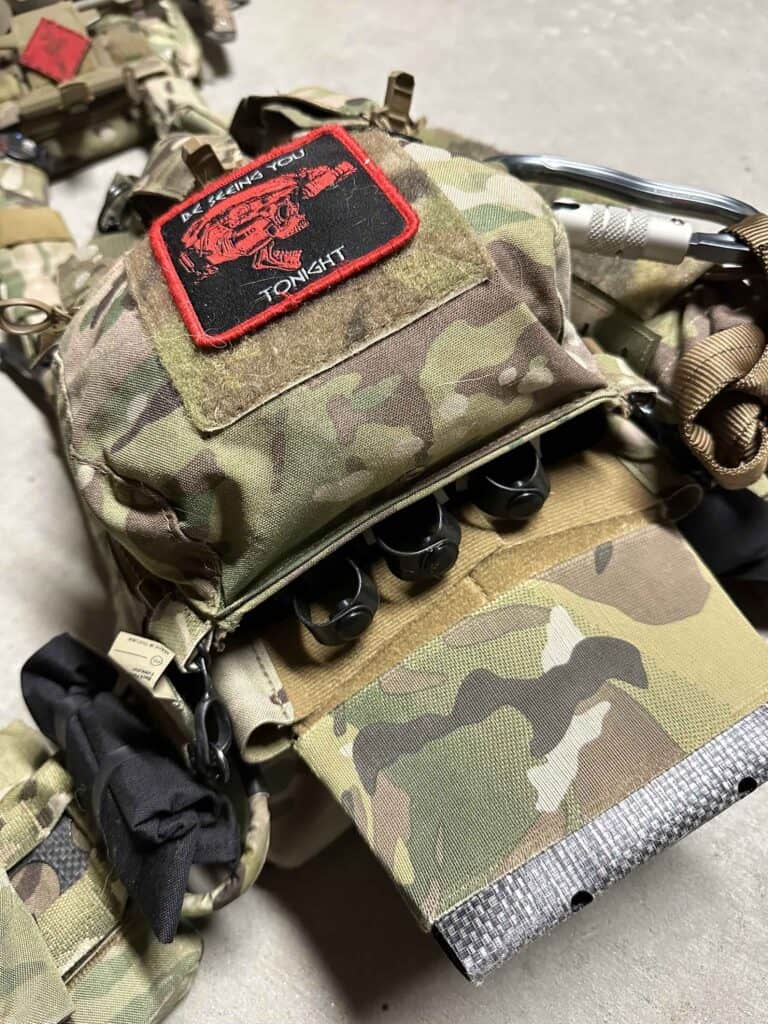
Two zip-on panels are stacked on my back. The base panel holds mechanical breaching tools. An assault element should spread out the carriage of breaching tools so that one poor soul isn’t laden down with everything. This practice also means that tools are available no matter who you end up with during flow. This panel can hold a set of bolt cutters, a pry bar, or a sledge. The outer zip-on panel is configured to carry three bangers for a buddy to access. The lower pouch can hold various items like batteries, SSE bag, linked ammo, and so on depending on the mission requirements.
Between the two zip-on panels are three Cobra flex cuffs secured with shock cord. The downward-facing loops provide me easy one-hand access to them without needing to access a pouch or creating a snag hazard with other placement. The right side of my rear plate bag has a tubular pouch designed that holds 50 feet of daisy-chained tubular nylon with a load-bearing carabiner on the end. Tubular nylon can be used as a makeshift litter or rescue strap. With the carabiner, it can also be used to rapidly egress from a rooftop. The tubular pouch greatly decreases the snag hazard of the nylon webbing while keeping it readily accessible. Lastly, prisoner hoods are ranger-banded to both cummerbunds, butted up against the back panel. These can be quickly accessed one-handed.
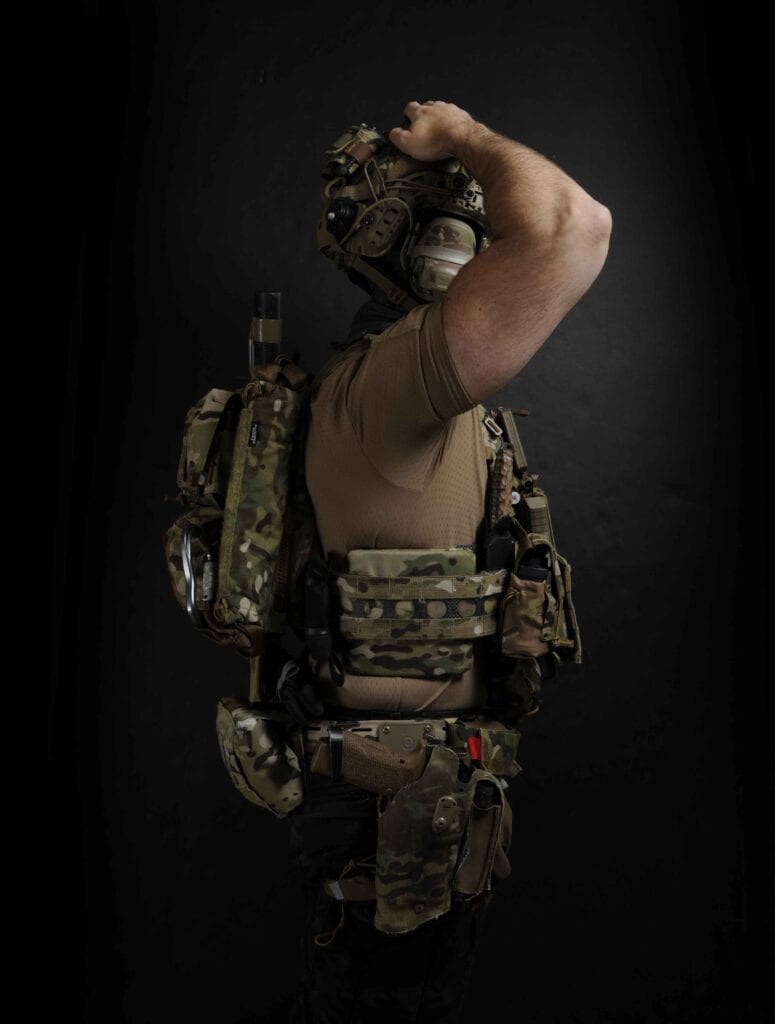
My belt is load-rated for personal retention lanyards. This is incredibly important for those of you working in or on helicopters. A lot of belts look like rigger’s belts but are not. If your job requires you to clip into a helicopter, then your belt better come with a legitimate load rating certification and be made in a first-world country from first-world materials. While I’m not pimping specific brands in this article, I will call out the Blue Force Gear CHLK belt. This belt was designed specifically for helicopter use and had heavy input from active-duty soldiers from 1/75 Ranger Regiment. Not only was it designed for this work, BFG has all the independent testing data available for reference.
I load weapons off my belt because it’s the easiest access to magazines from any position. Two angled pistol magazine pouches allow for more natural angles of pull and lower the profile of the mags. This keeps me from having to contort my body to access pistol reloads. The angle also keeps the mags from touching the pouch bottoms on my plate carrier (and from pinching my skin between them and my radio—ouch).
Immediately behind the pistol reloads is my emergency rifle reload pouch. As I said earlier, I will backfill this pouch from my plate carrier during a lull in the action. Like my pistol mags, I don’t want my rifle mag impinging on my carrier or pinching my skin in between. For this reason, I have it mounted on a slight drop platform that also contains a wedge. The wedge is important because it produces a slight cant to the mag to help it clear pouches on the carrier and speed up the reload. I made a custom belt clip from an HK hook and some One-Wrap that I use for clipping in a mini chemlight holder. This little placard securely holds a bunch of green chems. I discussed how I keep track of colored items in the dark: Red is on the right and green is on the left. Green is usually used way more often than red, so I carry more of that color.
Moving around the rifle mag pouch is a small deployable dump pouch. Operationally, I’m not a fan of dump pouches as I found that they snagged on everything and created more hazards than any convenient benefits. I know that some guys love them and that’s their preference. But I didn’t want one. However, I use one as an instructor because I’m no longer performing life-or-death work and it offers an easy place to carry a staple gun, tape, water, or an air horn while teaching.
At the small of my back is another IFAK. I’m a big proponent of carrying a lot of trauma supplies, as experience has taught me that bullets and frag rarely create a single clean wound. Ladies and gentlemen: An IFAK will hold the contents needed to treat a single GSW. Lacerations, flesh tearing, and multiple penetrations of tissue will require more. Beyond that, I carry extra gauze in pockets all over my uniform. Gauze, gauze, gauze. I also carry full-size IFAKs only. The minis are nice for saving space, but they sacrifice critical contents and contain miniature components. A second tourniquet is attached to this IFAK as well.
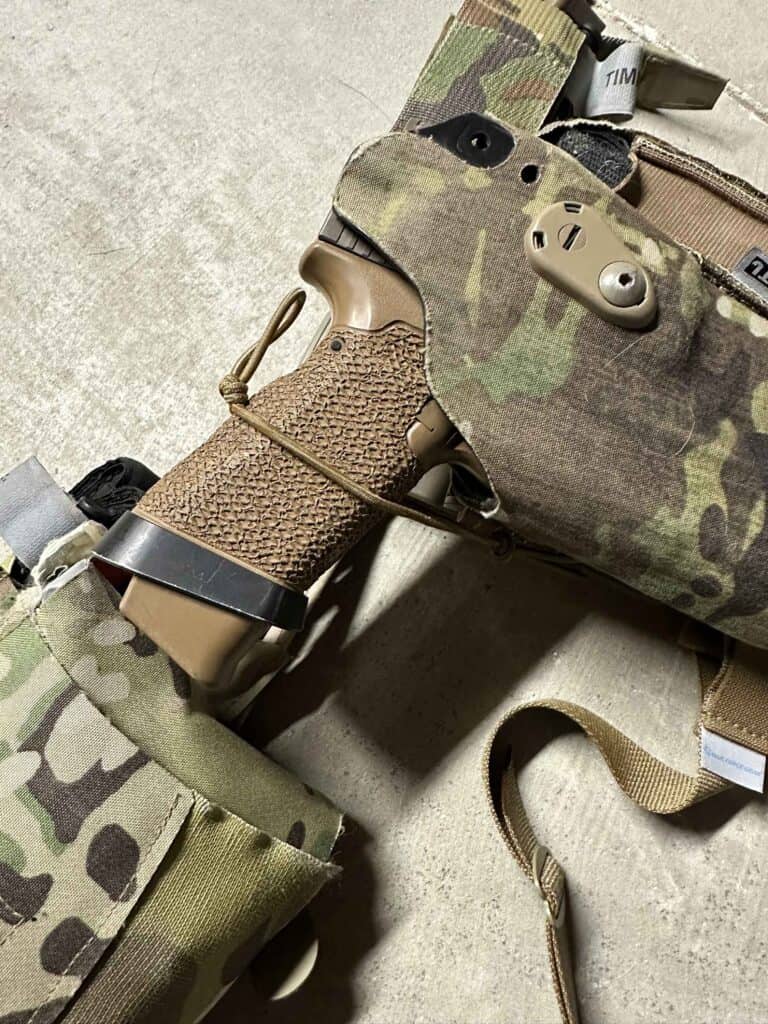
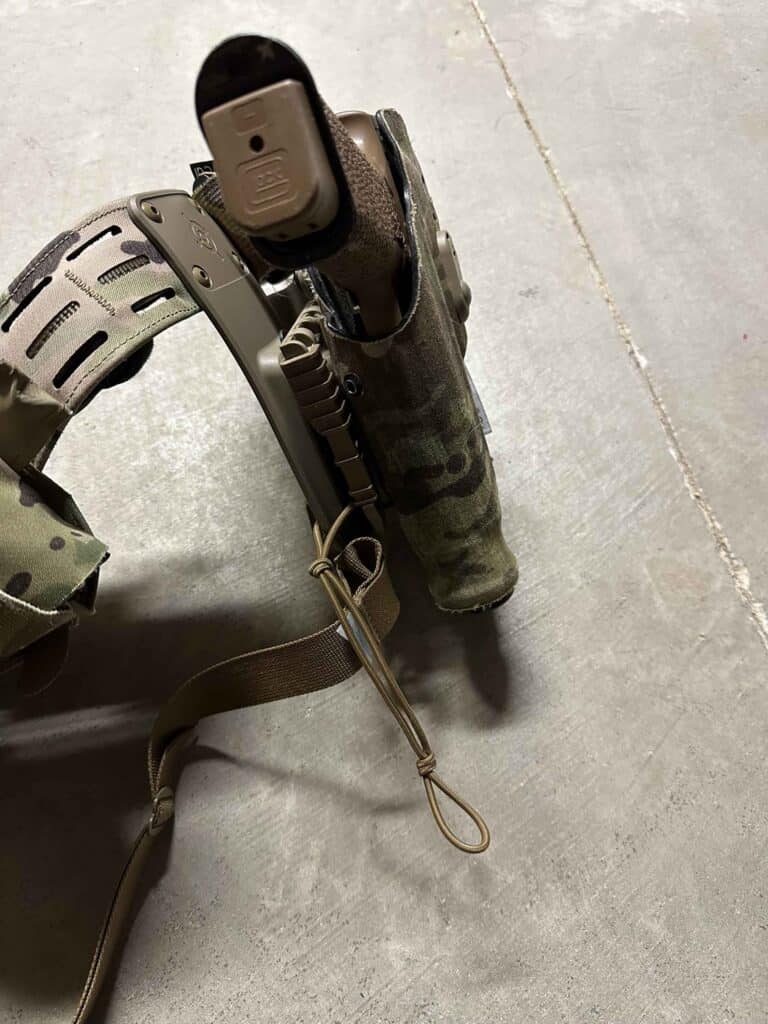
My holster is located on the right side of my belt. It’s placed on a zero-cant, mid-drop platform to help it clear my PC and speed the draw stroke. I don’t want my pistol any lower than this, as it impedes my ability to run. The holster has a mechanical secondary retention mechanism. This is CRITICAL. I don’t care what the Instagram and YouTube superstars use—if you don’t have a mechanism that requires deliberate defeat to draw your pistol, you will lose your blaster. Period. The real world is not a square range. Between riding in vehicles, climbing over obstacles, jumping across rooftops, fast-roping out of helos, hands-on fighting with bad guys, and myriad other activities, you will lose gear that isn’t secure. And your pistol is a pretty critical piece of gear to lose.
On that note, I’ve fashioned a tertiary retention device out of some shock cord that loops up over the pistol butt. Airborne and air assault operations taught me the need for this. Sitting in vehicles, wearing kit, can inadvertently activate levers and bails on holsters. Once I’m on the ground, the loop is pulled off the pistol butt. I have a third tourniquet mounted to the front of the holster. If I’m carrying a breaching shotgun, I will mount a retention device right behind my holster.
Coming back around the front of the belt on my right side is a horizontally mounted fourth tourniquet. I carry four tourniquets on my body because I have four limbs. Beyond that, some wounds may require more than one tourniquet on the same limb (I’ve seen this happen). Beyond that, I want to ensure that a tourniquet is within easy reach by either hand in any position.
Lastly, I clip my personal retention lanyard to my belt. You’ll notice that it is shorter than most. PRLs should never be longer than your outstretched arm from the belt. You want to be able to fully extend your arm and access the clip on the end while the PRL is stretched out in an emergency (in case the release on the belt fails).
You’ve probably noticed that certain pieces of common gear are absent from my setup. I’m talking about items like multi-tools, flashlights, or others. I carry these in the pockets of my uniform. As a smaller guy, I have less real estate for extra pouches on my kit. This practice also helped me from piggybacking pouches, slimming down my profile. But I also had the luxury of pre-staging my uniform and pocket contents prior to a mission in my past life. Some of you in law enforcement may not have this ability.
If you carry out patrol duties in a patrol uniform and respond to SWAT callouts where you throw on a plate carrier and helmet, you may need to carry everything on your gear. If this is a the case, then I’d recommend spending time figuring out how best to place and secure these items. A lot of cops show up to nighttime classes with a buffet of gear in open-top pouches on the fronts of their carriers. This presents easy access during routine missions and daylight hours where you can see everything. But this gear often ends up on the ground during nighttime drills. Take time laying out your kit. The most convenient concepts may cause you to lose items in the field.
This is how I lay out my kit based on my past life as an assaulter. Hopefully you’ve gleaned one or two ideas from it (or at the very least, were entertained). Remember: Every job has defined requirements and those requirements should define your gear setup. You may not need to carry what I carry, or you may carry specialty items. Take your time and think through your kit layout. Your gear must perform for you under stressful conditions.