4 Mission Driven Plate Carrier Setups

- 4 mission driven plate carrier set-ups examined
- Understanding hierarchy of gear
- Equipment use and placement explained
Plate Carriers are the central element to a modern warrior’s combat loadout. They serve two functions: positioning life-saving armor over as many vital organs as possible, and carrying the myriad of equipment needed to prevail in a gunfight and accomplish the mission.
The market is over saturated with options and brands, few innovators, and a lot of copiers. This is not a “buyer’s guide.” You can find one of those in just about every other tactical magazine on the newsstand. All a company has to do is send free gear to an editor and suddenly it’s “NTOA Approved.” This is actually the first part in a series of articles that will cover how to set up your gear for your mission.

Before we get started, I want to make clear that I do not work for any of the companies whose gear I will be talking about. I have, however, been a self-described “gear queer” who has a decent amount of operational experience to back up my opinions. The manufacturers I have chosen to present in these articles have earned my trust and business through their innovation, quality, and proven track record. They are not the only “good to go” companies. But, I have had personal experience using their products and would whole-heartedly endorse them to my brothers in military and LE SOF units.

Gone are the days of one-size fits all combat gear. Today, the name of the game is modularity. But like everything; the more options you have, the more confusing it can get. And before you know it, you look like the Eagle catalog threw up all over you. In order to properly solve a problem, you must break it down to its lowest common denominator. In this case, we are talking about gunfighting. Everything you carry into battle needs to trace back to the purpose of helping you win the fight.
One of my brothers and mentors, Buck Doyle (followthroughconsulting.com), begins each of his classes by defining the three basic tenants of gunfighting: Shoot, Move, and Communicate. I don’t think it can be broken down any clearer than that.
With this in mind, we need to interrogate every piece of gear we carry, every pouch we attach and where we attach it. How will this help me shoot, move, and communicate? We will always need to carry specialized gear to support our roles on top of the rifleman’s gear. We may need to carry dual comms, IZLID, breaching tools, ladders, specialized medical gear, or CBRN kit. But, we cannot let any of that hinder our basic load that allows us to fight.
Gear Hierarchy
I break my gear down into a simple hierarchy: primary and tertiary. Primary gear is the stuff I need immediate access to in a gunfight. Tertiary gear is everything else. Primary gear needs to be immediately accessible with either hand and (for an assaulter) should be located on the front of your body. Everything else can be carried elsewhere spread across your body (but still easily enough accessible by you. – I don’t ever want to have to call my buddy over to get something out of a pouch on my back. That’s some peacetime military shit). The three things you need immediate and unencumbered access to are:
- Primary and Secondary Ammunition so you can feed your weapon systems and lay the hate.
- A Tourniquet so you can stop massive bleeding whenyou get hurt.
- Your radio PTT or mic so you can talk to your team and let them know where you are.

Everything else is tertiary. Luckily for the modern warrior, plate carrier, pouch, and gadget design has come a long way since the beginning of the GWOT. I have put a lot of years into figuring out what works and what doesn’t. Because I’m a little guy, tactical real estate on my person has always been at a premium. It has forced to me question everything I carry and where I carry it because the smallest thing could hinder my movement and add extra weight that quickly adds up.
Give a warfighter or cop some open PALS webbing, and they are going to want to put a pouch there. Give them a pouch, and they are going to want to fill it with crap. I’ve had years to refine my gear loadout, and my overall approach can be disseminated across multiple platforms for multiple mission requirements.
While the plate carrier is the centerpiece of a warrior’s gear loadout, it is only one piece of the entire whole. You should not look to your PC as the carryall for every piece of gear. Hell, that’s why you have a belt and a cool-guy combat uniform with a million pockets. If you spread the load of your kit over your whole body, you will gain mobility. Keep that in mind as we look at the following plate carrier setups. If I left something off the PC, there is a reason and you will see it included on the corresponding belt kits, packs, and combat uniforms that will integrate with these plate carriers in future issues of UN12.
As mentioned, I create a hierarchy of importance for items I carry on my person. While you may set up your loadout and stand around in the team room or your living room thinking “yeah, this weight is comfortable. No problem,” I guarantee that you’ll be cursing the same load five hours into the mission when you’ve been on your feet, walking, running, jumping, falling, etc.
Ounces equal pounds and pounds equal pain. That’s why every piece of gear you carry (along with the pouch or manner in which you carry it) must be interrogated. Is this gizmo going to help me win the fight or is it something “nice to have?” As a little guy, my plate carrier and belt kit look pretty full. But, when you look at what I’m carrying, everything is purposeful for the mission. It just looks like I have more shit on me because I simply have less real estate which to place it compared to my linebacker-sized brothers.
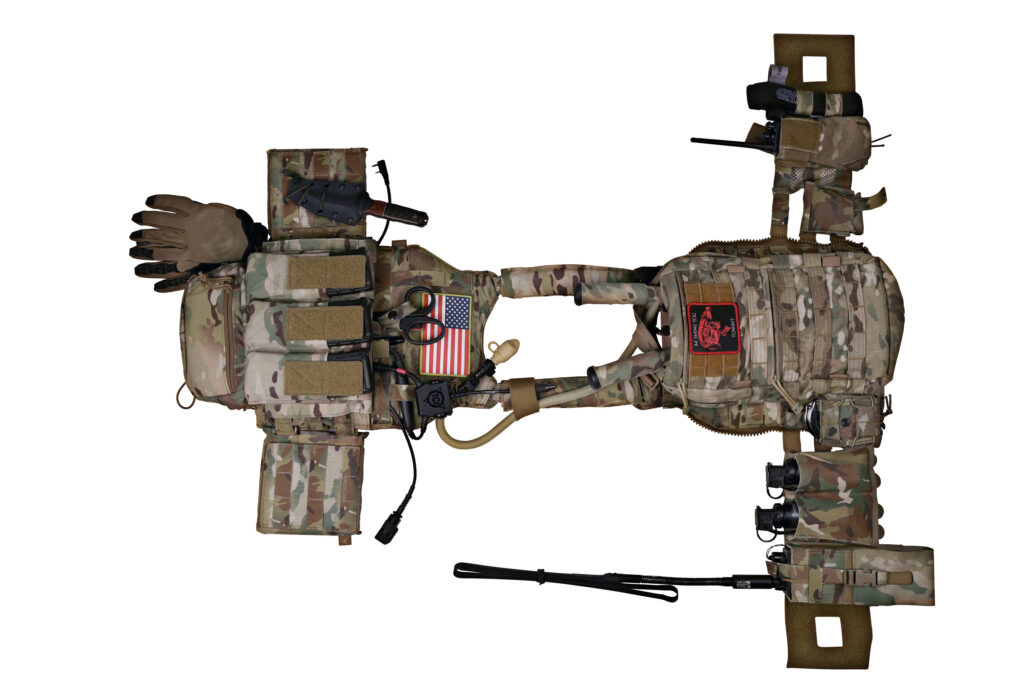
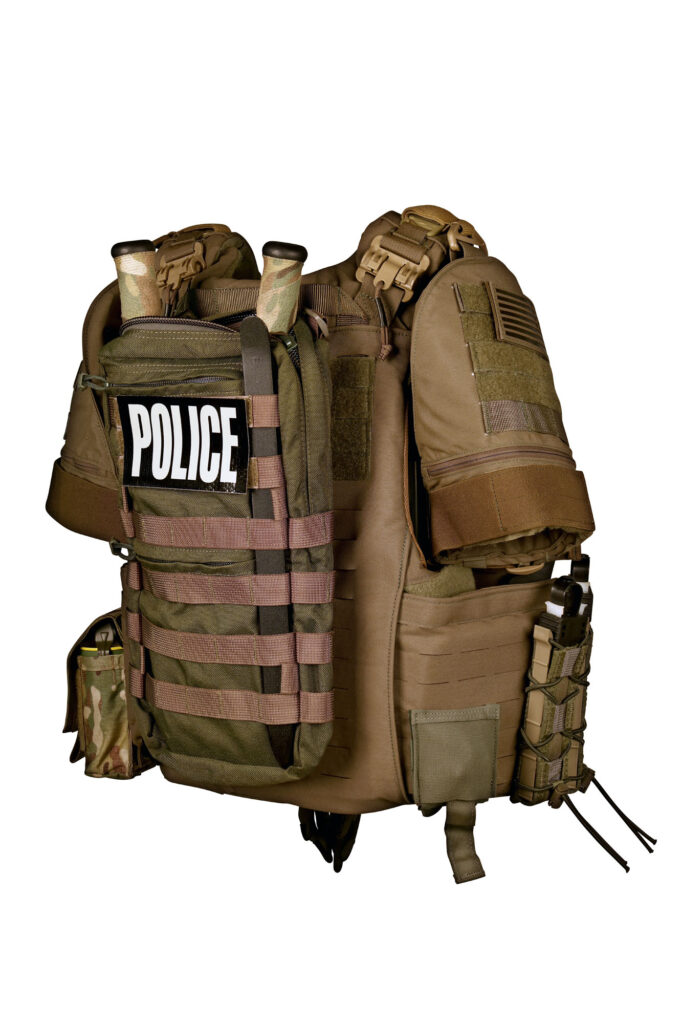
PLATE CARRIER 1: Assaulter
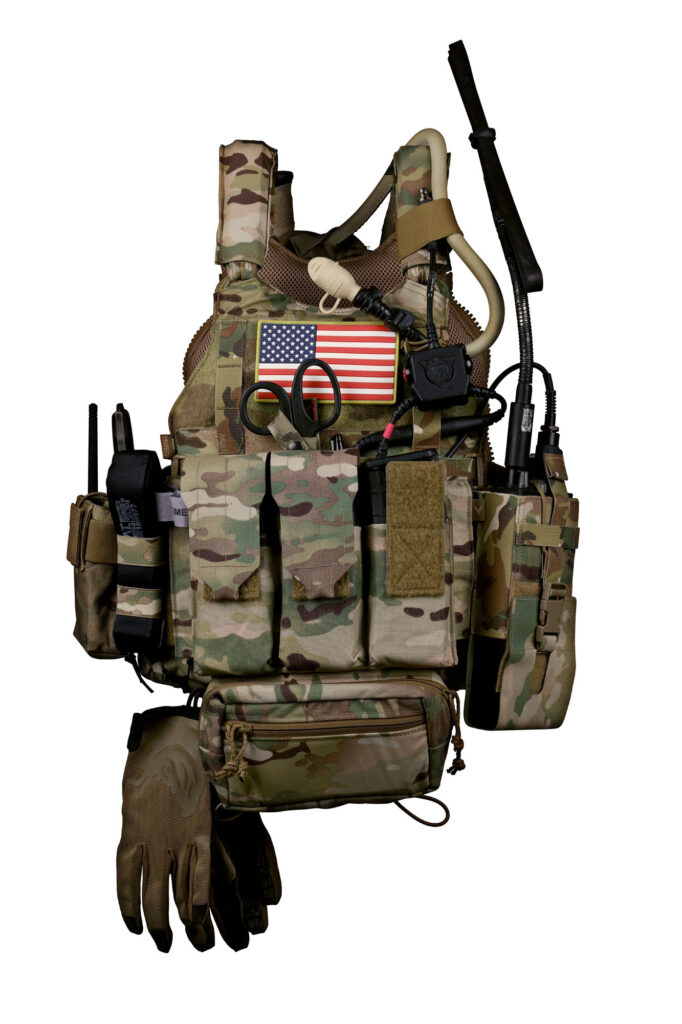
This Plate Carrier is set up for an assaulter in a military Special Mission Unit. It is set up for a direct action mission where my team may be flown directly to the target location or maybe need to infil 5 klicks. A hit like this should expect moderate to heavy resistance, so a reasonable amount of body armor should be worn, but I stop short of bicep protection, collars, yokes etc. I still need a high degree of mobility for infil, actions on the objective, and exfil.
I built this carrier off a Velocity Systems Scarab. It is a lightweight, scalable carrier that’s highly adjustable and cut for great range of motion. I installed front and back Velocity Systems API-BZ Multi-Hit Standalone Rifle Plates and Side Plates and backed them with Velocity Systems SAPI Soft Armor Inserts. I put soft armor behind plates whether or not they are standalone. Soft armor will dissipate the kinetic energy transfer of a projectile (something just as lethal as the actual penetration) while the plate is designed to simply stop the projectile.

Going back to my three primary items for immediate access in a gunfight, I have rifle magazine pouches, a tourniquet, and my PTT right at the front. All three of these items are within reach by either hand. I prefer to only keep three rifle mags up front and don’t want to stack multiple mags on top of each other. Gear should be as tight and close to the body as possible. Stacking mags or pouches on pouches limits your access to belt and pants pocket kit.
It can also lead to accidentally grabbing two mags instead of one (or even one mag pulling another out). I keep an extra rifle mag on my belt and 3 to 6 more in an assault pack. I like closed top mag pouches – especially when I’m roping from helicopters or doing any high angle work as they help keep large debris out of my mags. The Blue Force Gear (BFG) Triple M4 Magazine Pouch uses their proprietary Helium Whisper material to make an ultralight, yet robust pouch. I’ll tuck the flap of one of the pouches behind the mag for an easily grabbed emergency reload.
Right next to the mags is a CAT (Combat Applications Tourniquet) in a BFG Tourniquet NOW! Strap. Tourniquets save lives. The BFG TQ NOW is super lightweight and handy for rapid access. Yes, CAT’s are UV sensitive and can degrade over time. They are onetime use and should be replaced on an annual basis. I face the Rod Locking Clip toward my body so it doesn’t hook on slings or environmental obstructions.
Above my mags is the PTT for my radios. I place the PTT on the edge of the carrier so I have a clear path to my mags. I set this carrier up for dual comms and make ready use of the Velcro kangaroo pocket on the front flap of the cummerbund closure (behind the mags). This makes a great storage location for all the excess cables for radios.

This PTT is a Tactical Command Industries Liberator III LITE that puts control of both radios into one module. I secure as much of the cable as possible and leave a flat open launch pad on my chest for magazine access. The cleaner you can keep your chest, the faster and easier access you will have to mags. After all, an assaulter’s priority is the fight.
I carry large EMT Trauma Shears next to a Sharpie marker on my chest for rapid access. Shears are important for removing clothing on casualties to expose wounds so you can save lives. I keep the blades secured in the built-in cummerbund kangaroo pocket and the top secured with the RE Factor Trauma Shear Holster. I don’t care about losing a pair of $10 shears; it’s disposable. But I do care that my shears are on my person when my buddy just got his leg blown off and I need to cut away his clothes to save his life.
For a direct action hit, I a large ID panel on my chest. This is important for a couple reasons. During a hostage rescue, a traumatized hostage’s mind may look at a word on your chest, but not “see” it. The mind jumbles a lot when terrorized. A large, full color, friendly flag on the other hand – pretty hard to mistake that. It identifies us as the good guys. The other reason is, well… ‘Merica. A large good guy flag on your chest, coming through the door is a nice “fuck you” before you shoot the bad guy in the face too. Another nice thing about the large flag patches is they provide ample surface to conceal an important survival item: local currency.
In the event I need to implement an E&E (Escape & Evasion) plan, I’m not going to rely on my dashing good looks to charm the locals into helping me get out of dodge. Few things work better to motivate people than cold, hard, cash. Sure, I could wave a gun in someone’s face to get them to let me hide out in their barn, but they will most likely fuck right off and tell the bad guys where I am as soon as they can.
They may decide to do that even if I pay them, but my chances of buying some temporary loyalty are higher with honey than vinegar. I would generally keep $500 (local) folded up behind any ID panel on my chest. It also is large enough to conceal a chest mounted Blast Gauge that will let teammates know what PSI I may have been exposed to if they find me unconscious.
I run a Spiritus Systems SACK (Sub Abdominal Carrying Kit) under my mags. It dangles over my belt buckle and holds easy access tertiary gear. The front zip pocket holds a small Rite in the Rain notepad and pen along with a dedicated flex cuff cutter. I usually keep a small handheld thermal imager in the main compartment.
This gives me super easy access to it during the mission while not impeding access to any critical gear. I mount the SACK under the cummerbund. The inside is completely lined with Velcro pile and accepts a multitude of inserts for mission specific roles.
I always keep my radio on my left side, next to my mags. I remember seeing pics of “tactical operators” as a kid, with radios mounted high on the back. Hell, I did it back in the day before I knew any better. You should not need to rely on your brothers to sort your shit out.
Don’t be that asshole that’s always calling your buddies over to get something off your back. They’re busy doing work while you’re acting like a dog trying to eat his own tail. While the PTT lets you talk and is the most important comms gear to reach for, you may also need to change things on your radio depending on the type of comms problem you have to solve.
As a right-handed shooter, I keep my radio on my left side so the antenna does not interfere with my primary shooting shoulder. I put the larger of the two radios (AN/PRC-148 MBITR) on my left side. I have ready access to the controls from the open top in my BFG Multi-Radio Pouch.
My smaller team radio is mounted just next to my tourniquet, under my right arm. I try to keep this area as free of pouches as possible so I can more quickly present my pistol from the holster on my right hip. But in the case of dual comms, you only have so much real estate. So, I place the smaller team radio there in a TYR Tactical Motorola XTS Radio Pouch.
I always want to keep the real estate on the sides of my plate carrier as minimal as possible. This keeps my profile smaller, making it easier for me to quickly fit through doors, climb over walls and ledges, etc. But, that doesn’t mean it’s off limits. Mounted directly to the side plate bag, behind the cummerbund, is my slashy/stabby tool. In this case, I’m carrying a knife from one of my favorite knife-makers, Half Face Blades.
The blade is utilitarian and thick – not going to break on me. I keep knives on my primary side, handle up, and tilted forward. This way, I can easily bring my “strong hand” up, removing the knife from its kydex sheath, and then bring it down in an underhand grip, behind the bad guy’s collar bone, if he’s trying to get handsy with me in close quarters.
Mounted over my right kidney is a BFG Ten-Speed Ultralight Dump Pouch. I hate dump pouches because the tactical training industry has created some bad training scars regarding their use. In a gunfight, I’m not retaining mags. End of story. Mags go on the ground. If I recover them later, so be it. But, I’m not taking precious seconds to finagle an empty mag into some bag hanging on my hip when I should be getting back to slinging lead. Dump pouches are for SSE (Sensitive Site Exploitation). They are for collecting important items that you don’t want to leave – like a pistol or documents.
Mounted under my left arm is a BFG Double M4 Mag Pouch. This is essentially a pouch made out of elastic. It secures two mags, but lays completely flat when not in use. However, I like to keep flashbangs in them. This placement gives me access to my own bangers. I don’t need to find a buddy to work off his back or have a buddy get one for me off mine. I keep the pins facing my body to eliminate snag hazard.
The draw from the pouch is absolutely silent. (I remember the old bang pouches from the 90’s and early aughts that had Velcro closures. Yeah, that was a good idea. Let’s rip loud Velcro in a hallway to access a device we are going to use to surprise the guys we just spent an hour sneaking up to!) Ten Speed pouches keep them secure. One caveat – they do wear out over time and need to be replaced. I wouldn’t jump these pouches with bangers in them, but they work great for groundwork.
Rounding off the left side is a 215 Gear Multi-Mission Weapon’s Retention Lanyard. This is the simplest, lowest profile and most snag-proof primary weapons retention I’ve used. It’s basically an industrial elastic strap covered in tubular nylon that clips to a PALS-mounted side release buckle. It pins my rifle to side, completely vertical (muzzle down) while climbing or fast roping. This is especially useful on ladders (actually the activity that sold me on this thing).
As I mentioned, I don’t want pouches for things on my back that I cannot access myself. I always wear a small assault pack that can quickly and easily be slung over my shoulder. Even though the Scarab has a zip-on assault pack panel, I do not use it because I can’t access it myself. Instead, I keep a flat pouch on my back to hold a water bladder and my bolt cutters.
One of my favorites is the Emdom Vehicle Hydration Carrier. It’s wide and flat, allowing me to wear an assault pack over it. It is also short, so it doesn’t interfere with sitting in a vehicle. Even if I’m not the designated breacher, having some mechanical breaching tools is a good thing since the actual breacher may not always be at my side.
I have large bolt cutters from Home Depot stowed in the main compartment of the carrier – ready for deployment ninja style. The carrier’s dual snap fastener is woven between the handles to keep the cutters from coming out the semi-open top. But, the snaps will be undone by a hard yank on the tool. The outer zipper pocket contains a folded up vs17 marking panel.
Next to the hydration carrier, in the lower left corner of the plate bag, is an HSGI Handcuff Pouch. While my team would always carry plenty of flex cuffs on belts and in pockets, I always want to have at least one pair of double locking standard handcuffs. Good flex cuffs are essential for multiple prisoner handling.
Ideally, a hit carried out with speed, audacity, and violence of action will either leave the bad guys dead, or without any more will to fight. But, some assholes don’t know when to quit. If it’s an HVT or just a belligerent jackass we can’t kill, he is going in steel cuffs during SSE and extraction. Lastly, next to the Hydration Carrier, is a Titanium Entry Tool (TET) from Explosive Ops Gear. I love this little pry bar for popping locked cabinets, trunks, etc. It is super lightweight, has enough length to get leverage, and fits through PALS webbing.
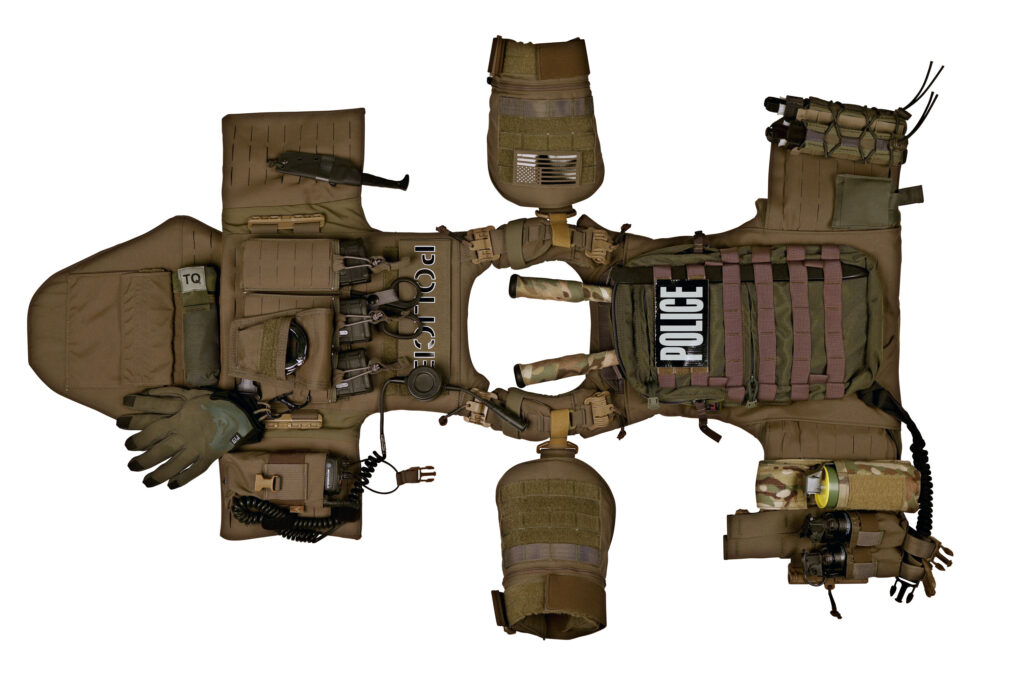
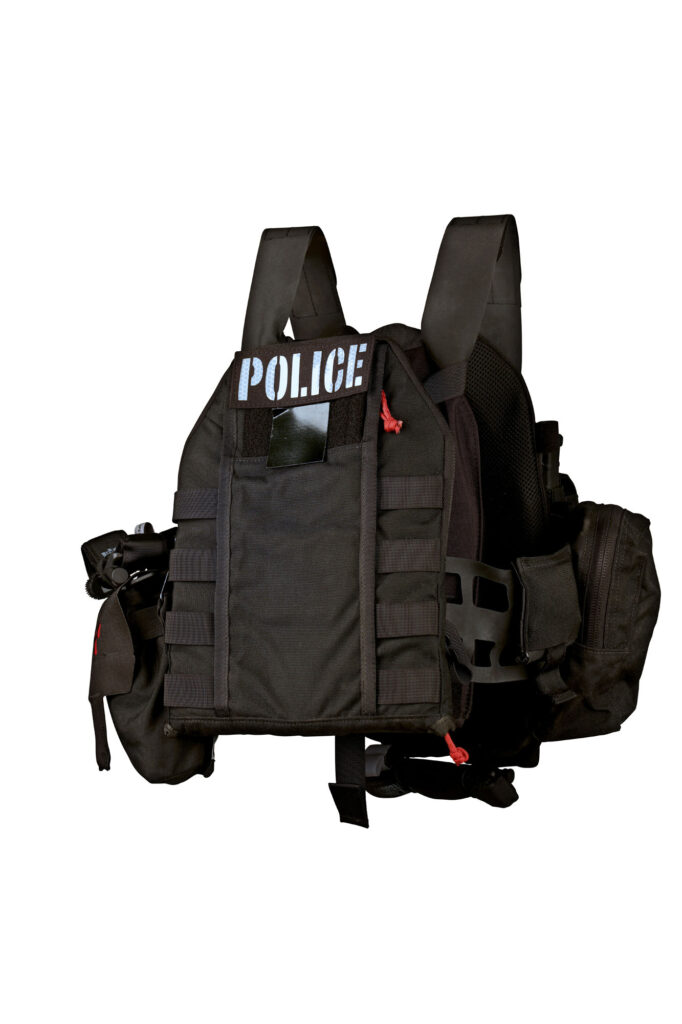
PLATE CARRIER 2: SWAT
I set this plate carrier up for Domestic Law Enforcement SWAT. Regardless of the mission, I carry over a lot of the same themes and elements between loadouts because it just works. This kit is set up for typical SWAT callouts. The team may roll up in force, dismount the Bearcat, and kick in the door for a high-risk warrant service. Or, it could be a surround and call-out op where we stand around for eight hours waiting for the suspect to realize he isn’t going to win. Either way, this mission differs from the SOF hitter in that it’s unlikely we are going to hike in and out of a target zone.
While mobility is always very important, a lot (not all) of SWAT callouts are light on marathons and heavy on hurry-up-and-wait. The threat is also different. If an operator is facing a pistol downrange, his world has probably taken a turn for the surreal. But domestically, officers face down pistol threats every day of the week. So, some of the extra body armor panels like IIIA bicep protection, start to make a little more sense. But, I am always careful to not go full Michelin Man. An officer waiting in 100 pounds of body armor during an eight-hour standoff can be just as smoked as an operator hiking the Hindu Kush.
Wrap-around soft armor is important for “heavy entry.” For a standard SWAT Plate Carrier, I want something that holds front/back IIIA Spear/BALCS-cut armor panels for the uninterrupted coverage of pistol-stopping protection. It also needs to hold standard size rifle plates with the option of adding side plates. And, it needs to accept scalable up-armor components for added IIIA protection to extremities.
Personally, I want Bicep and Groin protection, but stop short of full shoulders, yokes, and throat protection. We need to strike a balance between acceptable coverage and mobility. Yokes and collars are practically useless for protection. A high velocity projectile will flatten it out and strike the wearer above, or push under it and strike the wearer between the main carrier armor and the supplemental piece. Yoke and collar armor is not wide/rigid/supported enough to offer any real protection. It does, however, excel at limiting head movement while wearing a helmet, and adding unnecessary weight to the wearer.
This setup is built on the First Spear Siege-R Optimized platform. The Siege-R Optimized has a slick base design with no external cummerbund like the other systems in this article. I’ve installed BALCS soft armor and Velocity Systems API-BZ Multi-Hit Standalone Rifle Plates and side plates.
My biceps are covered with First Spear MASS Bicep protectors. I like their design in that they are quickly detachable without having to take the shoulder assembly apart (in case I need fit in cramped spaces). I also wear a First Spear MASS Groin Protector. I have a good relationship with my junk and want to keep it that way. After seeing two guys lose testicles, the importance of ballistic groin protection became apparent. Some things can never be unseen. The FS design also has a special pocket to fit a 6×6” side plate.
Following my rules, I have immediate access to my rifle mags, radio PTT, and CAT tourniquet on the front of my person. I carry three rifle mags in a First Spear Ranger Shingle. I often see SWAT officers running only one or two rifle mags with the reason being “that’s all I’ve ever needed,” or “If I need more, we have a box in the bearcat.” I am here to say: Fuck. That. Shit. I’m all for minimalist approach, but the looming threat of highly motivated, heavily armed, and well-trained jihadists attacking our nation is real and it’s here. And, Delta Force will not be first on scene to respond.
It will most likely be my brothers in blue that make first contact. I say this to the LE community: do not train and equip yourself for the 99% of scenarios that end with minimal or no shots fired. You need to be ready for that 1% where you’re fighting for your lives against an enemy that has you out-gunned (think Mumbai and Beslan). Reactive mindset is fatal.
Immediately behind the Ranger Shingle are my large trauma shears in RE Factor Trauma Shears Holster. My PTT is mounted all the way on the left edge of my carrier, for unimpeded access to mags. This unit is a TCI Tactical PTT – one of my all-time favorite designs. It is the simplest design, unmistakable in tactile feel, and incredibly easy to find the activation button. I’ve removed the Velcro rear clip and stuck it directly to the Velcro pile surface on the front of the PC. I’ve further secured it with a routed, heavy-duty rubber band.
My tourniquet is stored in a North American Rescue CAT Pouch. It is mounted horizontally on my groin protector. This pouch completely covers the CAT, protecting it from harmful UV rays and will help to increase the longevity of this life-saving device (because let’s face it: most cops probably aren’t going to replace their TQ’s as often as they should – I still see SWAT dudes running around with Gen3 CAT’s).
On the outside of my Ranger Shingle is a First Spear Double Handcuff Pouch. While I normally don’t want gear mounted on top of my mag pouches, having an immediate access handcuff is awesome when trying to restrain a suspect intent on fighting. Wearing a full plate carrier and wielding a rifle presents a challenge in reaching the back of my belt to access hand cuffs (where I’d normally keep them on a patrol duty belt).
I only keep one set of steel cuffs in this pouch for easier access. These cuffs are for belligerent suspects only. Everyone else gets flex cuffs. I run a large First Spear 3”x8” Cell Tag that clearly ID’s me as POLICE. This tag is both infrared reflective and visible glow-in-the-dark. The white glow gives me easier ID day and night, while the IR reflective acts as IFF while under night vision.
To the direct right of my mags are two HSGI Extended Pistol Mag Taco Pouches. I run my pistol mags on my belt, but these extended tacos are perfect for carrying one/ea Cobra Cuffs. These cuffs were first shown to me by my bro, John Chapman of Forge Tactical (www.forgetactical.com).
Chappy has an extensive LE background and knows a thing or three about suspect handling and cuffing. So, when he says Cobra Cuffs are the strongest, most escape-proof cuffs on the market, and are double-locking (and he doesn’t work for the company), I listen.
Talking about flex cuffs is a whole article by itself. Suffice to say, these are the best disposable flex cuffs currently on the market. I keep two on my side in the Extended Pistol Mag Tacos for rapid access (I’ll keep 2 more in my left pant cargo pocket). The Extended Tacos keep the Cobra Cuffs very secure and reduce snag. It drives me nuts seeing cops walk around with giant figure 8 flex cuffs hanging off carabiners. That shit is going to snag on something and eventually get someone killed. Don’t do it.
Behind the Cuffs is a Mil-Max CCW fixed blade knife. Cops need a good knife on their gear for the same reason an operator does. I don’t care if you’re a cop in some sleepy Midwestern town or a Tier1 operator downrange; the second that first bullet goes by, you’re in combat and fighting for your life. Prepare for it.
I recommend a small fixed blade that is attached to the plate carrier in a less obvious manner (a scary Karambit front and center may still be a bit much for the Television cameras). I trust my boy, Justin’s knives from Mil-Max every bit as my bro, Andy’s at Half Face Blades. These are my two favorite blade makers. I use the same clip and 550 cord method to mount the kydex sheath with a forward cant for a more natural draw stroke. Rounding out the right side is a BFG Ultralight Dump pouch. I can easily toss a suspect’s gun, or evidence in it.
I’ve attached a First Spear Double Flashbang Pocket on the left side of the carrier, directly next to the Ranger Shingle. Normally, I would prefer BFG Ten-Speed pouches for bangers for reasons mentioned already. But, SWAT has a unique challenge. There are a limited number of departments across the country with full time SWAT teams. So, the majority of SWAT officers are doing regular patrol duty, crime suppression, task force, and traffic, until there is a SWAT callout. They then race to the location and don their SWAT gear which they keep in the back of their squad.
SWAT still needs to do work even if the team truck with all the breaching tools, bangers, and other munitions isn’t on scene yet. So, officers need to have personal bangers and other tools on their person for crisis entry as soon as they get there. This means these tools need to be staged on your plate carrier or in your assault pack so you can grab and go.
I have elected to use fitted bang pouches with side release buckles so the devices can be left in the pouch – ready to go (pins facing toward body). Right next to that is a London Bridge Trading Modular Smoke Grenade Pouch (6131E). I purposely use a smoke pouch with Velcro closure next to bang pouches with buckles so I can feel for the difference and will be confident in what I produce from each.
Directly behind these munitions pouches, I have a Motorola HT1250 in a Velocity Systems Radio Pouch. The Siege-R Optimized does not have an integral cummerbund with front kangaroo pouch in which I can shove extra comms cable. So, I run a couple pieces of Velcro One-Wrap through the MOLLE attachment slits on the vest and shore up the entire cable bundle next to the radio pouch.
This leaves no exposed coil cable to snag. The antenna is routed to the back of the carrier via the TCI MAST to keep it out of my armpit. I also run a 215 Gear Multi-Mission Weapon’s Retention Lanyard on my left side for the same reason mentioned earlier.
The back of the carrier features my favorite Emdom Vehicle Hydration Carrier. Its short height makes it more comfortable to sit with in the Bearcat. As before, I keep my bolt cutters and Titanium Pry Bar in here. I want these tools on me. A part time team may not have everyone on scene for a while.
If there’s only three of us and we need to breach and do work, I don’t want to stand around with our thumbs up our asses because none of us have breaching tools. I actually wouldn’t keep a hydration bladder in this carrier because it’s more of a hassle to fill in a crisis situation. Grabbing a bottle of water for my pants pocket is generally easier.
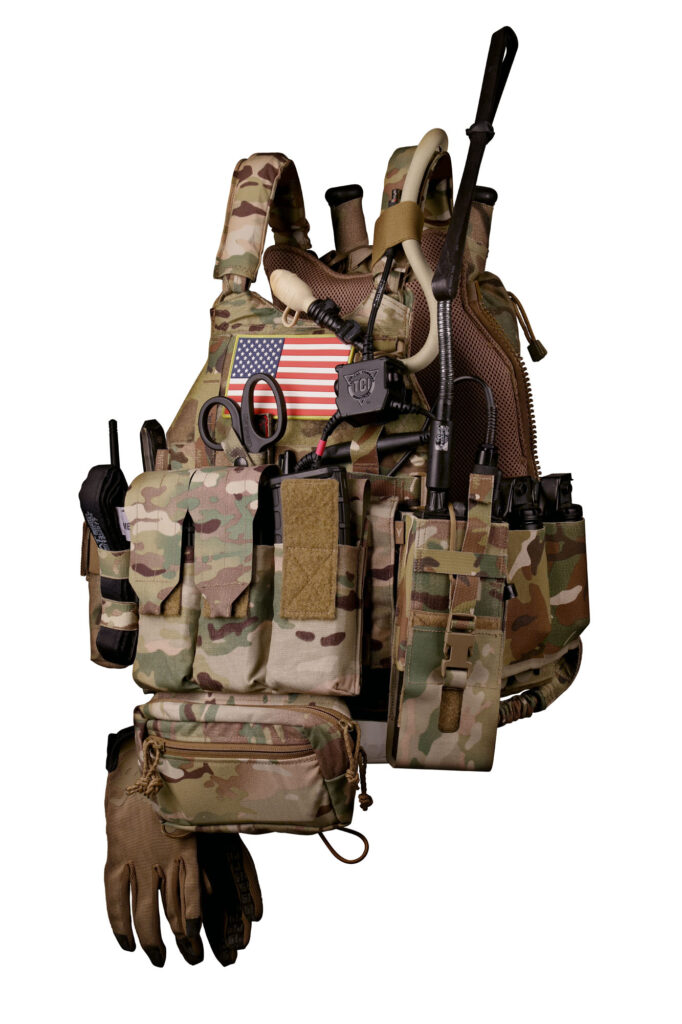
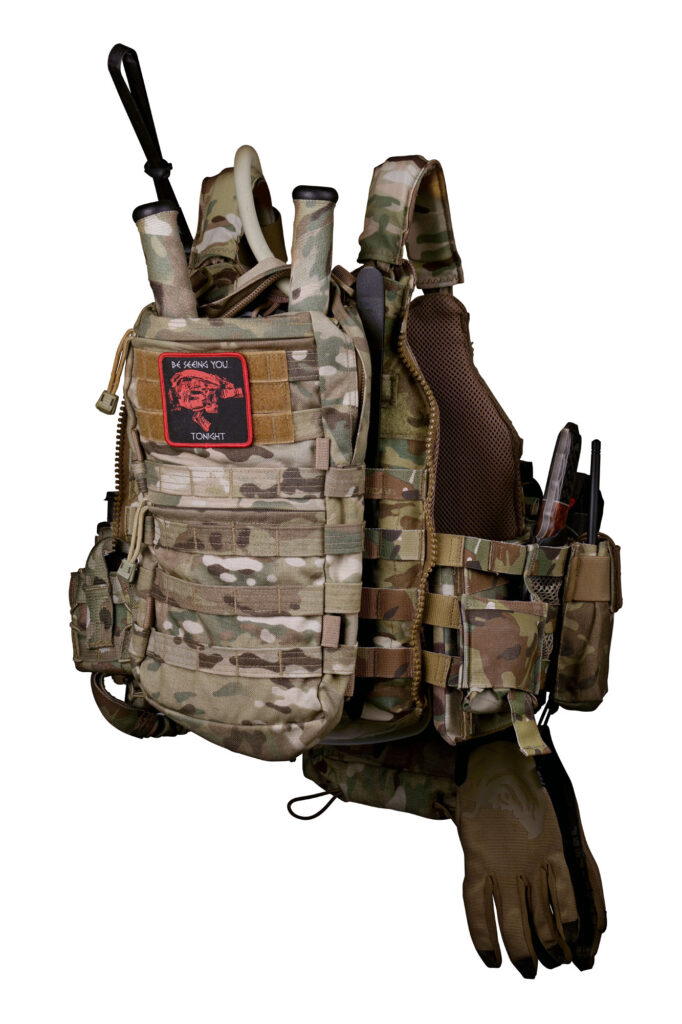
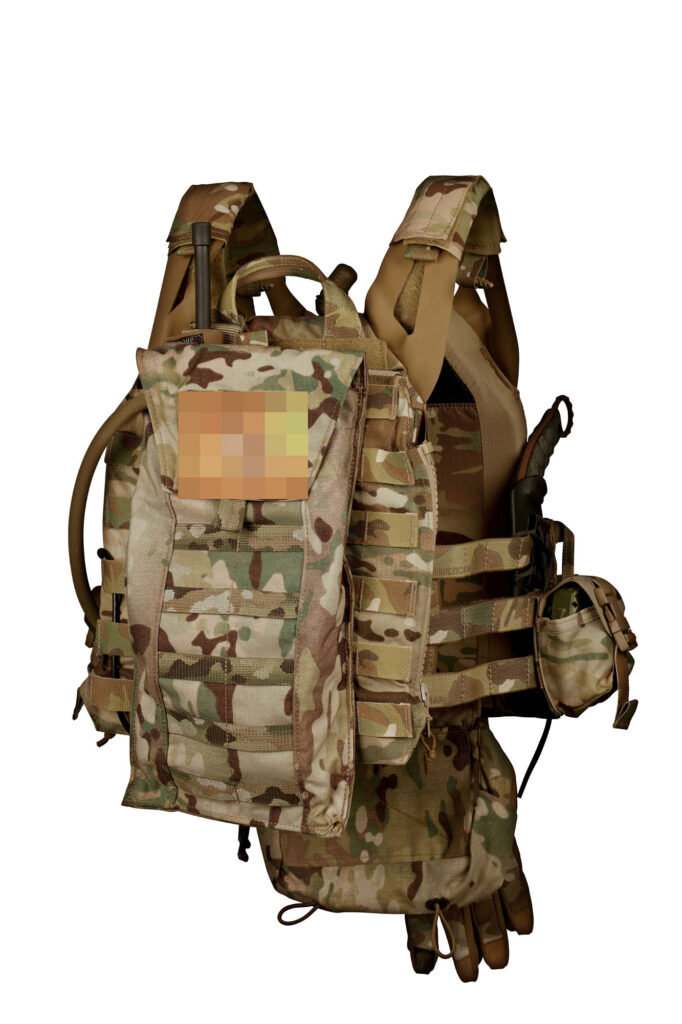
PLATE CARRIER 3 – SOF
This carrier is set up for a military SOF mission where the operator will be hiking challenging terrain, at various altitudes, in extremely austere environments. The mission would be a long-range recce to conduct ISR (Intelligence, Surveillance, & Reconnaissance) or possibly a hit that requires a long patrol infil and exfil.
Regardless, the operator and his team will be in the field anywhere from two to four or more days and will be carrying all the necessary sustainment equipment for that sort of work (i.e. a 72 Hour Assault Pack or Ruck). Operations like this require extreme mobility. I cannot underscore enough the grueling nature of carrying a heavy ruck in shitty conditions, at altitude, in a non-permissive environment.
Ask any grunt and they will tell you all about the high suck-factor of this type of work. But, it needs to be done. Drones are cool, but they can’t tell us everything. There is still no substitute for boots on the ground providing HUMINT (Human Intelligence).
Depending on the mission (especially altitude), I may elect to forgo the protection offered to me by a plate carrier in favor of increased mobility and less fatigue. Mountainous terrain, altitude, and cold can smoke an Olympic athlete as quickly as oppressive heat and humidity.
But, if I am going to wear a carrier, I’m going to go for the lightest system that affords me the most mobility, stability, and flexibility. So, I turn to the Crye Precision JPC2.0 (Jumpable Plate Carrier). The JPC2.0 is the latest evolution of Crye’s most popular platform. It is one of the lightest, most scalable, and well thought out plate carriers on the market. Its skeletal design cummerbund and shoulder straps were a revolutionary paradigm shifts that offer weight savings and heat aspiration routes without compromising functionality. The JPC2.0 has become the unofficial go-to plate carrier for many in the special operations community.
I almost always try to back my plates with soft armor for increased protection and comfort. But, there are no absolutes, so I adapt my philosophies to the mission. In this case, I am looking to shave every ounce I possibly can. The arduous task of simply getting to and from the mission can be just as dangerous as the actions on the objective due to the shear physicality of the trek.
So in this instance, I will leave out plate backers and rely solely on the Velocity Systems API-BZ Multi-Hit Standalone Rifle Plates. They offer me the highest protection level for the lowest weight. I will also sacrifice side coverage by leaving behind soft armor and side plates. This affords me more weight savings, highly increased comfort while wearing a ruck with waist straps, increased airflow through the skeletal cummerbund (important in extreme heat/humidity) and lower profile (important when worn over multiple layers in cold temperatures). The ultra-flat shoulder strap design is one of the best I’ve worn when used in conjunction with a heavy ruck.
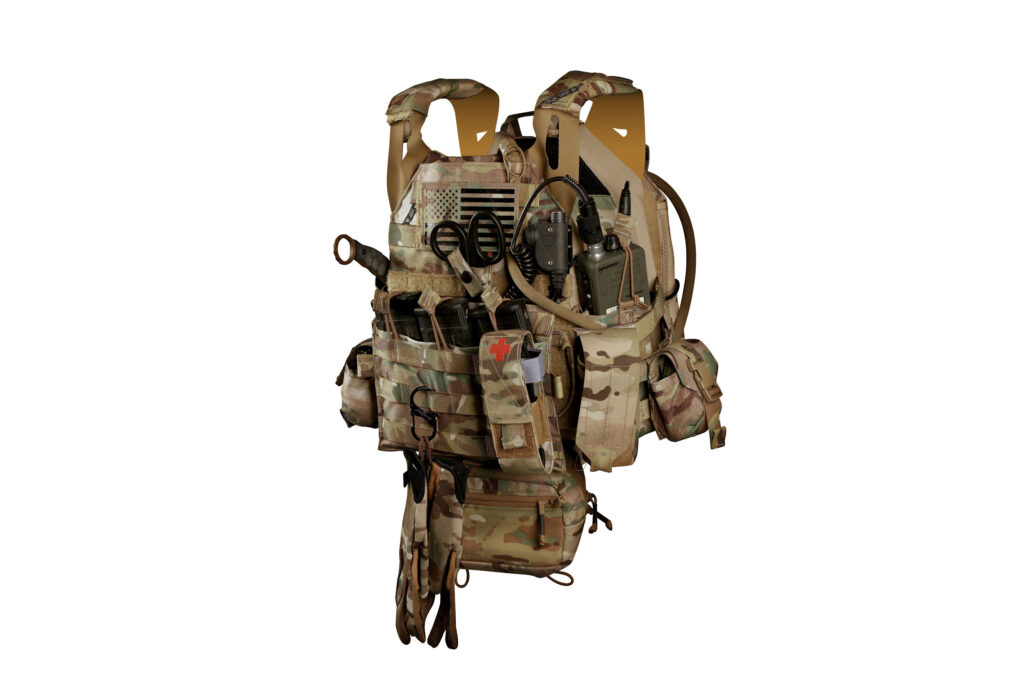
Sticking to my primary items, I have direct ambidextrous access to my rifle mags, tourniquet, and PTT. I’ve rigged my JPC2.0 with the Crye Precision AVS Detachable Flap M4 Flat. The plate carrier does not come with a front cummerbund flap. Rather, Crye offers several modular variants that will allow user preference customization across the JPC2.0 and AVS line. I tend to prefer covered mag pouches. They limit snagging and loss of gear due to environmental interference. You may be surprised at how much gear can be picked out of your pockets and pouches by dense foliage and rough terrain. For this reason, I like secondary retention of items on my person (flap covers, shock cord keepers, etc.) when going for long walks.
Compromises must always be made and in this case, I have decided to use open-top shock cord-kept mag pouches for the versatility offered. Being built in to the cummerbund flap, they save extra ounces from redundant fabric layering of a separate modular pouch. The flap is flat, keeping my mags close to my body and lowering my profile. And the front face features several rows of PALS for attaching small gear that would otherwise need to be mounted off center and become hindered by my pack straps.
My CAT tourniquet is stored in a Marz Tactical Tourniquet Pouch – MOLLE. Rather than use an open strap system like I would in an assaulter’s role, I prefer to keep as much of my gear covered as possible while in the field on recce. The Velcro-covered hooked Rod Locking Clip will attract every branch, leaf, and grass blade, so I want to limit its exposure as much as possible.
Right above the TQ is a Tactical Command Industries Alpha PTT for my radio. This is one of the most compact PTT’s I’ve ever used. It is lightweight, submersible, and weaves/hooks through PALS. The actual PTT button is located on the side, recessed in a raised pedestal that is very easy to find by feel with gloves. It is perfectly suited for edge-mount, leaving a clean launch pad for mags.
I intentionally leave the rest of the cummerbund flap PALS empty to provide as flat a surface as possible. Recce missions are going to require me to be prone or semi-prone for long amounts of time while observing a target or subject. I may take my helmet and pack off, but my plate carrier or chest rig stay on at all times. Slinging a pack on my shoulder and tossing a helmet on my head is quick. So, even though my ruck encourages me to keep pouches and items off my sides, I still don’t want to create a tactical shelf over my gut.
The TQ will smoosh down under my weight. I also have a small #3 or #4 locking S-Biner from Nite Ize. These things are awesome for chemlight bundles, but in this case, I’m going to reserve it for my gloves when they are not on my hands. Whenever possible, I try to not wear gloves or at the most, use thin tactical gloves.
My favorite are the SKD Tactical PIG FDT Delta’s. I’ll sometimes layer gloves if we are walking for a while and I need to keep my hands out of my hand-warmer and on my weapon. When gloves aren’t on my hands, they hang on the S-Biner. Nite Ize has a very simple locking mechanism that keeps the clasp from inadvertently opening and losing my gear.
Behind my mags is my large trauma shears, secured by the now-familiar RE Factor Trauma Shear Holster. I have a large 3×5” Infrared Reflective Flag Patch from Perroz Designs on my chest. This patch features a laser cut relief of the U.S. Flag (but can be made in your good-guy flag of choice) in Multicam nylon, and backed by IR reflective nylon. This allows me to keep a low profile compared to traditional IR patches that are covered in a shiny reflective material.
Like my assaulter’s kit, the large flag patch conceals local E&E currency and Blast Gauge. The small, built-in admin pocket at the top of the JPC2.0 is low profile and out of the way. Since it’s built into my plate carrier, it cannot block mag access, so I use it hold 4” Infrared Chemlights. They stay upright and accessible because I slide them into an EOG Mini Chemlight Holder that perfectly fits in the pocket and even adheres to the internal Velcro.
Dangling beneath my plate carrier is the Spiritus Systems SACK, holding a Rite in the Rain notepad and pen in the front pocket. The main compartment will contain a small handheld thermal imager or AN/PAS-29 ECOTI (Enhanced Clip-On Thermal Imager) for my night vision goggle.
While I may have room for other ancillary items, I will try to keep that pouches dedicated so I don’t end up spilling multiple items while trying to extract one. This is an important rule of thumb about GP pouches. Anything you put in them needs to be secured and organized. Having a yard sale of gear because you’re trying to dig something out of a GP pouch is stupid.
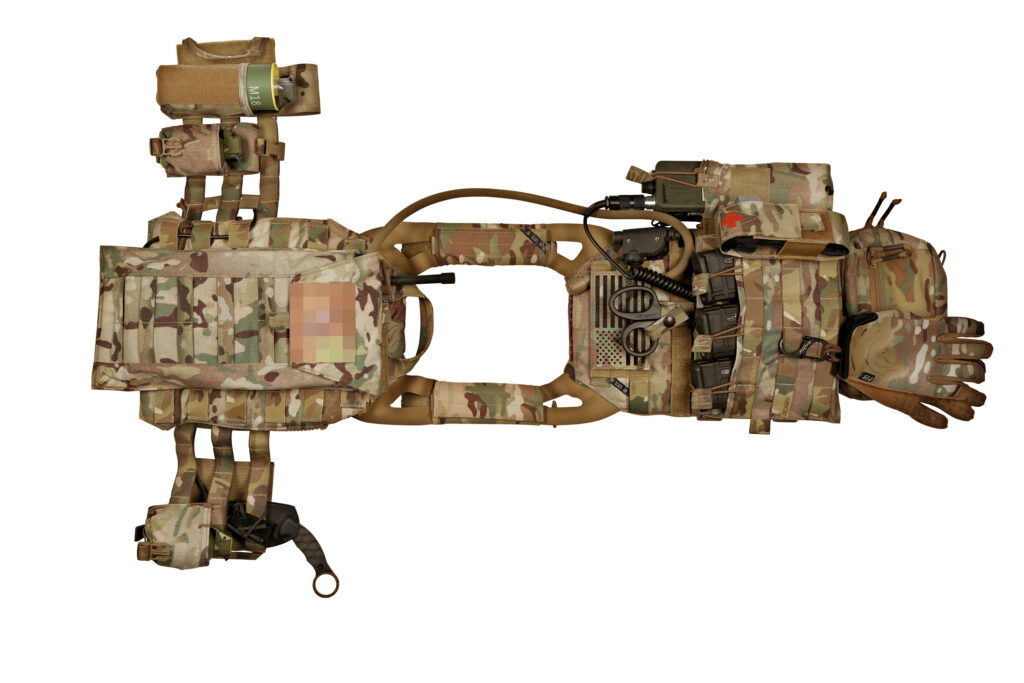
Immediately to the right of the cummerbund flap is a BFG Single Frag Grenade Pouch. Again, Helium Whisper is the strongest and lightest material for this sort of work. I keep this pouch up front on the PC for a few reasons. First, when it’s time to frag-the-fuck-out, I want ready access to one.
Next, it’s not on my side, so it will not interfere with ruck straps. And finally, frags are round and will naturally protrude more than a flat object. Keeping them on my belt would make my waist thicker, impeding the waist strap of my ruck. I also like the design of this pouch in that they use a side release buckle to secure the flap. I hate snap closures on pouches. They wear out and quickly offer no security. SR buckles require a deliberate action to open. And there are few things on God’s green earth that should require more of a deliberate action to initiate than preparing to throw a bomb.
Directly behind the frag, mounted to the inside PALS on the cummerbund, is a Half Face Blades Combat Karambit with sheath secured via clip and 550 cord. If you’re going to carry a fighting blade, it should be a blade worth carrying.
Immediately to the left of the cummerbund flap is a BFG Single Smoke Grenade Pouch. Ready access to smoke is important, but hanging munitions off your kit via their spoon is a sure way to lose your shit. Following the theme of keeping things contained, I keep my smoke contained in a Velcro flap-covered pouch.
This Helium Whisper pouch both feels different than the Cordura nylon TQ pouch next to it, and has a different type of pull tab. This makes it harder to accidentally open the wrong pouch even though they are right next to each other. Directly to the left of the smoke pouch is another BFG frag pouch. If the situation requires me to throw one frag, odds are that I’ll probably need to throw a second. So, having easy access to two is a good idea. As mentioned, tactile feel of pouches is important. The frag pouch’s SR buckle requires a more deliberate action than the simple Velcro closure on the smoke.
Immediately behind the smoke and frag is my radio in a Crye Precision JPC2.0 MBITR Radio Pouch. This pouch simply attaches via Velcro under the cummerbund and hangs off the side. It is held against my body by the skeletal cummerbund over the front and allows me to keep my radio off my shooting side but still have easy access to the controls from the top.
As always, I make amble use of the kangaroo pocket behind the front cummerbund flap, to store all the excess cable. The AN/PRC-152’s antenna is mounted on my back via the Tactical Command Industries MAST, keeping it completely out of the way of pack straps, slings, etc.
The MAST relocates the antenna out of the way. I route the MAST extension cable through the skeletal cummerbund to keep it secure and make use of the Crye Precision MOLLE Zip-On Panel 2.0 on the back of my JPC. Basically, this is a flat panel of material that provides a clean PALS/MOLLE surface on the back of the plate carrier. I use this to cover up the excess antenna cable and cummerbund attachment points.
Directly on the center of the back panel is a Tactical Tailor Fight Light 2 Liter Hydration Carrier. It is thin and very low profile; providing no interference with my pack. I actually prefer a water reservoir and straw during recce missions due to the ease from which I can access water while on the move.
Hiking rough terrain is no time to try and tilt my head back and drink from a water bottle. I can barely do this while walking on a sidewalk, let alone while carrying 100-plus pounds in a combat zone on a 60 degree hill with no footing. Hydro reservoirs are good because they allow me to safely and comfortably drink on the move. I’ve got the drinking tube routed under my arm and through the PALS webbing on my chest to keep it out of the way of pack straps.
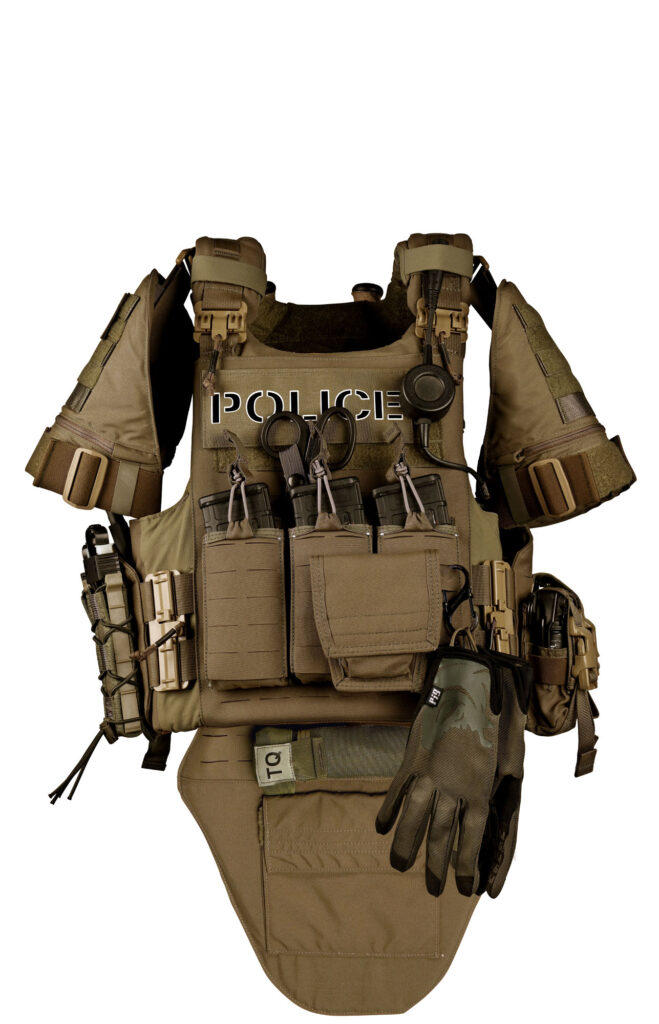
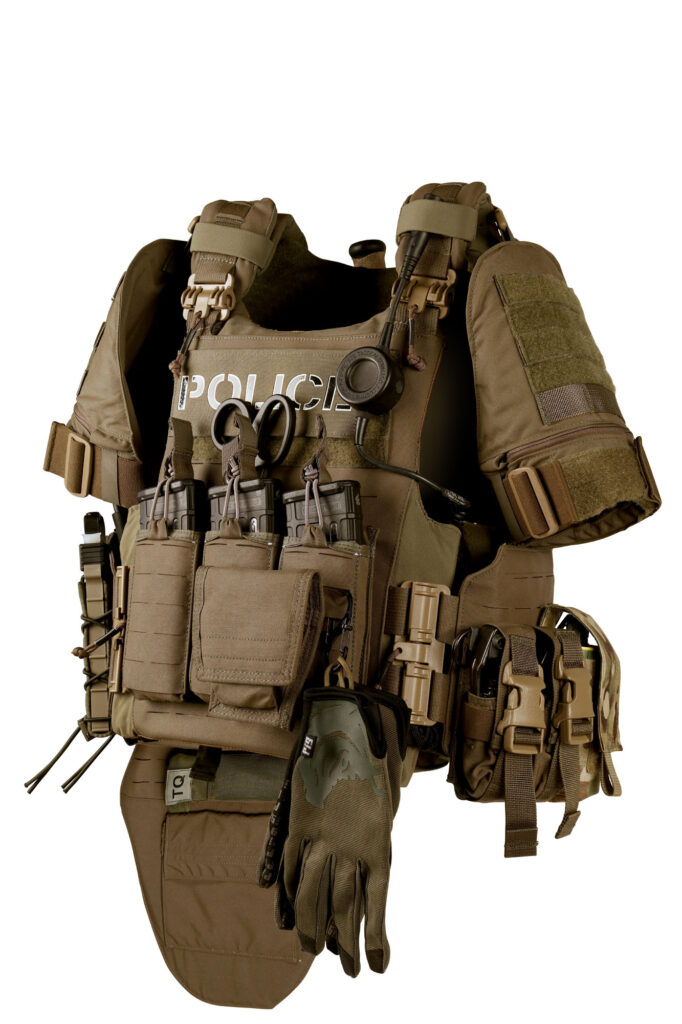
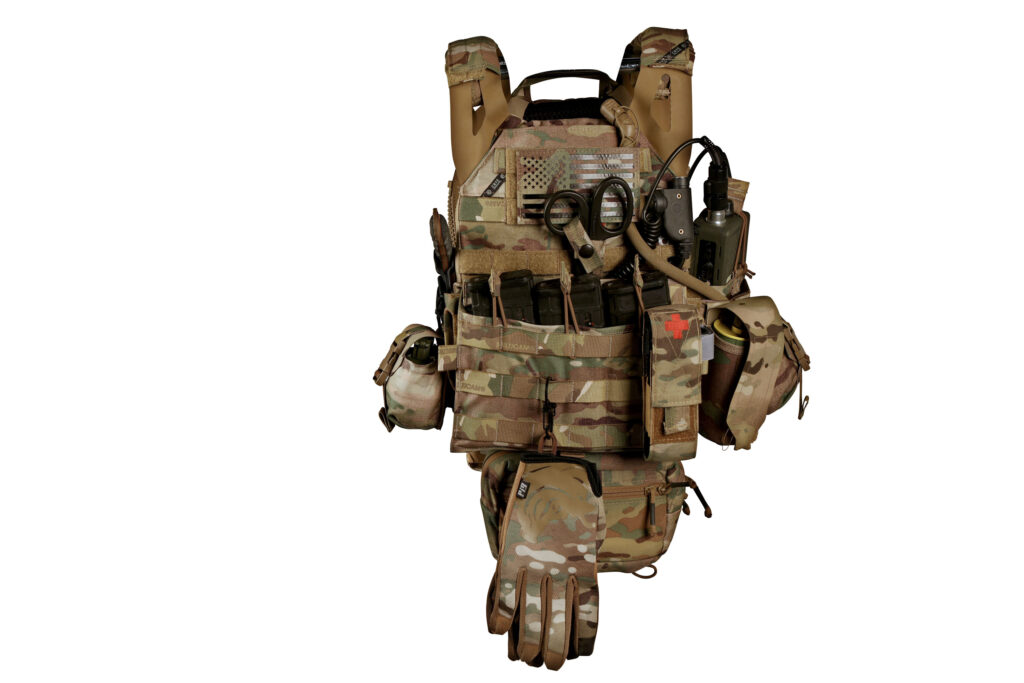
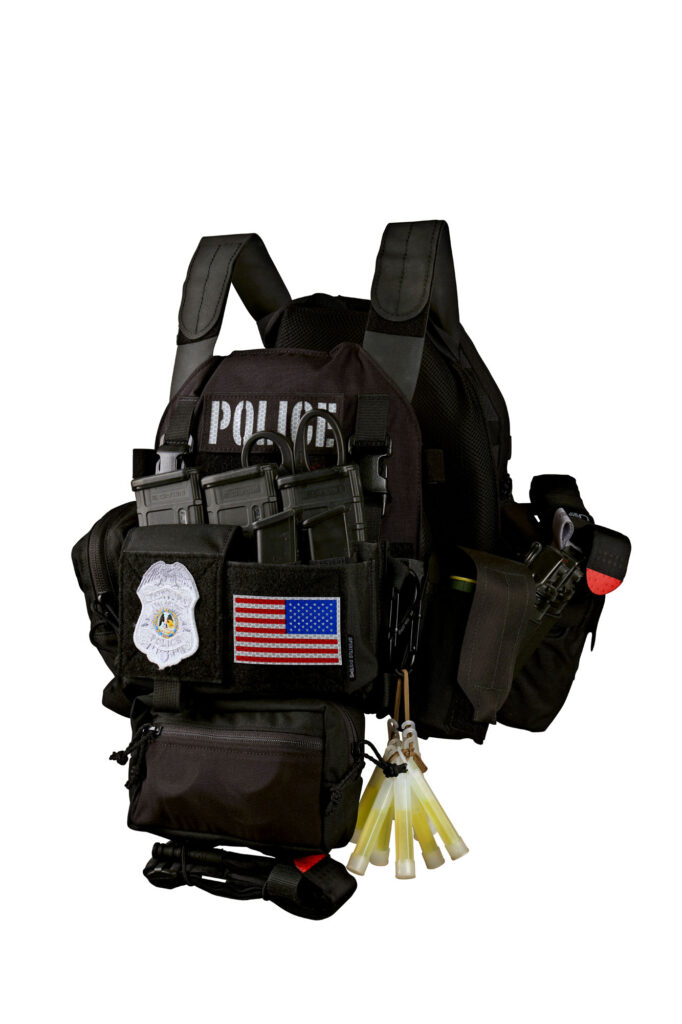
PLATE CARRIER 4 – LEO
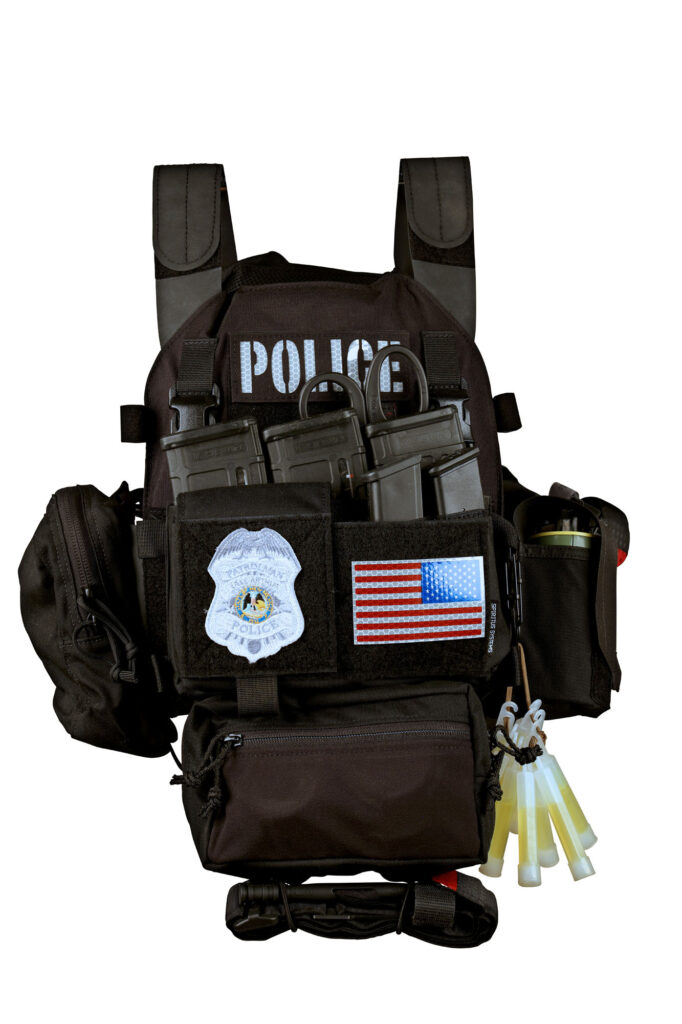
The last plate carrier is designed for a domestic LEO as an active shooter/terrorist response kit. Let’s face it: the threats our brothers in blue need to protect us from are growing at an exponential rate. It doesn’t matter if the shooter is some foreign fighter yelling “Aloha Snackbar,” or some suburban pansy that can’t cope with the world anymore.
Cops need to prepare for the fight of their lives. A lot of tactical gear companies’ solutions to active shooter gear involve some sort of “go bag” or “ready bag” concept that usually involves some sort of repurposed hipster man-bag with mag pouches slung over the officer’s shoulder. That is stupid.
The first responders on scene are going to be patrol officers. If some of those officers are on the SWAT team, cool; they can don their SWAT kit. But, more of the officers are probably going to be patrol and traffic. Either way, they need to grab their kit and move towards the gunfire. If that’s me, I don’t want to grab a rifle and a purse to head into a fight with a suspect(s) armed with rifles. Why the hell would I want a sling bag sliding all over the damn place, full of gear in a giant compartment that will not allow me to find what I need? I want a plate carrier.
The responding officer is already wearing his/her patrol uniform and duty belt. 99% of the time, they will have all the tools they need to do their job on their duty belt and/or soft armor carrier. Knowing this, the items on a critical response plate carrier need to augment and work in conjunction with the duty gear. This PC needs to provide the officer all of the gear he/she needs to win the fight and begin rendering aid to casualties (after the threat is neutralized). It also needs to contain gear that will sustain the officer for hours during ongoing sweep/clear.
For this mission, I use a Perroz Designs LPSPC (Low Profile Slick Plate Carrier). Designed and built by an innovative company in Toronto, Canada, The LPSPC is one of the lightest, most versatile carriers I’ve ever worn. Perroz Designs’ innovative use of materials allows this carrier to be low profile enough for concealment under clothing (button down shirts, jackets, etc – basically great for PSD work), or decked out for assault roles. Even fully kitted, the LPSPC will take up minimal space in a trunk.
One of the main things I look for in a PC from which to build a critical response rig is low profile. The officer is already wearing a uniform shirt over a concealable IIIA soft armor vest, or an outer soft armor carrier. While fine for pistol threats, these vests won’t do shit against a rifle.
Any plate carrier worn over this duty gear needs to be as low profile as possible. The act of wearing a vest over a vest is already going to add unwanted girth. Perroz uses an ultra-thin High Abrasion Neoprene Kevlar (HANK) material for the cummerbund. It is as thin as they come, yet incredibly strong.
The shoulder straps are constructed out of the same material, so they won’t add thickness to the vest underneath. The officer simply throws the LPSPC over their head, re-clips their radio mic from their shirt to the front of the PC, fastens the cummerbund, and is off to the fight.
I’ve installed Grey Ghost Gear Level IV Plates in the carrier. In conjunction with the already worn soft armor, a Patrol Officer will have a lot of protection with these plates. I chose these plates because of their high protection level and very affordable cost. Most patrol officers will be buying their critical incident plate carriers and armor out of their own pockets.
While the afore-mentioned Velocity Systems plates are lighter, thinner, etc, they are made for special operations units with special operations budgets. Their $1,175/each retail price tag is spendy. These Grey Ghost plates come in at $210/ea for Level IV protection.
Following my rules, I have rifle mags, tourniquet, and radio mic up front and easily accessed. If you are not familiar with the Spiritus Systems Micro Fight Chest Rig, shame on you. It is the most modular and scalable chest rig on the market. Why use a chest rig with dedicated pouches, designed for crap you probably aren’t carrying? The Micro Fight is by far, my favorite chest rig on the market.
In this case, I’ve taken the base Micro Chassis MK3 and attached it via side release buckles to the front of the LPSPC to form a cummerbund flap. I’ve installed the Spiritus Systems Micro Fight 5.56 Rifle Magazine Insert so I can carry three AR15 mags. The insert is made out of heavy duty elastic, so mag retention is via friction fit and is held very securely. While I normally want some sort of secondary retention, this mission does not require it.
I’ve partitioned the front pocket with the Micro Fight Half Flap. This creates a pocket for carrying an extra set of handcuffs. The open side of the front pocket contains a Micro Fight Pistol Magazine Insert that holds two more pistol reloads. The pistol mags sit low enough compared to the rifle mags behind them.
Earlier I said I don’t like stacking pouches over pouches. But, this mission requires the plate carrier to work over already worn duty gear. The added girth of the carrier may impede access to belt-mounted pistol mags. Or, some smaller officers may have pistol mags mounted on an outer armor carrier vest.
Any gear worn on an outer carrier needs to either have a home for a fast reposition on the plate carrier, or be able to be covered up and not needed in the fight. This includes Tasers and mags. If you keep your Taser on an outer carrier, you better have a holster for it on your critical response plate carrier. You won’t be able to access it otherwise.
Directly behind the Micro Fight is a set of Trauma Shears in an RE Factor holster and a Perroz Designs 3M SOLAS Reflective patch. The name of the game is high visibility Identification. There are going to be lots of panicked civilians running around.
They need to clearly ID you so they know to listen to your instructions. As mentioned before, peoples’ minds don’t always read words when they are terrified. I recommend a bright full color reflective flag patch alongside an easily seen LE badge patch. These symbols will resonate with civilians and fellow officers during massive adrenalin dumps.
Below the Micro Fight is the Spiritus Systems SACK. This is my marking pouch. It is dedicated for materials I will use to communicate my location and/or danger areas. The front zipper pocket contains Cyalume Adhesive-Backed Light Shapes. These are like chemlights, but are large flat shapes with an adhesive back. Once activated, they can be stuck on doors, walls, etc. to indicate cleared areas, direction of travel, devices, or anything your department puts in the SOP.
The main compartment contains a fat permanent marker, and rubber door stops. I can use the stops to pin doors open, creating an egress path, or pin doors closed to create a strong point. Hanging off the bottom of the SACK (seriously! Phrasing!), is my CAT tourniquet, secured by shock cord.
I know I said I hated general purpose pouches. But in this case, it is necessary. One of my SOF veteran brothers, Don Edwards (greenlinetactical.com), used to be an instructor at FLETC and has some great ideas about sustainment materials for critical response situations. I took his advice and added this kit to my active shooter plate carrier. I’ve placed a BFG Medium Vertical Utility Pouch directly to the right of my front plate. This placement still allows easy access to the pistol on the duty belt. This pouch is for sustainment in the fight.
While the operator has the luxury or being able to be dressed for combat and carry his gear across his entire body, the LEO is dressed as a peace officer. Most cops are still required to wear the polyester “Officer Friendly” uniform. So, their critical response plate carrier better carry everything they need for sustained combat. Situations develop rapidly and could drag on for hours. If you’re one of the first on scene, you may be pulling inner perimeter security or part of a search team. It could be hours before the scene is code4, and you can’t just pause for lunch or pack it in because your shift ended 45 minutes ago. You’re there until the job is done.
My sustainment pouch is going to hold two bottles of water (thick bottles – not those cheap ass save-the-planet thin crinkly bottles that will break and soak me). I also have four SOFLETE Pre-Workout QuickStix for my water. This stuff provides a natural energy boost that doesn’t make me jittery and crash, or increase my heart rate and blood pressure like caffeine.
I also keep two Kirkland Signature (Costco Brand) Protein Bars in this pouch. These bars act as meal replacement, and have one of the best protein/carb/fiber ratios on the market. They are also very low in sugar, so I won’t get the drowsy effects. Lastly, a small bottle of Motrin with sound-deadening cotton balls will keep aching joints, muscles, and head at bay. A BFG Ten Speed Ultralight Dump Pouch sits right next to the GP pouch for collecting SSE items.
I keep a bundle of ten bright green Cyalume MILSPEC 4” Chemlights on 550 cord, hanging from a Nite Ize Locking S-Biner to the direct left of my mags. Normally, I don’t want large, bright, chems for tactical operations. But, active shooter situations require bright, clear marking for follow-on officers to follow, provide civilians a safe, marked exit route. Running gutted 550 cord through the hole at the top of a chemlight will allow it to be pulled away, breaking the plastic ring, and left behind.
Directly to the left of the plate is a BFG Single Smoke Grenade Pouch. Responding officers should have smokes for use in covering approaches or escape angles for civilians. A BFG Ten-Speed Double M4 Mag Pouch is next to the smoke and would hold two flashbangs.
Moving towards the back of the carrier, I have a BFG Trauma Kit NOW. This is another great invention from BFG. While I normally advocate wearing an IFAK on the belt, most cops are not going to be able to wear a full IFAK on their duty belt. Even though it is mounted behind the officer, a quick tug can remove the fold-up card that holds the contents and brought around front for rapid access. I have another CAT tourniquet strapped to the top of it.
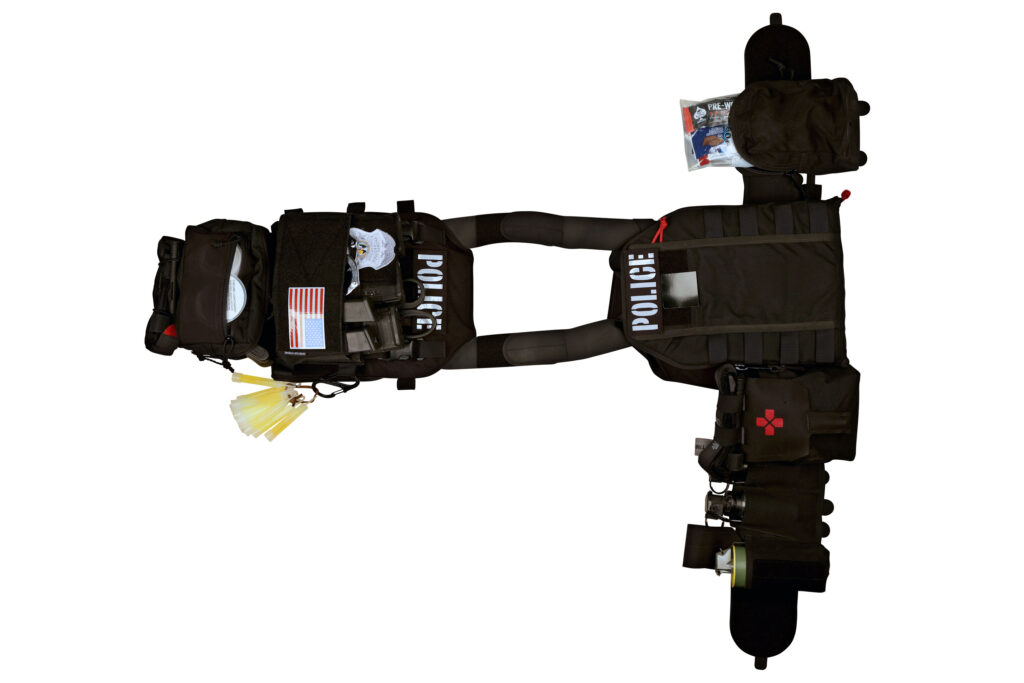
Rounding out this plate carrier, is an RE Factor Tactical Aggressor pack. I have lashed it to the back of the LPSPC so the full kit can be thrown on as a single system. The Aggressor is a plate-sized, very thin, deployable pack. It has pull-tabs on top and bottom for removing the internal fold-open card, which has loops and pockets for storing all sorts of gear. In this case, I’m carrying extra, more comprehensive IFAK supplies.
The mission should always drive your gear setup. There is no single configuration that will be all things to all users for all applications. But, I have found that my fundamental principal of primary and tertiary gear hierarchy can be applied to just about any plate carrier build for most mission profiles. That said, professional warriors should not rely on a single plate carrier for every mission.
While manufacturers have recognized this and started developing scalable platforms with “mission configurable” structural components, the reality is that you’re not going to rebuild your PC before every mission. Invest in different plate carriers for different types of missions. Even if you like a specific system because it can be configured in multiple ways, buy multiples of the same carrier and preset them in the configurations that will work for your different missions. You can easily enough transfer the contents of one carrier to another before a planned mission. Or, you can simply stock each of the carriers for “grab and go” (the smart kids will do this).
It is vital to remember that the number one reason you wear a plate carrier is because you expect to encounter gunfire and explosives on a two-way range. And chances are pretty high that if you’re in the presence of said projectiles, you are returning the favor downrange – meaning you are there to fight. Nothing is more important in a gunfight than winning. So make sure you are ahead of the power curve by setting up your gear for success.
Don’t just buy pouches and place them on your plate carrier because you saw a picture on Instagram. Always keep your mission in mind and set your gear up thoughtfully and purposefully. And for the love of God: adjust your carrier so it fits properly. The Top plate edge should be at your collarbone, not your nipples! Afterwards, train with it. The best litmus for testing your gear setup is to train at night. Darkness shrinks our world tremendously, causing us to use feel and tactile response to find stuff on our person. If you can effectively feed your guns, move quietly through various obstacles, and operate your comms in the dark, you will have no problem during the day.
Text by Charles “Chip” Lasky and images by Jerry Tsai.