Optimizing Your Primary Weapon System
If you’ve been reading UN12 since the beginning, you have probably figured out that I’m a bit of a gear guy. This started back in my team days and persists to present. I’ve always been fascinated with the toys of the trade. In fact, I have to admit: One of the reasons I chose the career path I did was because the cool guys get to play with the cool toys. We all know that personal drive, teamwork, and training are what counts in the fight.
But when your gear is properly chosen and set up for the mission, you’re putting yourself ahead of the power curve. I’m not writing about training in these pages. There are plenty of great instructors and schools out there. What I can do is to help you set up your gear for success so you can perform your job better.
Previously, I’ve covered a lot of wearable gear. This time I’m going to discuss setting up a rifle for work. By “work,” I mean for the job of a professional gunfighter. These weapon systems are going to allow the operator to work day or night, with or without night vision goggles. This means lights, lasers, the works. If you’re going to sit here and whine “nobody needs all that crap on their gun,” then you are not a professional gunfighter and should flip past this article.

The AR-15 platform is the most common rifle system in use by military and police units. There are endless variations and countless possibilities for setups. The makeup of the weapon in and of itself has tons of variables. I’m not discussing rifle brands. Soldiers are issued what they are issued. But law enforcement officers sometimes have leeway in what they carry. Many departments have policies that allow officers to carry personally owned weapons on duty. If you work for one of these departments, you need to listen to what I am going to say.
There will come a time when your life, and the lives of the public, will depend on your weapon. It better be built for no-fail. “No-fail” does not include $500 cheapo or no-name/fly-by-night manufacturers found at the general store. “No-fail” does not include Frankenguns cobbled together by you, on your workbench, after you watched a YouTube DIY video, and bought no-name parts from some faceless warehouse company during a Father’s Day sale. “No-fail” also does not include Frankenguns cobbled together by your buddy who fancies himself a gunsmith. The rifle you take to work needs to have been built by a professional, for a professional.

There are several factors to take into consideration when selecting a rifle for the job. Outside of Semi-Automatic Sniper Systems, the AR can be broken down into a four main types:
1. Carbine. Carbines are going to be 14.5- to 16-inch guns. They are going to have either carbine or mid-length gas systems. The carbine is the most common type of AR found in professional service, and can be employed in ranged engagements or CQB.

2. SHORT BARREL RIFLE (SBR). SBRs are going to be 10.5- to 13-inch guns. They most commonly have carbine-length gas systems (although some companies can build them with mid-length gas systems). The SBR is generally used for shorter range work (under 300 meters), but can be stretched out further in a pinch. More compact than a typical carbine, an SBR is more maneuverable in smaller spaces and is ideal for CQB and working around vehicles.
3. PERSONAL DEFENSE WEAPON (PDW). A PDW is an ultra-compact package that’s ideal for concealment. It will generally have a barrel length between 6 and 9 inches. Operators will generally use PDWs in non-permissive environments where they are working out of uniform and need to blend in. They can be carried in backpacks and satchels so as to not draw attention. PDWs provide more firepower than a pistol and are often used for close protection details and surveillance operations.
4. RECCE. Recce rifles (sometimes called Special Purpose Rifles) are carbines or rifles that are fitted with low- or high-power variable optics. They are designed to provide intermediate to long-range target engagement capability. A recce rifle is usually going to have a 14.5- to 20-inch barrel and should have a 1:7 or 1:8 twist to help stabilize heavier bullets. Recce platforms can easily reach out from 500 to 1,000 meters and beyond, even with a 5.56x45mm round.
Choosing the right tool for the job is paramount. Sure, little PDWs look sexy as hell. But if you’re a deputy or SWAT officer in a rural community, that little 7-inch barrel is a poor choice. Likewise, clearing a double-wide meth lab with an 18-inch-barreled recce rifle is going to present some challenges. Regardless of the platform type, there are certain mission-critical tools that work guns need to have in order to do the job. These include optics, lights, and lasers.

There are numerous manufacturers of these devices. Some are great. Some are okay. Some are complete shit. Suffice to say, that $100 red dot at the local gun store has no place on a work gun. I don’t care if you make $30K because you’re two years on the job in a small department and just got on SRT. Don’t go to the bars for a couple months and buy some solid kit that will save your life. Don’t show up to rescue my friends or family with a Cracker Jack box optic and laser that won’t hold zero.
Here, I’m going to show four different rifles, representing the four different types mentioned above. They will be set up with commonly used, high-quality lights and lasers. I am going to demonstrate how different-length guns can still effectively be put together with all the necessary tools for the modern professional gunfighter. These setups will be optimized for combat use.
Full disclosure: I work for Unity Tactical. Unity develops integration solutions for weapons and gear. Some of the products I am going to show and recommend are made by Unity Tactical. I approached this article with some hesitancy because I did not want to come across as a shill, shamelessly plugging my own products. Please note that this information is based on my opinions and recommendations as a former operator. Some of the products featured are made by Unity. Some of them are made by Unity’s competitors. My company’s products are not always going to be the best choice. Sometimes they will be.
“Rail estate” is always at a premium. There are several rules I abide by when setting up a rifle. I keep these rules in mind when assembling a work gun as they are going to dramatically affect the performance capability of the weapon.
- Have complete control over all functions of the weapon, including fire control group, optics, lights, lasers, activation switches. You are the master of your weapon and shouldn’t need to work hard to operate it. Controls, be they safeties, bolt releases, charging handles, magazine releases, weapon light click caps, or pressure switches, should be thoughtfully placed so they can be consistently actuated under stress.
- Every interface with the weapon system must require a deliberate action.This is just as important when activating lights and lasers as it is for working the safety and pressing the trigger. An accidental discharge of white light or laser may not be immediately deadly like a negligent discharge. But it can draw attention to you and your team, inviting enemy fire and compromising the mission. In other words, light/laser controls should not be placed exactly where the support hand will grip the weapon. The firing grip should not need to be broken, but a slight, deliberate movement to actuate the controls must be a requirement.
- Take into consideration various shooting positions and conditions when placing controls.Essentially, you should be able to operate your weapon system ambidextrously. Now, I have never, ever, switched shoulders in a gunfight or while clearing structures and reducing rooms. I do not advocate it because you will not be nearly as stable/accurate shooting off your non-dominant shoulder. However, I will switch shoulders to post up on a barricade or corner while my guys are wrapping up things behind me. During those ten seconds I may need to engage threats, which means I better be able to operate my light and laser in that position.
- Build redundancy into the system.I see a lot of professionals show up at my classes with guns that have one optical sighting system. When questioned, they often say their laser is their backup. I don’t like this trend. I don’t want to be relying strictly on electronic devices to aim my weapon. Why? Historically, lasers will fail faster or more often than red dot sights. And if my red dot goes down, I don’t want to rely solely on a downrange-visible sighting system. It points both ways. And lastly, not all lasers perform on-demand in all conditions. Even high-quality lasers can have a lot of trouble in extreme cold (intermittent operability or downright failure to work). This should be a concern for any cop or warfighter who is stationed in, deployed to, or working in cold climates.
- Mount lights and lasers appropriately.There’s a lot of arguments about light/laser placement. I’m in the camp of placing them as far forward as possible. I don’t want anything in front of my light and laser emitters if I can help it. Any potential blockage of the emitter can cause the device to bloom in my vision, my team’s vision, or my aerial support’s vision. I want my laser on top of my rail, as far forward as it will go. This gives me access to the onboard fire button if needed, and means that I really only need to worry about height over bore with a converging zero. I also want to attempt to get my light above bore. This helps place the dark “Pac Man” mouth of light, created by the barrel or suppressor, at the bottom of the circle. It also helps me clear the light when I shoot from a barricade.
- Use a good two-point sling.If you are using a single-point sling, you better be running an MP5K. If you are using a three-point sling, you better be running an MP5. The bottom line is two-point slings allow you to create a more stable shooting platform. They allow you to securely sling the weapon while roping or rappelling, or going hands-on with a suspect.
These rules should be used as guidelines for setting up your work gun for success.
Carbine
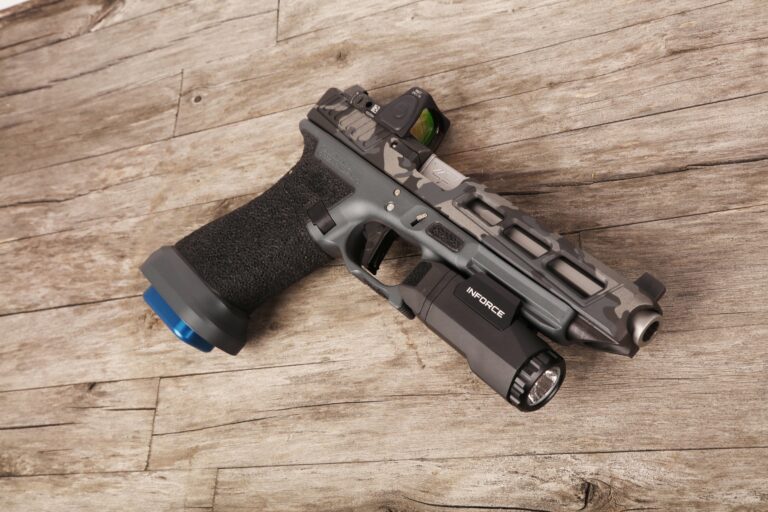
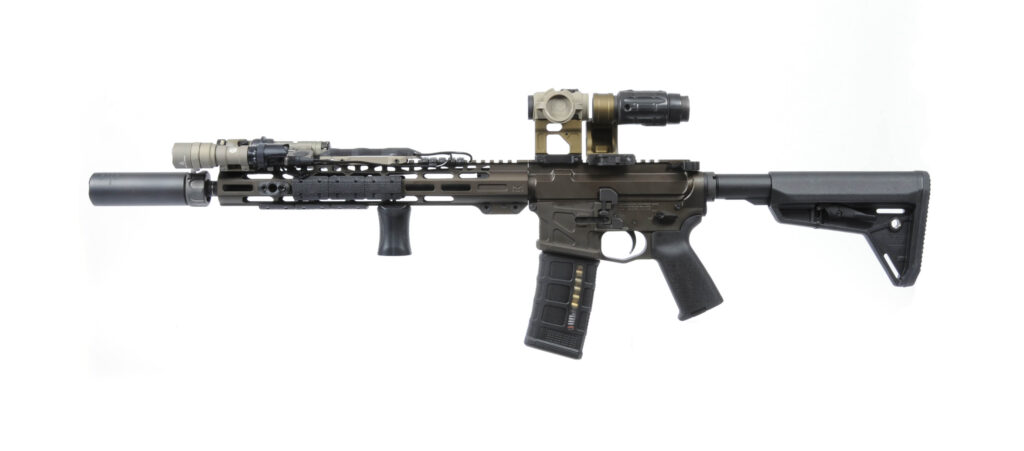
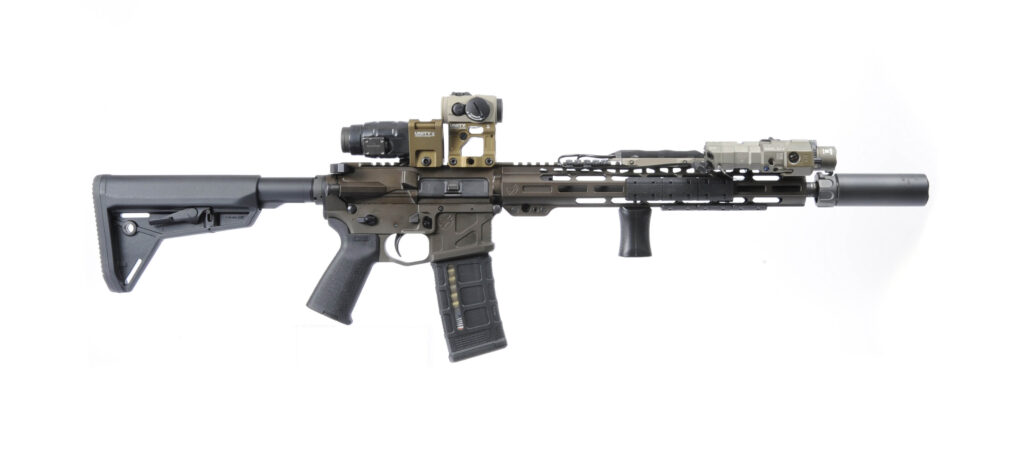
This 16-inch carbine is built on an American Defense Manufacturing UIC (Universal Improved Carbine). Right off the bat, it possesses a truly ambidextrous lower receiver that checks one of my boxes with an integral feature. This gun has a full length free float MLOK rail handguard. A professional’s rifle needs to have a free floating handguard system. We mount laser aiming devices to these handguards. Once zeroed, we cannot afford for them to move. MLOK has proven to be the winner in the next generation modular rail system wars. It is stronger than KeyMOD and lighter than M1913 Picatinny.
I’ve upgraded this carbine from stock configuration with the addition of a Geissele Automatics SSA Trigger and Surefire Warcomp. There are many great triggers on the market, but there is a reason why operators at the tippy tip of the spear choose Geissele triggers. The Warcomp allows for attachment of QD Surefire SOCOM2 Suppressors. A work gun should have the option of running suppressed.
This carbine is configured with everything needed to fight: light, laser, and optics. The laser is a B.E. Meyers MAWL. Its unique shape provides excellent access to onboard fire buttons. Immediately in front of it is a Unity Tactical FUSION Micro Hub 2.0 with FUSION Front Sight. This assembly provides a direct mount solution for the Surefire M300C Scout Light. In this configuration, both light and laser are well above the bore. The M300C is fitted with a Surefire DS00 tail cap that features both an onboard click button and port for remote switch. This is key in that it allows easy, yet deliberate, activation of the light and laser with their onboard controls. Meanwhile, a TAPS Dual Pressure Switch is mounted directly behind the MAWL. The purpose of this is redundant access if I need to shoot with my opposite hand.
A 16” carbine could easily be set up with a red dot or low power variable optic scope. In this case, I have mounted the excellent Aimpoint Micro T2 and 3XMAG in Unity Tactical FAST mounts. I’m a huge proponent of pairing magnifiers with red dot optics. Gunfights can quickly transition from same-room/in-your-face, to outdoor/ranged engagements. Hell, a SWAT officer may need to take a 100+ yard shot across a grocery store or Walmart. Magnifiers are our friends. The FAST mount system raises the optics up to help clear comms headsets, gas masks, NVG’s, etc. The built in adjustable rear BUIS works in conjunction with the front sight at the end of the rail. In this configuration, this carbine is prepared for almost any scenario.
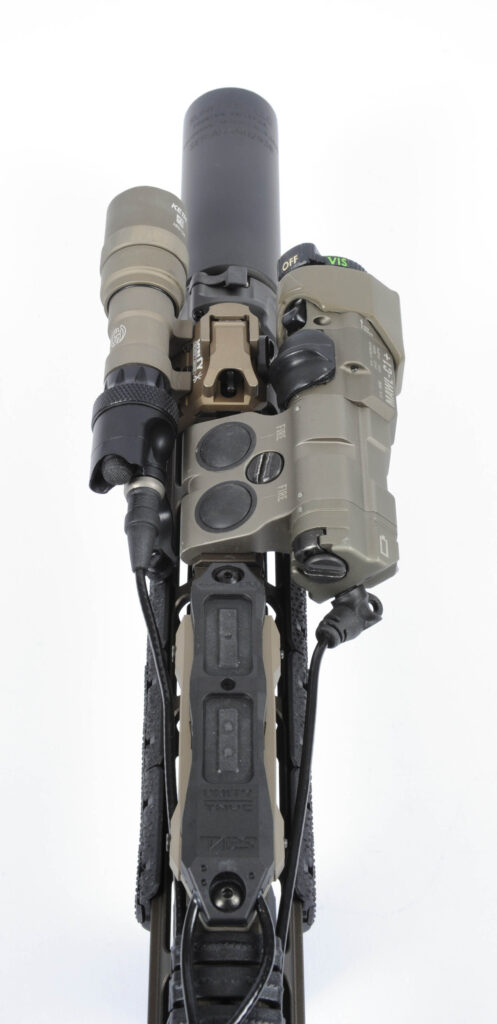
Carbine Detail 1
Mounting both light and laser above bore allows them to easily clear a barricade as long as the muzzle clears. The Micro Hub 2.0 acts as a low profile mount for the Scout Light while also providing a platform for the back up front sight.
Carbine Detail 2
Rail covers are more than just decoration. They help provide a repeatable grip index point. It’s important to use covers with aggressive texture as hands, gloves, and rails can become slick from the elements and blood. These Magpul M-LOK Rail Cover Type 2’s are some of my favorites. Besides having sharp texture, they have enough surface area to protect hands from the heat of a hot rifle.
Carbine Left
Red Dot sights should be accompanied by magnifiers. The fight can quickly move from 10 feet to 100+ yards. While a rifleman is certainly capable of hitting a target with a 1X sight at these distances, a critical shot calls for more accuracy. If a hostage-taker shot needs to be made across a grocery store or Walmart, you will need all the help you can get.
Carbine Right
Shorter “Mini” suppressors are great because of their size. However, they are best suited for standard length rifles and carbines. Professionals use suppressors. Period. Whether to mask your location, or help reduce hearing damage inside structures, professionals use suppressors. There is a time to not use cans, but if your team doesn’t have them, someone in your chain of command is either not doing their job by properly budgeting for and acquiring suppressors, or they are playing politics.
Carbine Top
This layout is the most optimized configuration when using a MAWL laser system. A right handed shooter can easily access light and laser controls by their onboard buttons. If shoulders are switched while posting security on a right side barricade, both light and laser are still 100% controlled by the TAPS dual pressure switch.
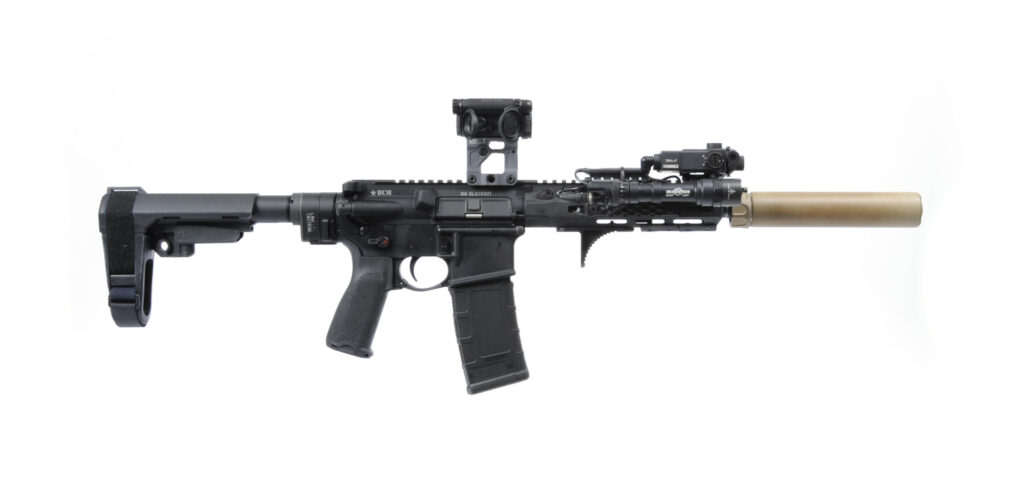
SBR
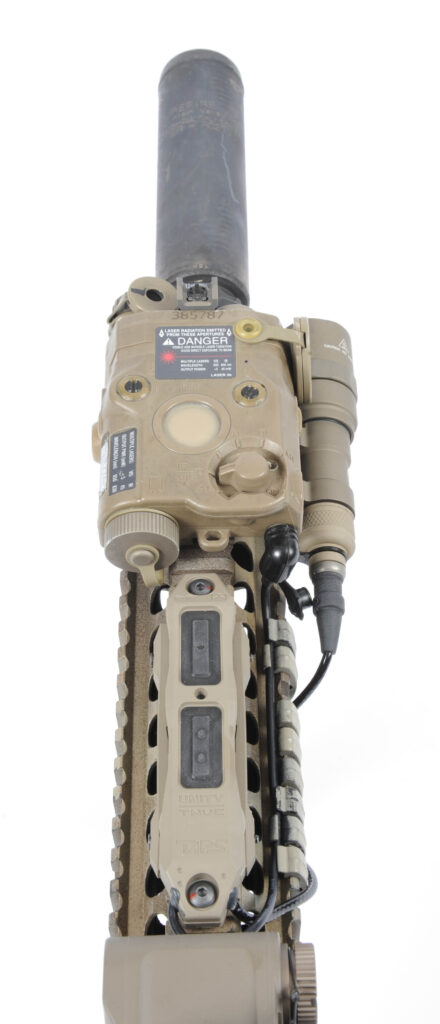
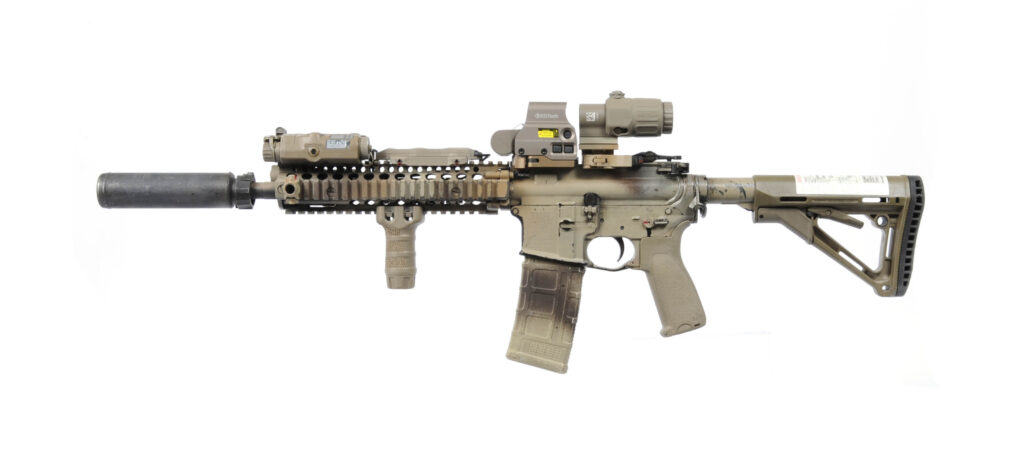
This SBR is somewhat patterned after the Mk18. While not as modern as some of the options, Mk18 type SBR’s are very popular for work guns. So, I wanted to demonstrate how a weapon like this can be optimized. This is a BCM4 Short Barrel Rifle. Bravo Company Manufacturing is well known for building some of the most reliable AR’s available. This one has an 11.5” barrel rather than the more traditional 10.3” found in issued Mk18’s. The reason is simple: 11.5” is the shortest barrel length for reliable performance when shooting a direct impingement gas system with a suppressor all the time. Like the previous carbine, this SBR is also upgraded with a Geissele SSA Trigger.
The free float hand guard is the SOCOM-issued Daniel Defense RIS II. This combat proven M1913 picatinny rail is fitted with a standard issue AN/PEQ-15 ATPIAL laser system. While older, the ATPIAL has an impressive record of dependability through well over a decade of combat in the GWOT. It adorns the rifles of most warriors in the NATO arsenal and many law enforcement agencies. I’ve mounted it all the way forward on the rail, so that no accessories can block the beams or cause refraction. Because I believe in back up iron sights, I have mounted the revolutionary Railscales PEQ-LEAF front sight. While quite pricey, the PEQ-LEAF provides amazing utility. Its unconventional geometry is quite literally unmatched in making the best use of rail space.
Once again, I have attached a Surefire M300C. I much prefer a dedicated white light option over a dual spectrum light. The reason is simple: when I want white light, I want as many lumens as possible, and I want them now! Dual spectrum lights, while versatile, provide anemic outputs in both visible and infrared compared to their dedicated counterparts. If I want infrared illumination, I will use the laser. If I want white light, I will use the weapon light. In my opinion, the Surefire M300C provides one of the best outputs (500 lumens) relative to its size. And Surefire’s reputation of unwavering commitment to quality and unmatched track record of dependability in the most austere conditions, is beyond question. I’ve mounted it using the excellent Arisaka Defense Side Scout Mount Picatinny. This highly affordable, tiny little mount takes up almost no space and snugs the light right up to the PEQ-15.
Both light and laser are controlled again, by a TAPS Standard dual pressure switch. Mounted at the 12 o’clock position, it provides ambidextrous control access to both devices. The placement of the vertical grip is less about grip and more about creating an index point for consistent grip. It puts my thumb in a position to ride alongside the rail. Swinging my thumb to the side will give me instant access to the TAPS switch without breaking my firing grip.
Optics are the commonly used EOTech EXPS and G33 magnifier in their factory configuration. Again: magnifiers are crucial to expanding your weapons’ combat effectiveness. The optics are at a lower 1/3 co-witness height, so the flip up rear BUIS can be used through the glass of the HWS (when the magnifier is flipped off to the side). The BUIS is the low profile Midwest Industries Combat Rifle Sight.
SBR Detail 1
MK18’s are very popular among military SOF, law enforcement, and lawful citizens. But, the shorter rail lacks real estate. The outstanding Rail Scales LEAF-PEQ takes up minimal space when paired with the AN/PEQ-15 ATPIAL. Likewise, the tiny Arisaka Defense Side Scout Mount Picatinny is one of the smallest and lightest ways to put a Surefire light on M1913 rail.

SBR Detail 2
A small flip up rear sight, like this Midwest Industries Combat Rifle sight, can be used when the magnifier is flipped to the side.
SBR Detail 3
The Tango Down Battle Grip Vertical Grip is part of the SOPMOD kit and is one of the most secure VFG’s on a Picatinny rail. I have stippled this one with a soldering iron for added grip. I’ve also been a fan of the Larue Tactical Index Clips for use on M1913, when routing cables. I’ve used them here to tame the dual cables from the TAPS switch.
SBR Left
While longer than a PDW hand guard, SBR rails still have limited space. Every inch needs to be maximized.
SBR Right
The Magpul CTR Stock is decorated with an RE Factor Tactical Combat Reference Guide. This one features the NATO 9-Line MEDEVAC Request procedure. Hard as it is to believe, sometimes even operators need reference cards to remember procedures. The Tactical Reference Guides come in several flavors and are extremely useful.
SBR Top
Both light and laser are 100% ambidextrously controlled with the 12 o’clock-mounted TAPS switch.
PDW
This Personal Defense Weapon (PDW) is a 9” AR15, chambered in 300 Blackout. The heavier caliber provides added punch and barrier penetration capability. One of the defining characteristics of a PDW is small size. What we gain in concealability, we sacrifice in barrel length. But then again, we wouldn’t choose this weapon for a recce mission in the Shah-i-Kot Valley. To increase concealability, I’ve installed a LAW Tactical Gen3-M-Folding Stock Adapter. This incredibly effective accessory allows a short PDW to get even shorter. In fact, the entire package fits easily into a standard backpack: perfect for low visibility operations. And with an SB Tactical SBA3 pistol brace, this PDW is a pistol that’s perfect for an emergency trunk gun for armed civilians.
Regardless of the lack of rail space, we still need to equip this gun with the necessary lights and lasers for combat operations. The laser is a Steiner DBAL-A3. I’ve removed the factory mount and attached it directly to a Unity Tactical FUSION Micro Hub 2.0, from which I’ve added a FUSION Light Wing for the Surefire M600U Scout Light. The light is fired by one of two separate controls. I’ve again used the Surefire DS00 dual tail cap. I’ve mounted a Unity Tactical Hot Button at the 11 o’clock. This placement requires a very small movement of the thumb for actuation. If I have to switch hands, I can still use the click button on the back of the DS00. The DBAL is controlled with a factory tape switch that is literally attached to the top of the rail with Velcro and a zip tie. This is a pretty old school technique that is less than elegant, but works.
Due to the lack of rail estate on this PDW, I have mounted an Aimpoint CompM5 in a Unity Tactical FAST Micro Mount. This mount has built-in, fully adjustable, iron sights. While the sight radius is only about 1”, these are backups.
PDW Detail 1
A Law Tactical Folding Stock Adapter is the perfect accessory to make your super short AR15 PDW even shorter. Especially useful when carrying the weapon in a non-descript case like a standard backpack. If the PDW is an AR Pistol, the Folding Stock Adapter creates a small package that can easily be kept as a trunk gun to help get home safe if you’re out and about when the zombie apocalypse kicks off.
PDW Detail 2
Making the best use of minimal rail space, the DBAL is mounted directly to a Micro Hub 2.0 that also acts as a mounting platform for the Scout Light. As a PDW Pistol, the rail sports a True North Concepts GripStop for stability when shooting in place of a vertical grip.
PDW Detail 3
The FAST Micro Mount features integral front and rear back up iron sights; extremely useful for super short PDW’s and SMG’s where rail space is at a premium.
PDW Left
A professional’s weapon must be equipped with everything needed to prosecute the fight, regardless of the size. Great care must be taken to properly lay out the accessories to maximize efficiency.
PDW Right
The use of a Surefire DS00 tail cap provides both onboard click activation and a port for a remote switch.
PDW Top
While not elegant, the zip-tie/Velcro mounting of the OEM pressure pad provides ambidextrous access to the laser controls. The Light is controlled by both onboard click button and remote Hot Button Switch.
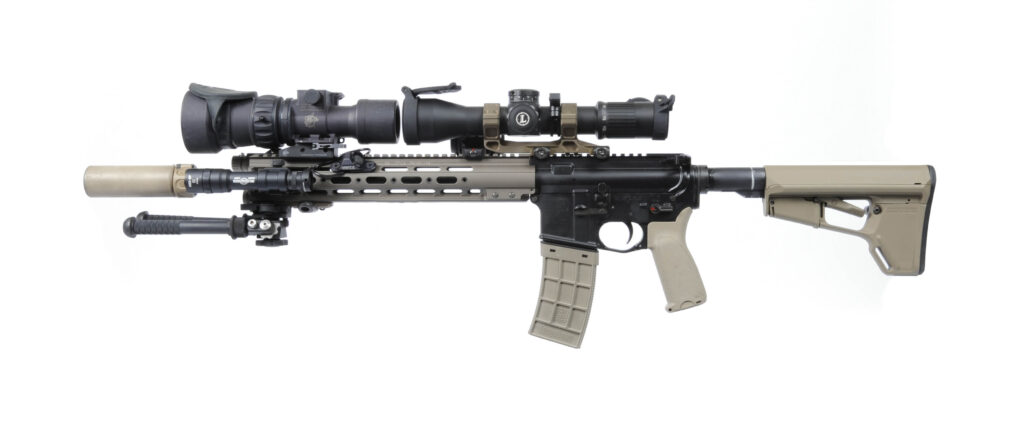
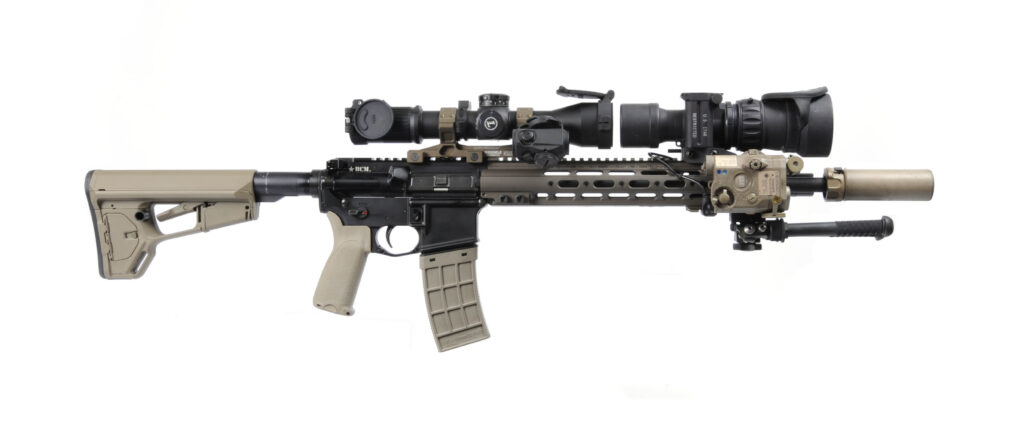
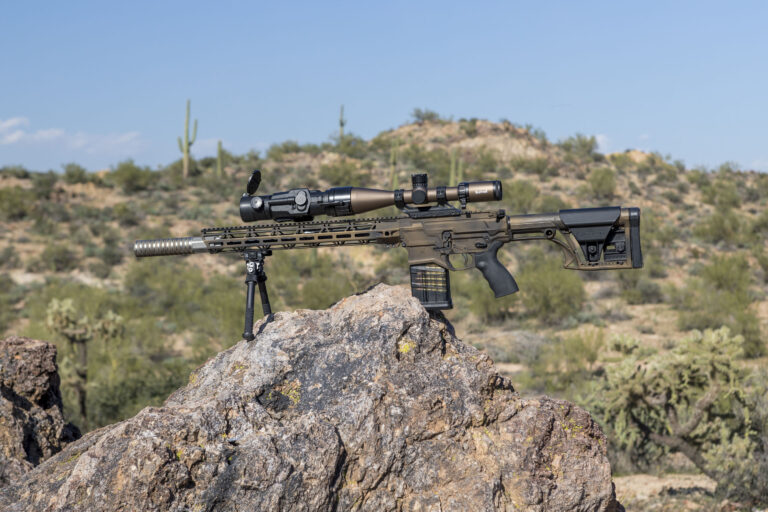
Recce
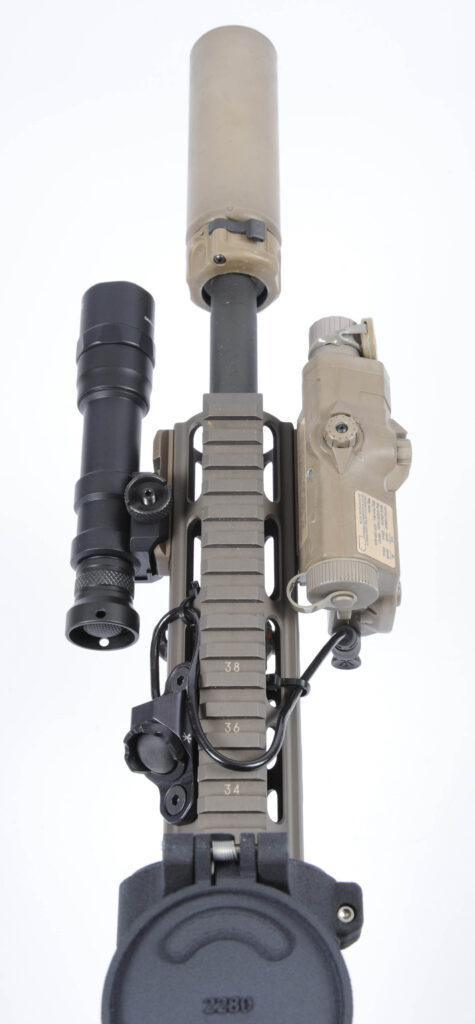
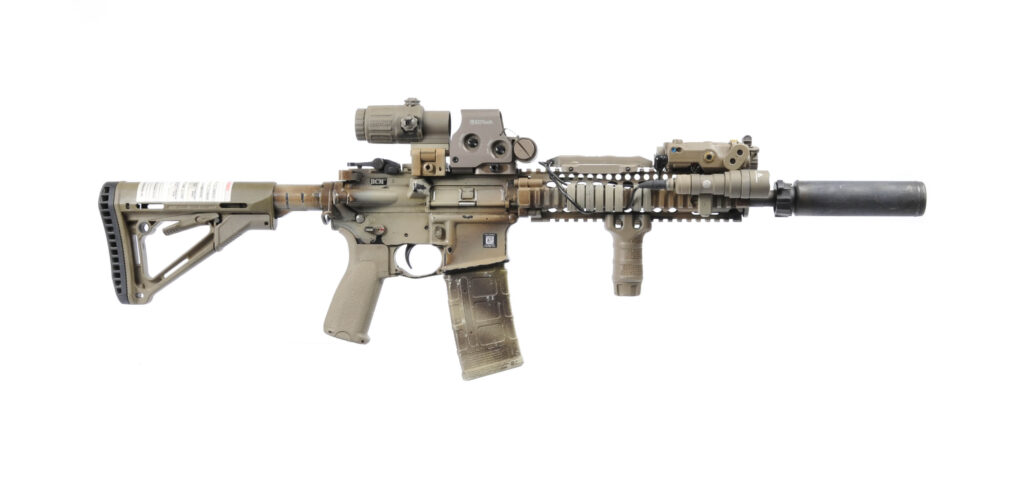
This is a weapon I would use for engagements where I need to hit at intermediate distances. It is light enough to be carried long distances. The 14.5” barrel is short enough to be maneuverable in built-up environments. I’ve outfitted this rifle with a Geissele Super Modular Rail. Besides looking cool, Geissele rails are renowned for their rigidity, which is a major concerned when a CNVD (Clip-on Night Vision Device) may be used. CNVD’s are great tools, but need to remain 100% in line with the host optic.
In this case, the host optic is a Leupold Mk6 3.5-18x. This is one of my favorite optics for sheer versatility. The range of magnification is incredibly useful, without making the physical package overly bulky. I prefer the TREMOR3 reticle for rapid engagement. The scope is mounted in a Geissele Super Scope Mount. I swear I don’t get paid by them to say this, but Geissele pretty much makes the best of just about everything. I have used their products for a long time and would absolutely recommend them for going into harm’s way. Speaking of high quality accessories, I put the excellent AAdmount Flip-Up Scope Caps on all my scopes. These caps, made by a little known company: Aadland Engineering, are one of the best-kept secrets in optics. They are durable as hell, won’t fall off, and they fold flat against the scope.
When running a variable power optic, I prefer to use a red dot sight as a backup system. I know, I know: I said I like having non-battery operated backups. But there is a good reason for this exception. While offset iron sights are great, the front sight will interfere with a CNVD. Obviously, this isn’t a problem if you don’t use a CNVD. But, I did say this article was about setting up fighting guns for professionals… I have placed an Aimpoint Micro T1 on a Daniel Defense offset mount. Aimpoint Micro’s are about as durable as you can get. So they’re perfect for hanging off the side of a gun, where they are exposed to impact.
Recce rifles have a very versatile role. I may be engaging targets out to 1,000 meters, or I may be clearing structures. Up until this point, you have probably noticed a distinct lack of quick detach levers. In my world, QD has its place only with items that actually need it. For this gun, my Atlas bipod attaches via LaRue Tactical lever. For ranged engagements, I will most likely want to use the bipod in conjunction with a small bean bag. But, I certainly don’t want that weight and bulk hanging off the front of my gun while trying to clear rooms.
I generally want to keep my laser on top of the rail. It allows me to make quicker calculations for offset while aiming because I’m used to sighting systems being on top of the gun. But, the need to add or remove the CNVD negates my ability to put my laser where I want it. This is one of the only times when I advocate mounting the laser on the side of the gun. In this case, I have placed an LA/5-PEQ on the outside of the rail. Its primary control will be a Hot Button remote MLOK switch placed at the 11 o’clock. While this rail is not actual MLOK, its slots do still support some MLOK hardware. Normally, I would not advocate this practice, but remote switches do not see the same sheer/torque as vertical grips and other accessories, so it’s strong enough. I’ve placed a Surefire Dual Fuel light at 9 o’clock. This puts both light and laser controls in easy access, while still requiring deliberate action to press. Meanwhile, the top rail is left open for adding and removing a CNVD (in this case, a Knights Armament Company AN/PVS-30).
Recce Detail 1
The Hot Button provides easy access to the laser control, even though the laser is mounted on the opposite side of the rifle. It securely locks to the rail while staying out of the way of CNVD’s.
Recce Detail 2
Professionals have little need for quick detach levers on optics, lights, and lasers. But a bipod should always be QD. You will sometimes need it, and sometimes won’t. It needs to come off easy.
Recce Detail 3
Clip-on Night Vision Devices are essential tools for rounding out a recce rifle. What good is carrying a rifle with magnification capability, if you can only use it half the day? A good CNVD, like the proven Knights Armament Company AN/PVS-30, should be in the assault pack of every operator armed with a recce rifle.
Recce Detail 4
I much prefer an offset MRDS over offset iron sights when a CNVD may be used. The night sight objective lens will not clear the front offset sight. Due to it needing to hang off the side of the rifle, the MRDS of choice must be rugged as hell. In this case, the Aimpoint Micro T1 is an excellent choice. Being completely enclosed, it won’t become fouled by dirt and debris.
Recce Left
A work gun needs to have a free float rail that won’t flex when CNVD’s and lasers are in use. This is especially important as the rail gets longer. Geissele Automatics has long built some of the stiffest rails used by professional gunfighters in some of the most elite SOF units.
Recce Right
It’s important that a recce rifle stock has a protected lever. I prefer the Magpul ACS for its SOPMOD-type cheek weld. The lever is protected from accidental release when propped on a rear bag.
Recce Top
Recce Rifles that utilize CNVD’s are the only weapons that I advocate a side-mounted laser.
Being a professional means doing everything as if your life depends on it. Since your weapon is literally the tool you will use to defend your life, optimizing it should be of paramount importance. Like all of my gear and tools, I configure it to work in complete darkness. If I can use it in blackness, I can do it in the light. Running my gun and gear at night is the true test for whether or not it is going to work. Bad things tend to happen at night and I need to ensure I can deal with them. I need a light to work in the dark, a laser to work with night vision, a suppressor to keep decibels down and mask my position, and an optic system that allows me to engage targets near and far. And, I need to have complete control over every function of every device, regardless of which shoulder I’m firing from, both day and night.
Once I’ve configured my weapon, I ensure I shoot it regularly. I ensure I handle it regularly. I dry fire when I cannot shoot. I make sure I practice moving it around my body while wearing my gear. I make sure I work all the controls in the dark with complete consistency. This builds neural pathways in my brain, ensuring my ability to manipulate my weapon under all conditions. I commit the feel of switches, pressure pads, buttons, safeties, and trigger to memory. I ensure my hands find the same place on the pistol grip and hand guard so as to not inadvertently actuate anything that I do not want to deliberately actuate. A professional ensures that everything on his person and on his weapon is purposeful and suited for the job. Your weapon is your life.
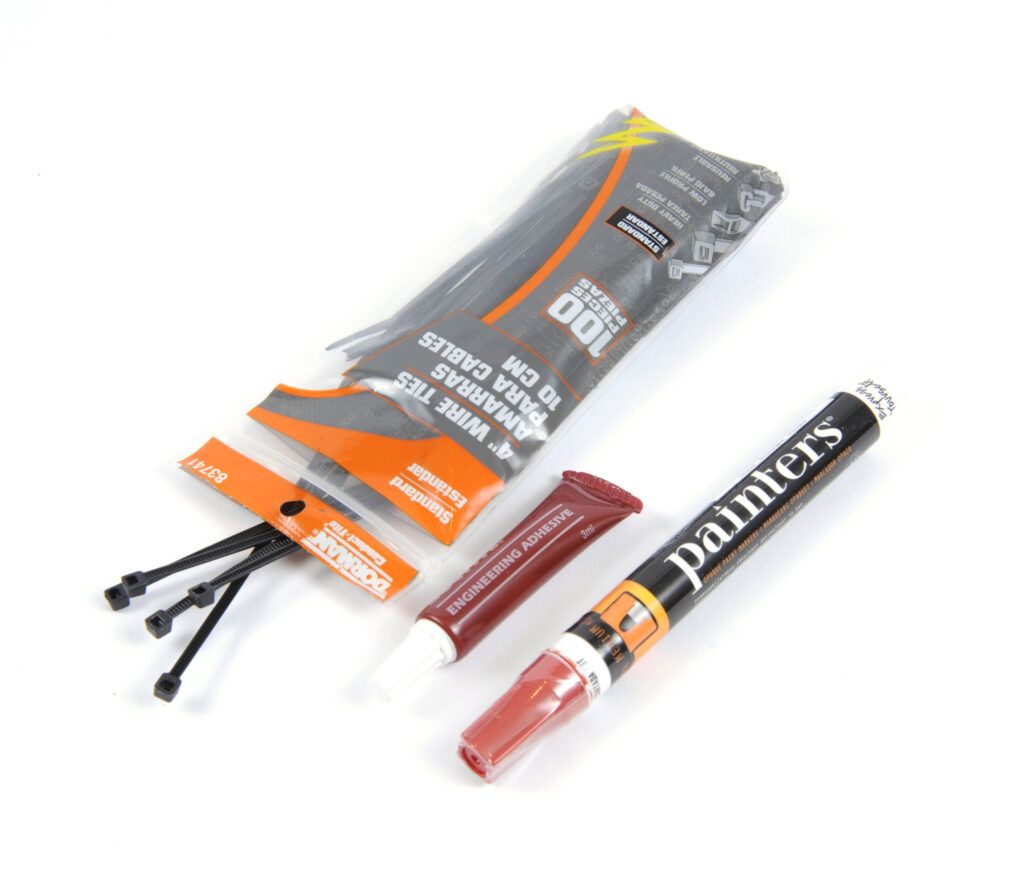
Supplies
When building a work gun, make sure you have these supplies. Mini zip-ties are essential for shoring up wild cables from lights and lasers. Blue thread locker should be used on all screws, be they accessories, or mounting bolts for rails. But be cautious to not overdue it. A little bit goes a long way. If you use too much, you run the risk of gluing the screw, ensuring you’ll never get it out. Finally, a paint pen should be used to make witness marks on all fasteners. This is a short line drawn over the bolt and the adjoining surface. If the line appears broken, I immediately know the fastener is backing out.
Text and Images by Charles “Chip” Lasky.