The Equipment to Load
We continue on with a relatively in depth view of creating a custom load that matches your own gun, and enjoying the stress killing activity that is hand loading.

Last time around we went through the various components that make up a custom piece of loaded ammunition for a “semi-precision rifle.” If you haven’t checked that out yet, do that first.
Now, lets go over some of the equipment used in the process of creating these loads one by one. If you don’t care about equipment, and just want to start loading, scoot on down a couple paragraphs…but what guy doesn’t like gear?
Also read:

Part I: Cooking Up Some Loads For The Semi-Prescision Rifle Shooter
Part II: The Equipment To Load
Part III: Loading For The Semi Precision Rifle
Part IV: Performing The Ladder Test
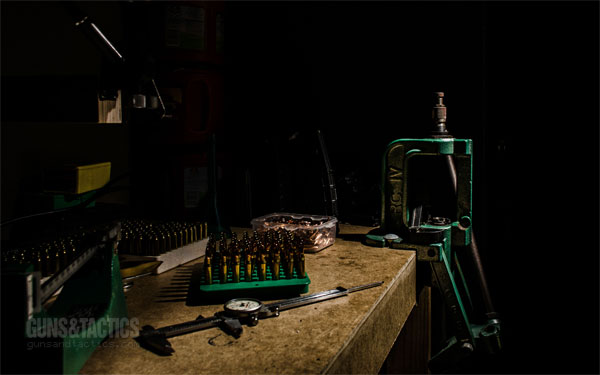
The Press

The press is where we’ll manipulate our round through a series of metal dies. These dies shape our round into a final product, and this shaping takes a significant amount of force. So, a strong framed press bolted to a heavy bench that won’t flex is essential to consistency from round to round. You can’t do this on a folding table.
There are two major types of presses on the market: single stage and progressive presses. With a progressive press, multiple dies are screwed into the top, and each pull of the handle raises a round into one of the dies, then moves it into position for the next die. With each pull of the lever one can size brass, prime brass, charge with powder, and seat a bullet. Every time you pull that lever, a new round is created. This has a big benefit on speed, but with the wrong setup, you could easily trade that speed for consistency.
A single stage press only has a place for one die. So, instead of running brass through multiple stages at once, we run all our brass through the same function, then change out dies, and run them all through again. This is the type of setup we’ll be dealing with.
Powder Handling
Powder measures, tricklers, and accurate scales are vital. Some powder measures are very consistent, eliminating the need to weigh every charge…but most aren’t. In that case, a guy will weigh each charge and trickle in powder granules until the exact weight balances out on the scale. It takes longer, but its consistent.
Priming

The most often used priming system is the “hand primer.” Nearly every company makes one, and people like them because its easier to feel when each primer seats. You can also prime on the downstroke of many presses, but its often harder to feel when the primer is seated properly.
Dies
Don’t skimp on dies. Sure, you can get a set of Lee .308 full size, neck size, and seating dies for $34, but take my advice…don’t. Spend the money and get an RCBS or Redding Competition Die set. The seating die with the built in micrometer is gold, and makes it easy to adjust seating depth by as little as .001 inch. This die set is one of the best investments I’ve made in reloading over the past decade.
Measurement
A good pair of calipers are essential. A set of bullet comparators and headspace gauges are good to have, but a trustworthy set of calipers is a must.
Lets Actually Start Loading Something
Ok. We’ve just got back from the range. There’s some dirty spent brass in the ammo box, and we need to get it ready to shoot again.
First up, we need to get the old primers out of the cases. Spray the cases with case lube, or roll them on a lubrication pad and run them through the sizing die to remove the primer. A properly set up sizing die will also push the case’s headspace back .001 – .002 to where it should be.
Now, this sizing process above is considered “full length” sizing. There are a large group of target shooters who don’t full length size. They “neck size.” Like its name implies, this only re-sizes the neck of the brass. Supporters of this method believe its easier on brass, and since the case was fired in the same gun last, its expanded to fit its chamber perfectly. Some think this results in greater accuracy. But, if the round could be fired in other guns, a semi-auto, or its new brass, always full length size.
Our brass is now sized, and de-primed. Over time, and several loadings, brass begins to “flow” and lengthen. A full length sizer brings the shoulder back to spec, but the neck may need to be trimmed down. If allowed to continue, this gradual lengthening may keep a round from chambering correctly.
The RCBS manual states a .308 case should be trimmed to 2.005”. Remember those calipers? This is where we use them first. If you find several instances of brass a couple thousandths long, trim them down. Some guys just make this step part of the process each time. With powered trimmers like the Giraud that register off the shoulder of the cartridge, a guy can trim lots of brass really really fast. Using something like a manual trimmer from Hornady or Lyman can take much longer. Even the drill attachment trimmer from Little Crow Gunworks would make it pretty easy to always keep your brass length perfect.

I know somewhere there’s a bench rest guy out there asking why I’m not measuring my chamber so I can trim my brass to the perfect length. If you want to take the next step, measure your chamber with a case insert like the Sinclair Chamber Length Gauge. After modifying a sacrificial case, you can create a dummy round that will give you the exact length of your chamber, and the “perfect” length to trim your brass. The chamber on my 5R is 2.045”, so that’s what I trim to for that gun.
Even if trimming isn’t part of the brass prep process this time around, its good to quickly chamfer the case neck both inside and out. Without a smooth tapered entrance to your case neck, you stand a good chance of stripping the copper jacket off your projectile as you seat it. If you do any trimming, chamfering the neck is vital.
So now we’ve go oily dirty cases with brass shavings tumbling around inside. Not exactly something we want to put in our bolt gun.
Its bath time. Some guys use vibratory tumblers with walnut or corn cob media. That does more polishing than cleaning. After an hour or two in the tumbler the cases need to be separated from the media and cleaned of residue as well. Its a pain. Within the past several years a lot of guys have moved to ultrasonic cleaners. Throw some brass in with a little cleaning solution, and let her run for 30 minutes or so. The brass isn’t always shinny, but its clean.

Lets face it. We’re spending a large chunk of time on a handful of special rounds here. We want them to look nice, so just being “clean” isn’t good enough. That brass needs to shine. To get this, replace that ultrasonic cleaner with a water tight rotary tumbler. Add some stainless steel media, water, and liquid soap. Nothing will get your brass looking as good as this method.
Hopefully by now you can see this isn’t rocket surgery. Reloading is easily one of the most relaxing things a guy can do after a long day at work. It gives you time to think…time away from the loudness of life. Its a chance to take control of the lead you send downrange. With factory ammo, you don’t have that control. If there was a flyer, was it your fault or Federal’s? Eliminate that possibility from the chain. When you put this much time into each round, you will shoot better. Not just because the ammo is better suited for your gun, but because you can take pride in knowing you crafted it.
Next time around we’ll take a look at priming the brass and setting the charge.
Next
Part III: Loading for the Semi-Precision Rifle

![[News] FightLite® Reveals Next Generation (Squad Automatic) MCR® and Lightweight Polymer Ammo](https://un12magazine.com/wp-content/uploads/2017/07/FightLite-NextGen-MCR-Rifle-768x510.jpg)

![Custom Services from Williams Gun Works [Triggrcon 2022]](https://un12magazine.com/wp-content/uploads/2022/10/Williams-Gun-Works-Triggrcon-2022-768x432.jpg)
![[News] IWI Launches MASADA – A Striker Based Line of Pistols](https://un12magazine.com/wp-content/uploads/2017/10/maxresdefault-1-768x432.jpg)
