Helmet & Gear Setups
In UN12’s very first issue I wrote about setting up a helmet for various applications. A lot of things have changed since then, and many new products have come to market. And while I covered the basics of setting up a helmet for professional or recreational use of night vision goggles, I did not talk about what I personally wear.
Throughout my writings I’ve continually mentioned that I am a total gear whore. Always have been and always will be. Embarrassing as it is to admit, that was one of the things that drew me to special operations.
While I got the chance to operate with some of the fiercest warriors on the planet, I also got to use some of the coolest toys. And one of the most iconic pieces of kit for any elite warfighter throughout history has been his helmet.

Helmet technology has come a long way over the past 20 years. I’d venture to say that we have seen a bigger leap in helmet design and material advancement during the GWOT than we have in all the years of the century prior. Few things advance technology faster than war.
I’ve been lucky enough to get experience with a lot of different helmets through the years. And I’ve been able to watch manufacturers take direct warfighter feedback and use it to turn out even better products.
In my opinion, the current leaders in American warfighter helmet design are Ops-Core/Gentex, Team Wendy, Crye Precision, and MTEK. Please note that this analysis is based on my personal experience with these helmets and not a market study. I’m sure there are other great helmet brands out there, but I lack practical experience with them.
Worn gear is tricky to design since no two people have the same exact body build. This is especially true for helmets because the human head requires a lot of consideration: protection, mobility, weight, padding, accessory integration. Our heads are our information hubs.

Most of our sensory cues are collected by our head (through sight, sound, smell, and taste) so it’s important to enable the use of these senses with the least amount of impairment brought on by protective gear. Comfort must be a high priority, because if your head is uncomfortable it’s hard to focus on anything else. And of course we need to integrate essential accessories.
The modern battlefield is more advanced than the ones our fathers and grandfathers fought on. With new threats come new tactics. And with new tactics comes new gear to support them. As always, I search for a balance of combat effectiveness and comfort when assembling my gear. Every little piece gets interrogated before getting added: Will this widget help me be a more effective gunfighter? Does this item help support the three tenets of gunfighting—shoot, move, communicate?
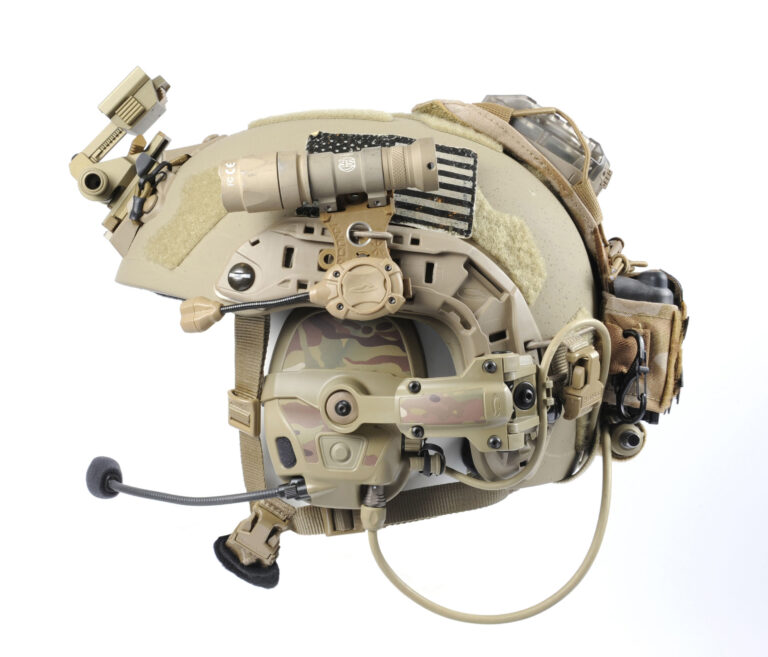
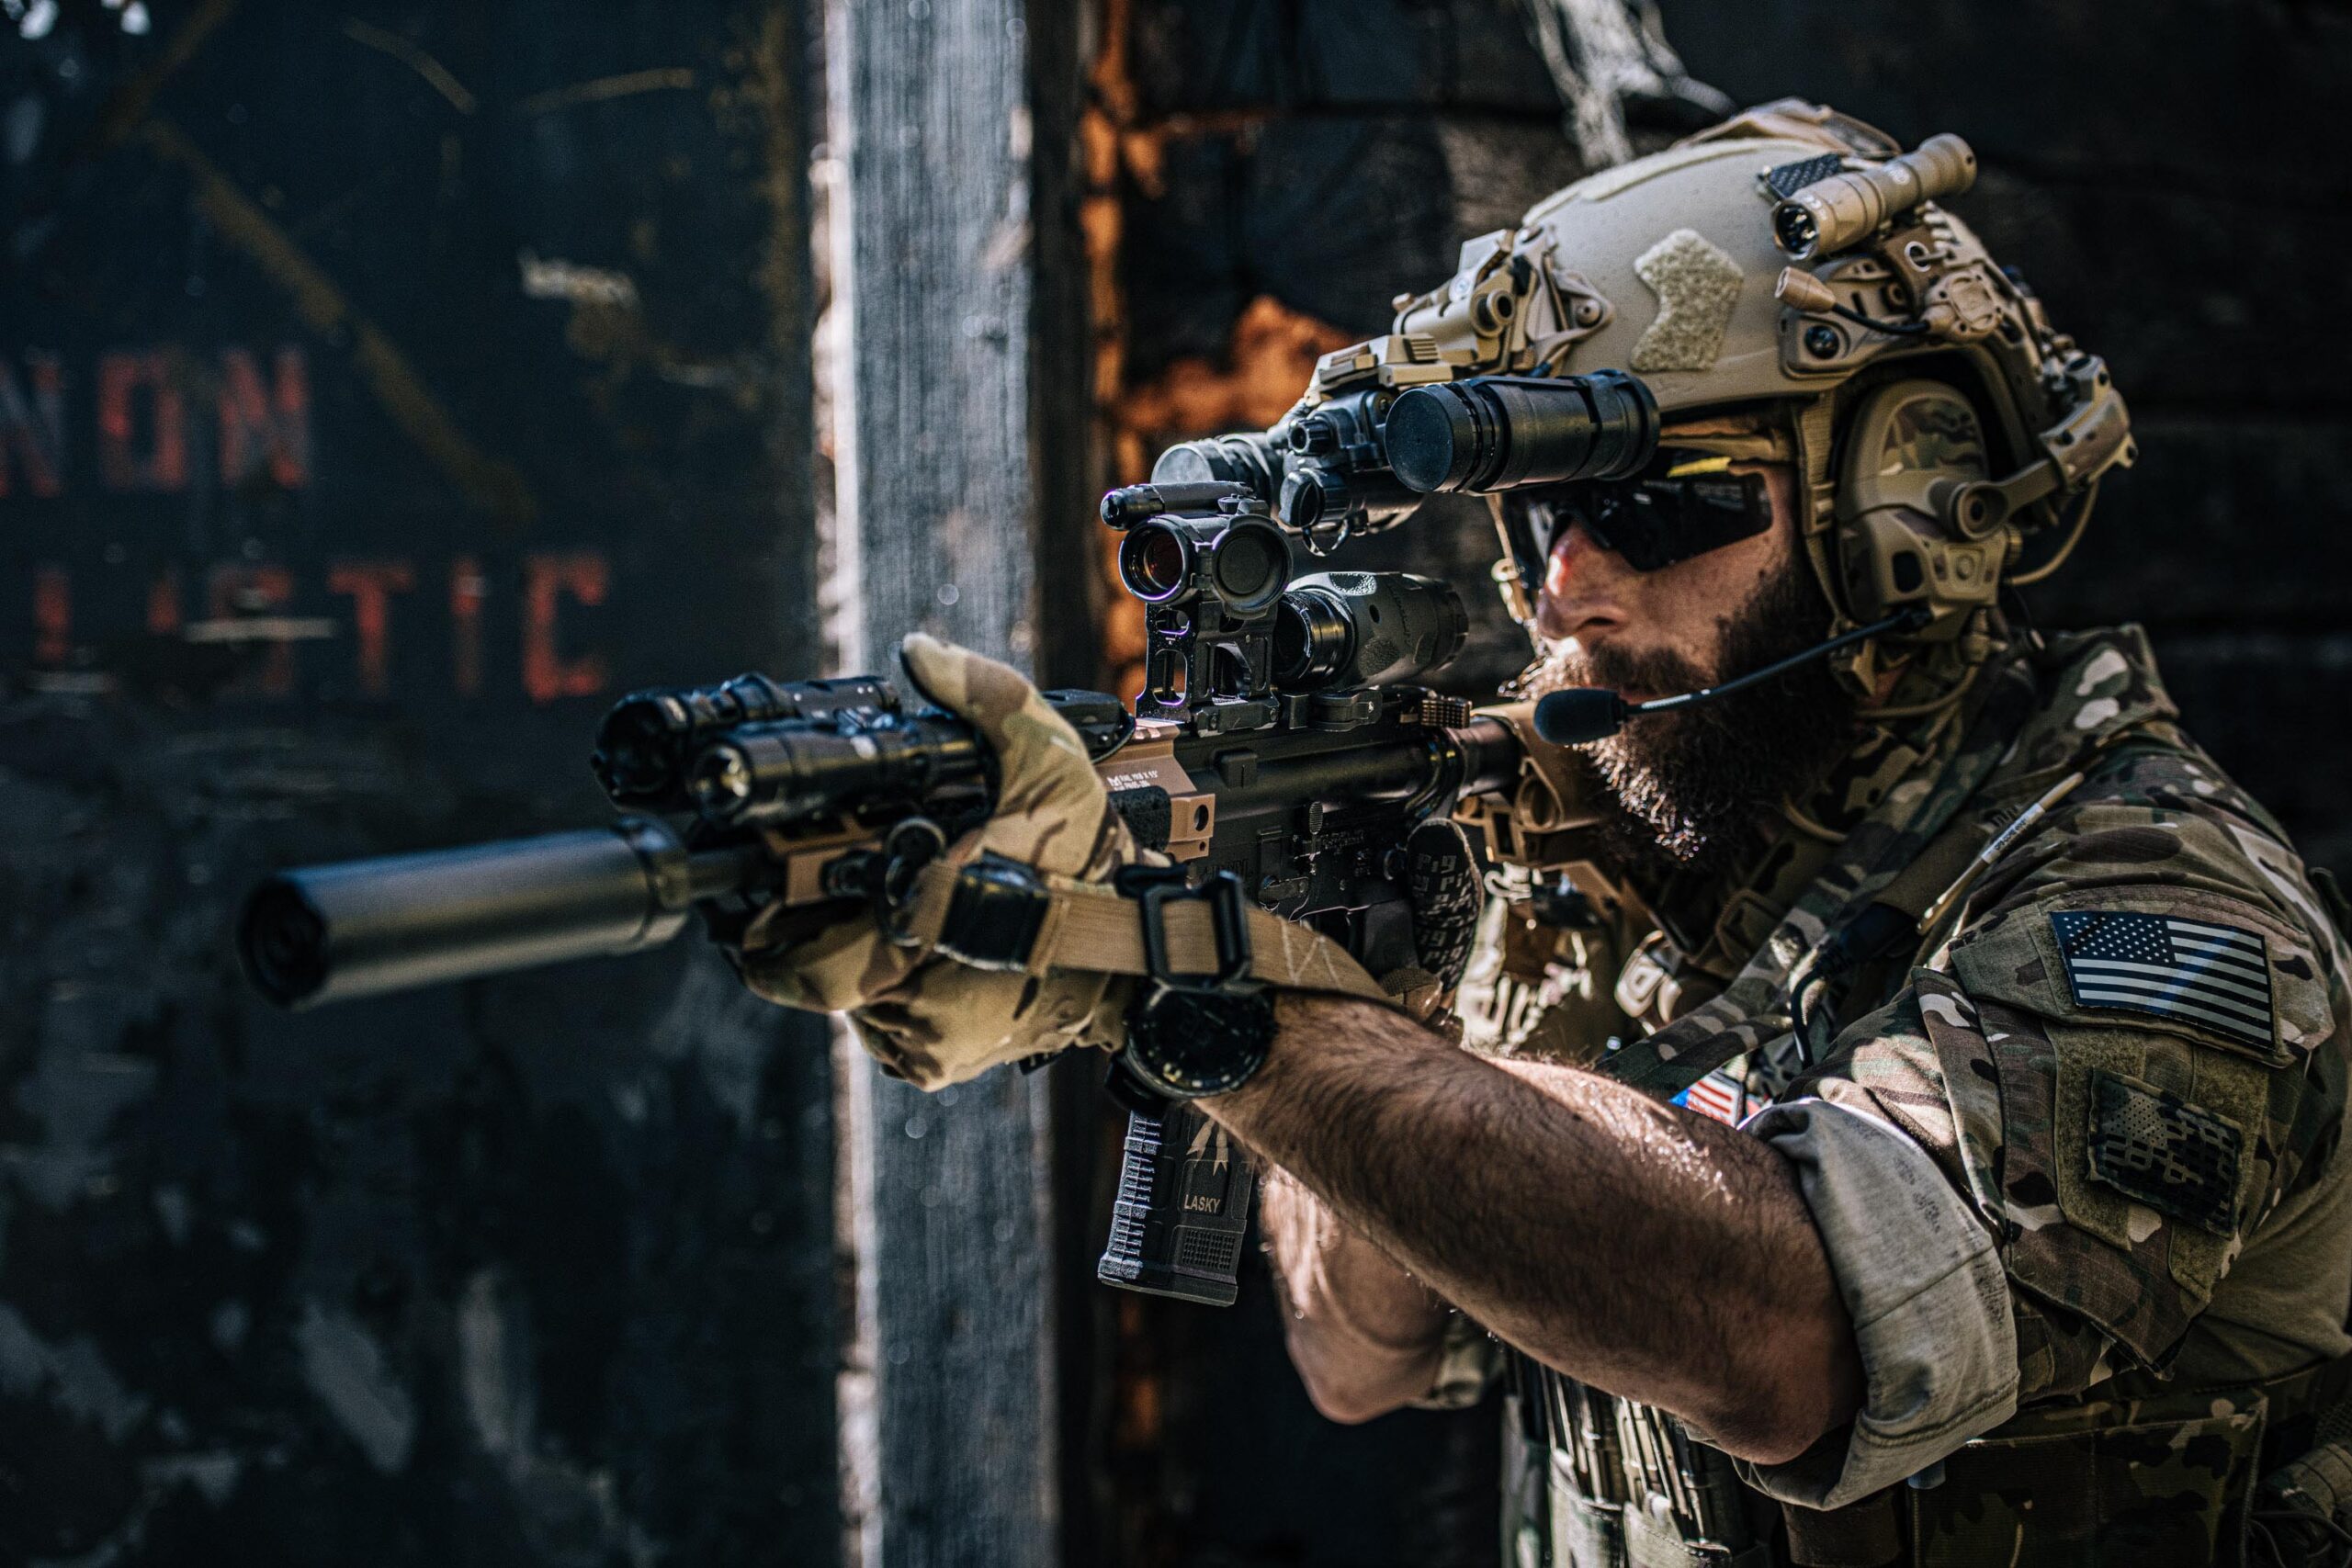
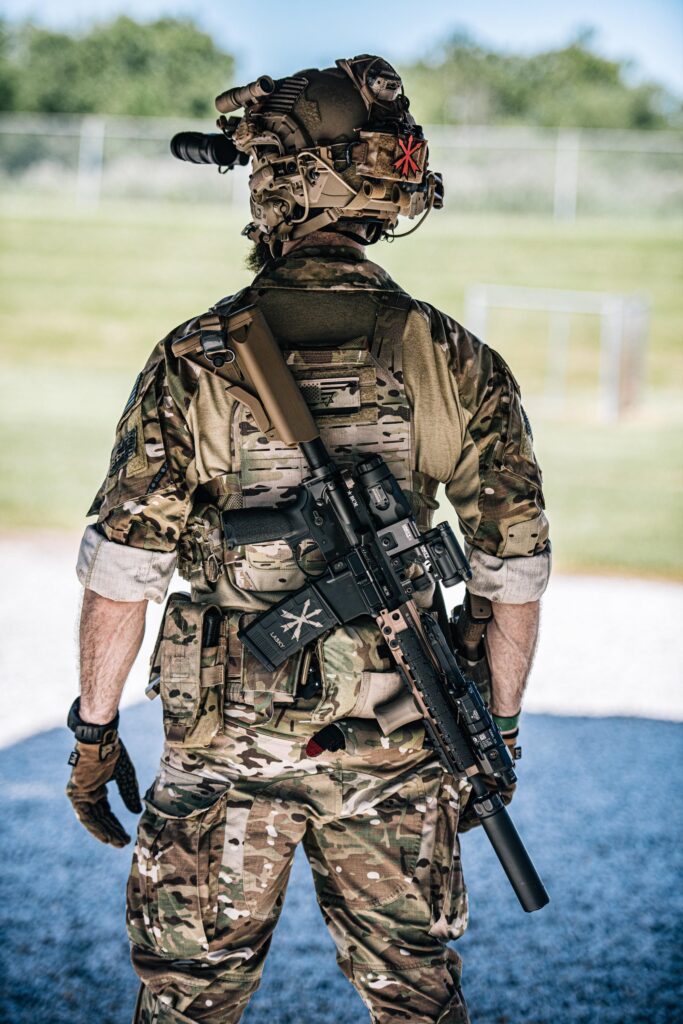
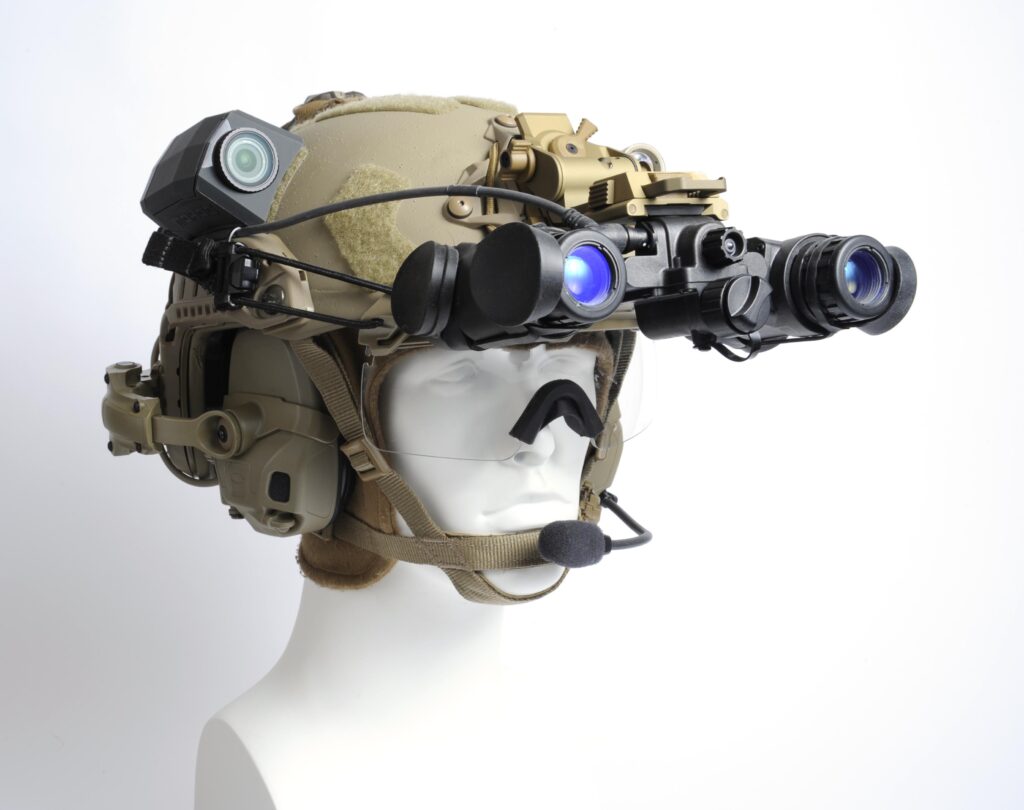
My go-to helmet is an Ops-Core FAST SF. This is the latest/greatest entry in the storied FAST helmet line. I still have my original FAST Ballistic (from before they began calling it the FAST XP), covered in layers of spray paint. It’s on its fifth liner system since the previous ones got so used and crusty they began holding shape.
Ops-Core was the original designed-from-the-ground-up special operations helmet. They started the trend of taking the helmet concept down to its core and designing something based completely around feedback from elite warriors.
Other companies followed suit and we now have many great options from several manufacturers from which the warrior can choose. Over the years I wore Crye Precision Airframes, Team Wendy EXFILs, and MTEK FLUXs. All are solid options to be sure, but I kept coming back to Ops-Core.
Admittedly, I was never a fan of Ops-Core’s original liner system (the OCC Dial). To me, the “pads” might as well have been river stones attached with Velcro. They featured a rigid impact foam backer with a thin layer of padding that grabbed my hair and pulled every time I turned my head. I tossed those pads and replaced them with old ACH pads from Team Wendy.
Clearly I was not the only one to make this observation because Ops-Core would go on to replace the original OCC with the new LUX Liner, which is way more comfortable. But the thing that always drew me back to Ops-Core was the shell. The profile simply fit my head and integrated with my gear (plate carrier and pack) better than others. Having said that, comfort and fit is 100% subjective and any of the helmets listed above are good to go as a base.
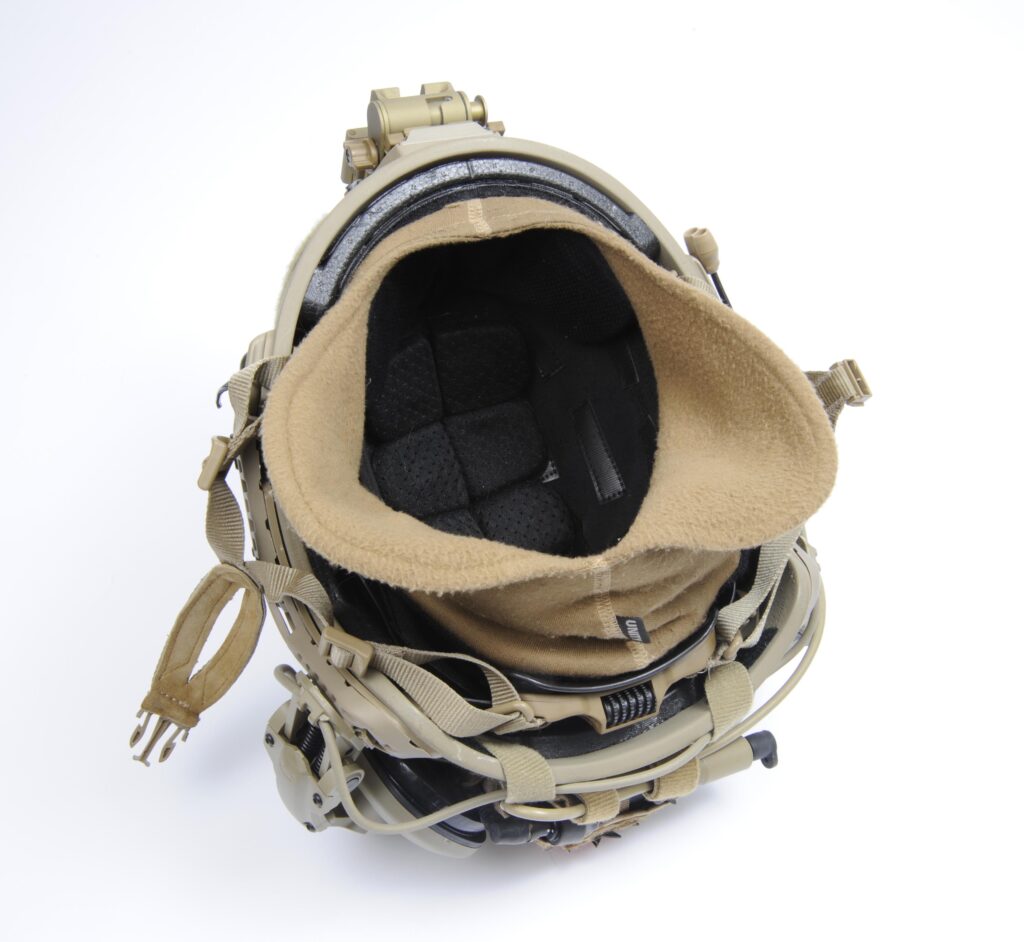
My FAST SF helmet features a lightweight ballistic shell built from some of the most advanced ballistic materials available. While I am no longer operational, I teach classes that place me around gunfire and explosives. So I still choose to wear a ballistic helmet rather than a lighter bump shell. The helmet came with the excellent Ops-Core LUX Liner pre-installed, but I have made some changes to the pad layout.

Helmets are notorious for creating “hot spots” of discomfort over long periods of wear, so don’t just use whatever configuration comes out of the box. My head slopes down toward the front (I was probably dropped as a child), so I put thicker pads in the front dome and thinner pads in the rear dome. It’s important to mix and match pad shapes and sizes to ensure all-around coverage and long-term comfort.
Speaking of mixing and matching, I replaced the OEM brow pad with one from 4D Tactical. The 4D pads are some of the best in the business, containing a memory foam that will conform to the curvature of your head. I like this brow pad more than the multi-cell version that comes with the helmet.
On the topic of fitting a helmet and pads—there is a reason that helmet manufacturers have “fit guides” and “fitting kits” for their specialty helmets. As noted, the helmet is the nerve center for most of the warfighter’s sensory gear: communications headset, night vision goggles, O2 mask, gas mask, and so on. And the head is a very sensitive part of the body.
The helmet needs to protect your brain from TBI/ballistic threats while keeping all the aforementioned gear stable and in ready-use placement, all while creating the least amount of discomfort. It is absolutely imperative that a helmet is fit properly to the wearer. If it’s too small, the fit will be too tight and the wearer will experience a pressure headache. To relieve this pressure he may opt to use thinner pads, which leaves him open to possible traumatic brain injury (TBI) in the event of blunt force trauma to the head.
If the helmet is too big, the shell could move around on his head during use and compromise coverage in the event of ballistic threats, while also shifting mission-critical gear around. I always recommend biasing toward the larger option if your head measurement puts you in between sizes. The difference can be made up with pads and chinstraps. If your measurement puts you squarely within the range of a specific size, then you may consider yourself lucky and you should stick with that size. One thing is certain: Wearing a helmet that’s too small for your head is one of the most miserable feelings.
I also live and often teach classes in northern states where it’s colder for a good portion of the year. During those frosty months I keep a Unity Tactical Cold Weather Liner installed in my helmet. The CWL eliminates the major discomfort of trying to smoosh a fleece cap or balaclava under your helmet. This little detail is often overlooked until it becomes a major pain. The thickness of a fleece watch cap or winter balaclava will displace the pads enough to add noticeable pressure around your head. This can cause a level of discomfort that will be exacerbated by being cold.
The weight of the helmet will also cause it to grip the hat material and micro-grind it into your scalp and forehead. This can cause blisters and abrasions throughout the duration of a mission. The same micro-movement will also bunch the hat material up, potentially exposing your sensitive ears to the cold. The Cold Weather Liner solves those issues for me, keeping me warm and protected from the elements without adding discomfort.
One thing to consider when wearing cold weather gear with a helmet is the seal of your ear-pro. I have permanent hearing loss in both ears from years of combat. Although I always did everything I could to protect my hearing, the cumulative effects of extremely loud noises will take its toll on anyone in this line of work.
Whether you wear a fleece cap under your helmet or an integrated cold weather liner, you are placing a layer of material between your ears and the ear cups of your headset or ear-pro. This will reduce the factory NRR (Noise Reduction Rating) of the device and expose your ears to damaging decibel levels.
In these circumstances it is important to double up your hearing protection by using in-ear buds (such as foamies or pass-throughs like the SureFire Sonic Defenders), or integrated hearing systems like the Ops-Core AMP with NFMI ear buds. Doing so will ensure you maintain the highest level of hearing protection while staying warm on the battlefield.

I feel like I have a permanent indentation over the top of my head from years of shoving a headset under my helmet. No matter how hard I tried to create channels for the headband using custom pad configurations, Velcro, tape, and other methods, I could never find a fully comfortable setup that included an under-the-helmet headset.
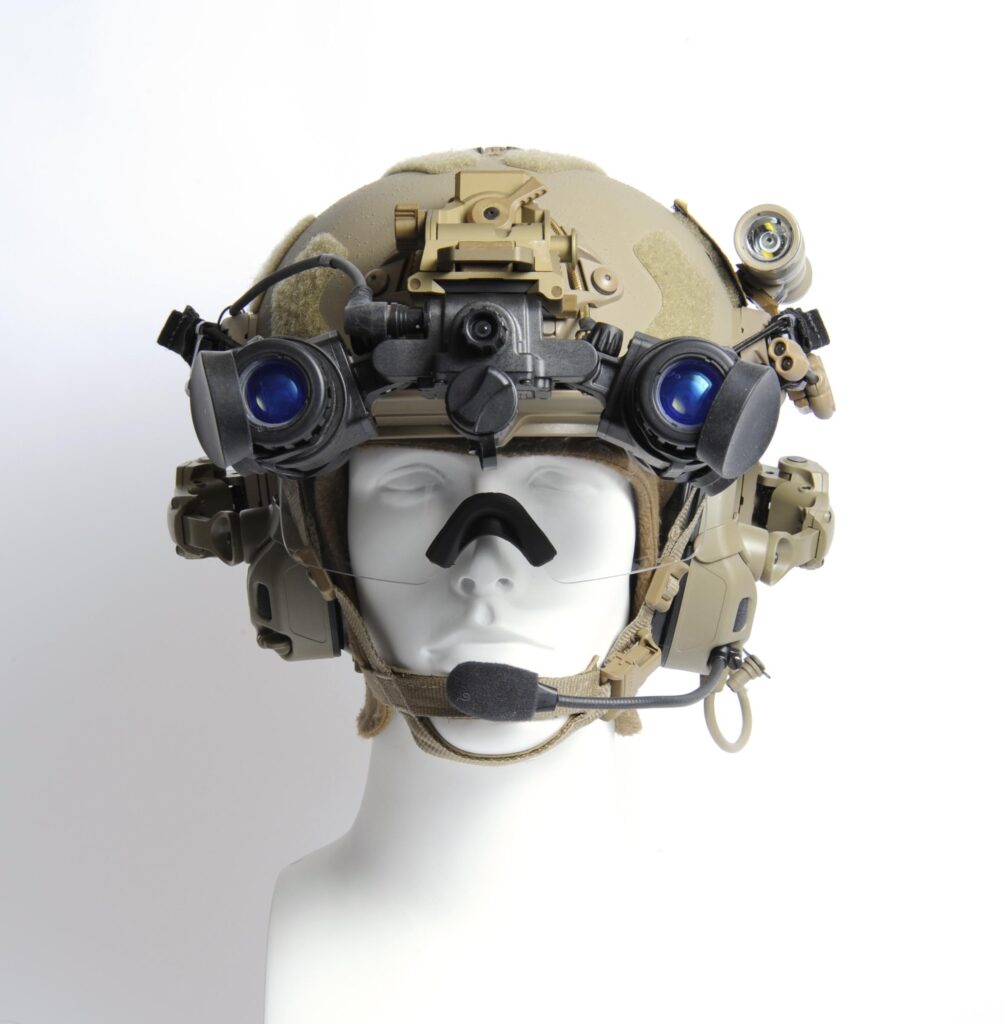
That’s why I choose to keep my headset attached to the rails on my helmet. I don’t want anything pressing against my head if I can avoid it. The Ops-Core AMP is my personal favorite electronic ear-pro/communication headset. Without getting too deep in the woods talking about the AMP, it features unparalleled modularity, versatility, and systemic integration with my helmet.
I can reconfigure it between headset and helmet mount in under a minute, and it features Near Field Magnetic Interface (NFMI) ear buds that provide doubled-up ear pro and seamless communications transmission. Basically, it does everything the manufacturer says it does. But this is a helmet setup analysis, so let’s focus on that aspect.
The AMP uniquely mounts to the helmet at the rear rail behind your ear. As with guns, rail estate comes at a premium with helmets. There are other mission-critical accessories that need to mount on my helmet. Since they can usually only go on the horizontal rails above the ears, I cannot monopolize the space with my headset mounts.
The AMP Helmet Adapter Arms attach to the rear rails and extend forward to support the ear cups over my ears. They have heavy duty springs that keep constant inward pressure on the ear cups, thereby increasing the NRR capability of the system. This configuration also helps to balance my helmet while wearing NVGs because it places the center a little farther back. And it keeps my top rails free for attaching other accessories.
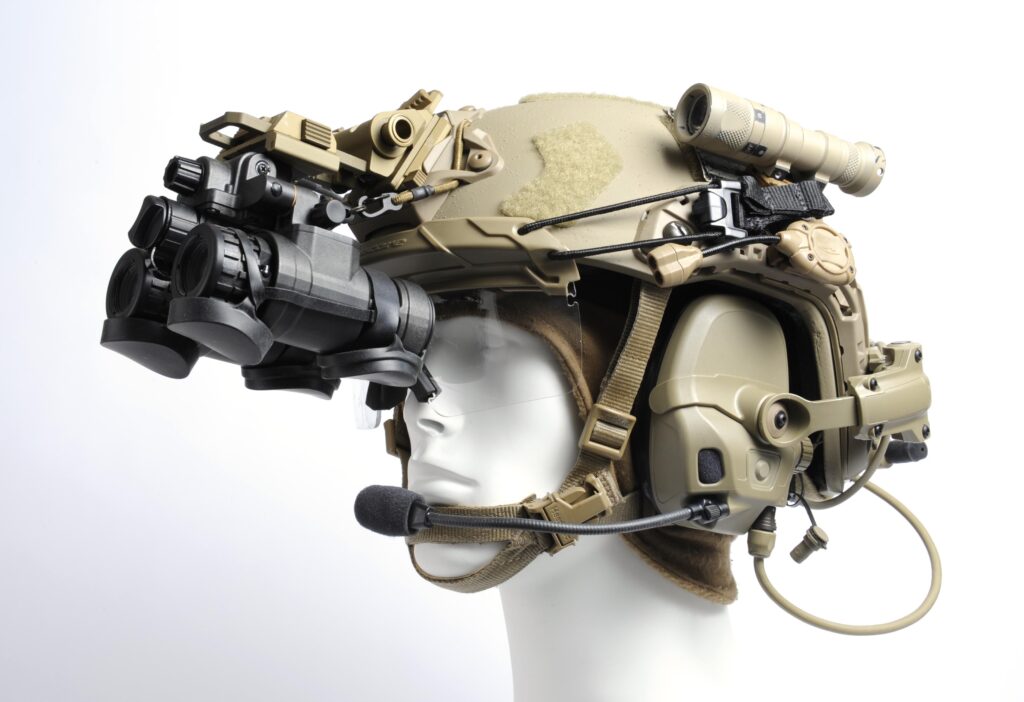
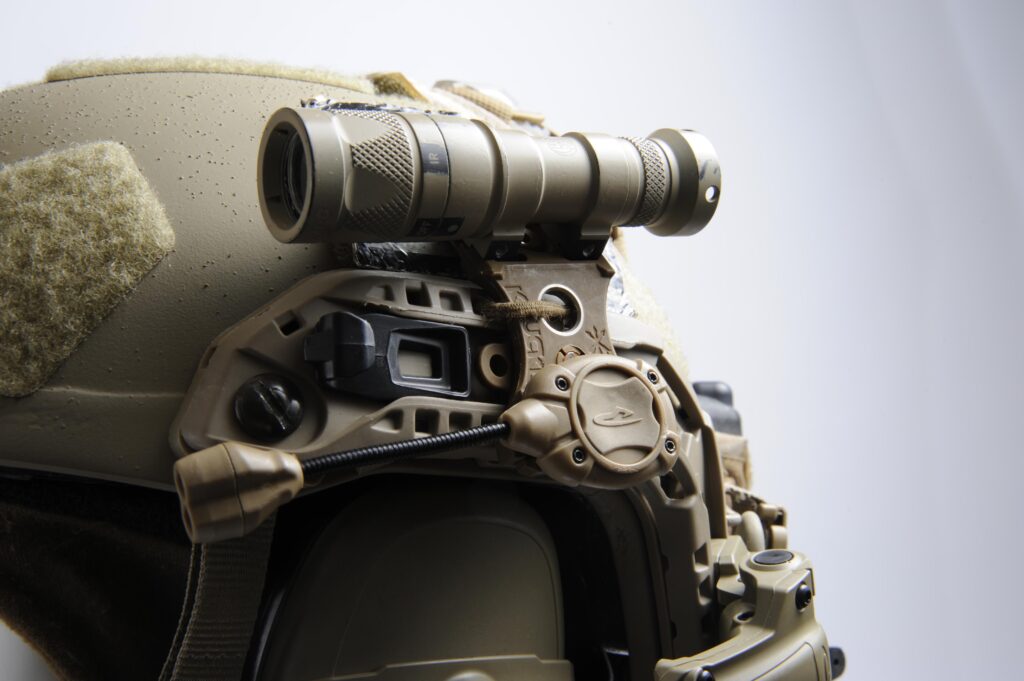
Like anything else, it’s easy to get carried away. So I make sure that anything I put on my helmet is going to be purposeful. I use two types of lights for different purposes. They are mounted on the same side of my helmet on a Unity Tactical KNUCKL kit. The top light is a SureFire M300V, which provides both white and infrared light.
I’m not a huge fan of the SureFire V-Series lights on guns because I feel they are a bit anemic with a 250-lumen output (compared to the 600-1,000 lumens that are common today). But it’s more than enough for a helmet-mounted spotlight. It gives solid real-world performance out to a little under 100 yards, but I can also get a good LED-based IR spot out of it. This is useful while driving ATVs under NVGs. My head may not always be pointed in the direction of travel, so IR headlights aren’t always the best option. And I can rotate the bezel to the “off” position to make sure I don’t get any accidental discharges of light.
Beneath the SureFire is a Princeton Tec MPLS Switch (white/red LEDs). This light is for close-in, task-oriented use only. I greatly prefer this LED configuration because red light has the least negative effect on my natural night vision while producing the least noticeable downrange signature. It can be used for all sorts of up-close tasks, from map-reading and gear maintenance to visual personnel interrogation and target location verification.
I’ve attached the KNUCKL to the ARC rail and run a loop of shock cord through the center hole and slits in the rail. The cord is tied off with an overhand knot behind the rail (which required me to remove the rail to gain access). The KNUCKL was designed to make use of the Wilcox Industries Retractable Lanyard, but I prefer my ghetto-rigging because it’s lower profile and acts as a rotation limiter while still keeping the assembly retained on the helmet. Retention of gear is critical on the battlefield.

The front of my ARC rails have attachment clips for my Ops-Core Step-In Visor. I am a huge fan of this piece since I’ve never liked the arms of shooting glasses being compressed against my temples under my headset. Sure, the Step-In only attaches to the helmet and I’ll lose my eye pro if I remove my lid. But that’s why I keep a pair of Oakleys in my pocket. I love the Step-In Visor for the same reason I love the Cold Weather Liner—it’s the little things that increase comfort and end up making a gigantic impact on the warfighter’s ability to concentrate on the mission at hand.
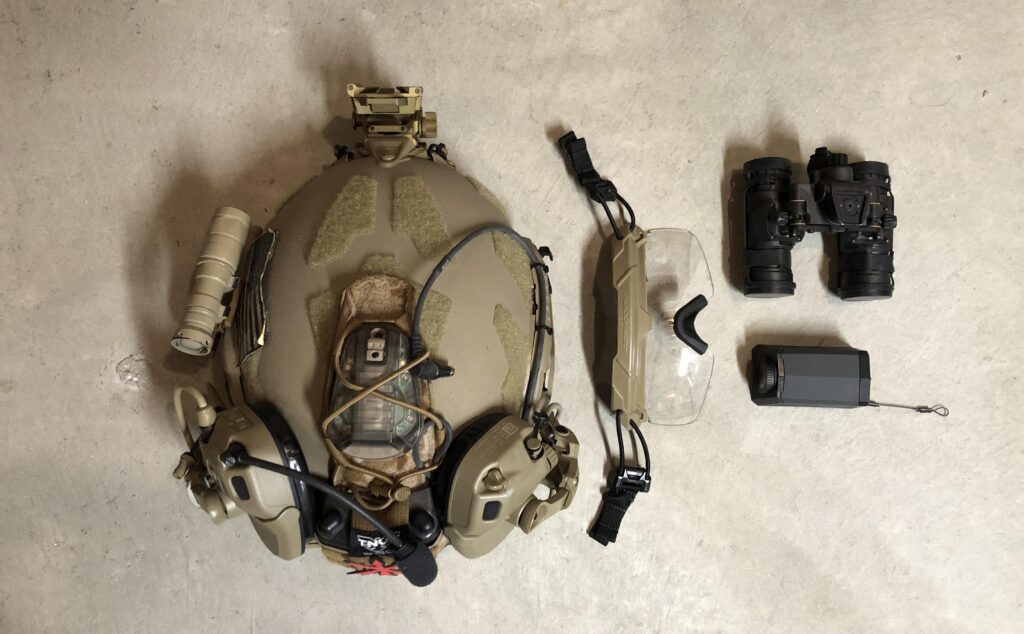
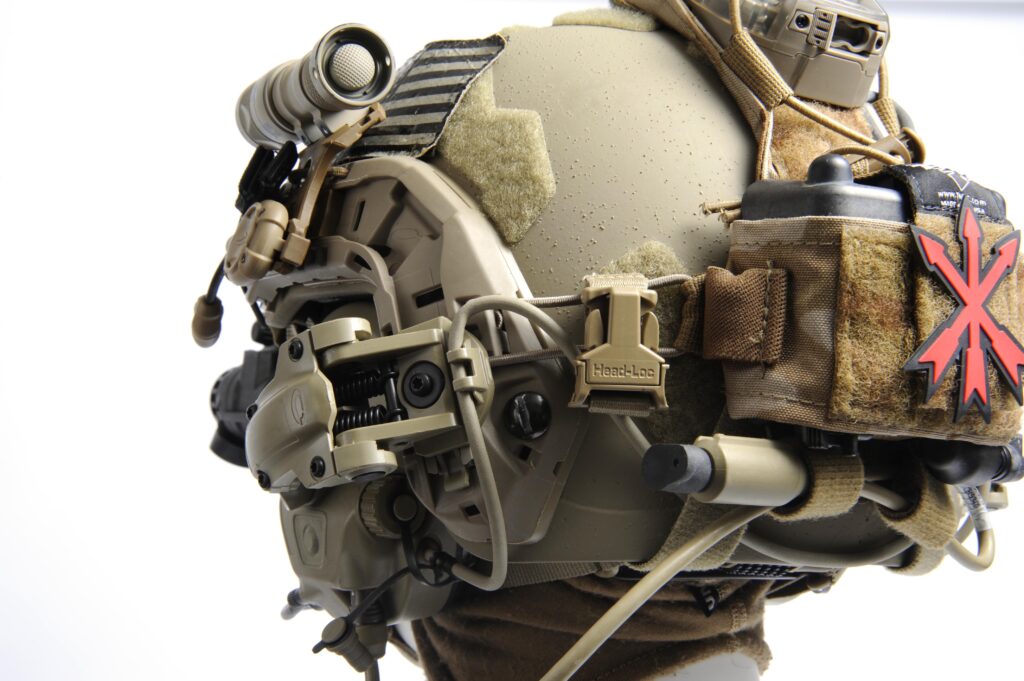
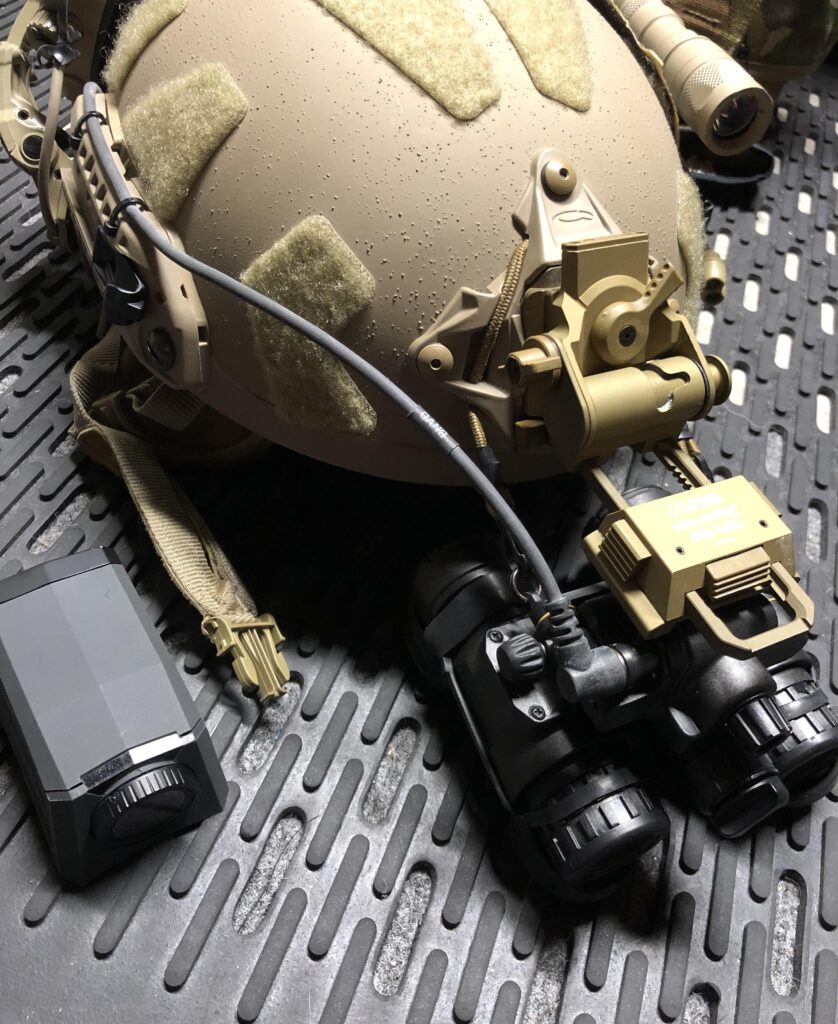
My AN/PVS-31A BNVD is connected with a Wilcox Industries L4 G22 helmet mount. I’ve used the G24 mount for years and the G22 is the latest evolution. It’s a G24 with a slightly longer fore/aft travel arm that allows for better use of NVGs with gas masks and other PPE. The L4 G22 clips into the Ops-Core Bungee Shroud. Bungees are important when using dual-tube goggles because they add tension to the mount assembly and reduce or remove any wobble from the mechanical tolerance stack.
The bungees built into this shroud serve two purposes. First, they retain the goggle in the event that it is knocked off the mount in the field (the spring-loaded clips completely secure around the rings on the goggle itself). Second, they will pull the NVG up and toward the helmet rather than down and into my nose (which has already been broken five times). The NVG is powered by the L-3/Insight Winter Battery Pack on the back of my helmet. The power cable runs over the top of the ARC rail and is secured with mini zip-ties. Exposed cord loops that may possibly snag are a no-no.
I’ve found that the factory Velcro backing on battery packs doesn’t hold up to the elements, so I keep mine in a TNVC Mohawk Mk3. The Mohawk gives me the ability to secure and organize kit on the back and top of my helmet. It attaches to the shell with Velcro and is further secured with loops going to the ARC Rails.
While some guys use 550 cord for security, I prefer shock cord for the elasticity. I run the shock cord through the holes in the ARC rail and tie the loops off with overhand knots under the rail before reinstalling them (just like the security loop on the KNUCKL). I can even use the shock cord to stow my Gas Mask Extender when not in use. The bottom One-Wrap loops hold my PTT downlead when not connected to a PTT.

I always recommend having a battery-operated active IFF device (strobe) on a helmet. IFF stands for Identification Friend/Foe and is the thing that will keep you from getting turned to pink mist by a friendly gunship at night. My strobe of choice is the Core Survival HEL-STAR 6.
Most military strobes will have visible and IR modes. And when they are activated, it is almost impossible for the wearer to see that they are functioning or ensure they are functioning in the proper spectrum. If your team is set up on a ridge marking targets for a gunship, you can blow the whole thing if you turn on visible strobes by accident.
I use and recommend the Core Survival HEL-STAR because it has positive click detents that can be felt by gloved fingers to assure me that my strobe is active or inactive, as well as firing in the correct mode and spectrum without me having to look at it.
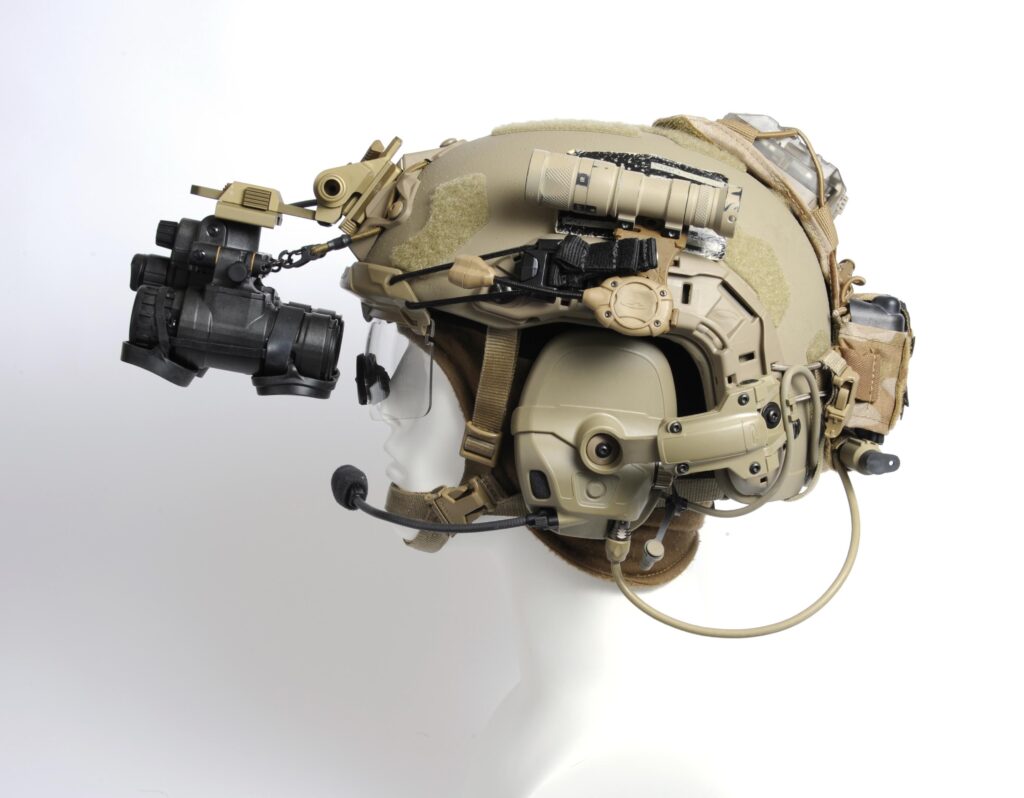
The last piece of gear I use with my helmet is a Mohoc video camera for recording POV. Most guys are familiar with this piece of kit and its durability. I have found it to be one of the least temperamental helmet cams with some of the highest quality video capture available. And it can take beating.
Like everything else, I want to make sure it is dummy-corded to my helmet. In this case, I don’t want to lose an expensive piece of kit. If I was still operating, I would not want to lose a camera containing sensitive mission data. The Mohoc comes with a lanyard string that’s long enough to wear like a necklace. Instead of using something so fragile, I built a custom-length loop of coated leader wire that attaches to a micro Nite-Ize S-Biner on the back of my helmet.
Life is dangerous, so you should wear a helmet. Your mission may differ from mine, but the basic principles of setting up a helmet should come down to supporting the three basic tenets of gunfighting—shoot/move/communicate. And you can only do that if you’re not distracted by an uncomfortable helmet.
The added weight and bulk of a helmet, NVGs, comms, and other gear will already be enough of a headache. So every opportunity to eliminate pressure points, hot spots, and unnecessary weight should be explored. Modern battlefields require modern technology.
The information age extends to the warfighter with augmented PPE, hearing, communication, vision, IFF marking, and recording devices. It may seem like a lot “stuff” to the uninitiated, but these are the tools of the modern warrior. Do not sacrifice capability in the name of minimalism, but ensure your gear has purpose and utility. Don’t just add something because you saw a picture of some special operator on Instagram with it. Focus on your mission requirements.
Text & Images by Charles “Chip” Lasky